SERVER
Cloud server setup
Refer Start an attendance management system with Cloud section for more details.
Install On-premises server on Linux
Refer this document to setup Docker for Linux. Once setup the Docker, follow the below sections to complete setup.
Prepare the program data directory
To prepare the program data directory
Create a directory “ProgramData”
Copy the following license files to “ProgramData/NCheck/License” directory.
license.lic
config.xml
Run the server
Use the following commands.
Run the server
docker run -d -p <port>:8443 -v <ProgramData>:/ProgramData –name ncheck ncheckadmin/bioattendance:<version>
Stop the server
docker stop ncheck
Start the server
docker start ncheck
Configurations
Refer Configurations section for more details.
Configurations
Additional Arguments can be passed as Environment variables.
docker run -d -p <port>:8443 -v <ProgramData>:/ProgramData -e VARIABLE1=’value1’ -e VARIABLE2=’value2’ –name ncheck ncheckadmin/bioattendance:<version>
The following configurations can be used.
Database type (Optional)
Database type can be selected to configure the database to connect to HASQL, MySQL, MSSQL, Oracle. If not, HSQL will be used. For each database type (DB_TYPE) the following configuration should be used
. SQLITE
DB_FILE
Database file name. Database will be stored in “ProgramData/NCheck/databases/server”
MYSQL, MSSQL or ORACLE
DB_URL
Database URL.
DB_USER_NAME
Database username
DB_PASSWORD
Database password
DB_MAX_CONNECTIONS
Maximum connections for the database. Default value for connection type is 30.
Keystore (Optional)
To setup SSL Certificate copy the keystore file (pfx) to “ProgramData”/NCheck/Keystore/<KeystoreFile>.
KEYSTORE
Keystore file name
KEYSTORE_ALIAS
Keystore Alias
KEYSTORE_PASSWORD
Keystore password
Restore (Optional)
Copy the Backup file to “ProgramData>/NCheck/databases/server”
DB_BACKUP_FILENAME
Backup filename
DB_BACKUP_PASSWORD
Backup file password
NMatcher configuration(optional)
NMATCHER_HOST
NMatcher name
NMACTHER_PORT
NMacther port
Install On-premises server for Windows
Refer Install for Windows section for more details.
Monitoring and Managing On-premises server
NCheck server monitoring and managing is done through the server tray.
On-premises server tray
NCheck On-premises server tray provides the following options to monitor and control NCheck On-premises server.
Icon status
NCheck On-premises server tray icon indicates the following status.
|
Server is running and ready |

|
Server has stopped |
|
Server has stopped with errors |

|
Server is running with warnings |
Notifications
NCheck On-premises server notifications are showing when the status changes. Sample notifications are as follows,
Notification |
image |
Server has started |
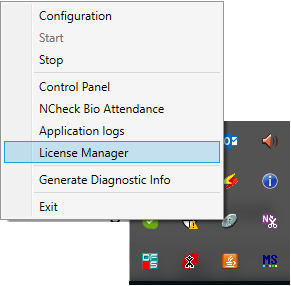
Figure 38 Notification when server is started¶ |
Server has stopped |
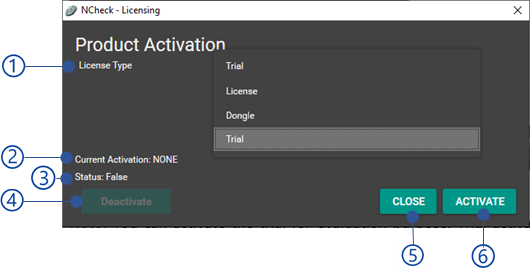
Figure 39 Notification when server is stopped¶ |
Server has ready |
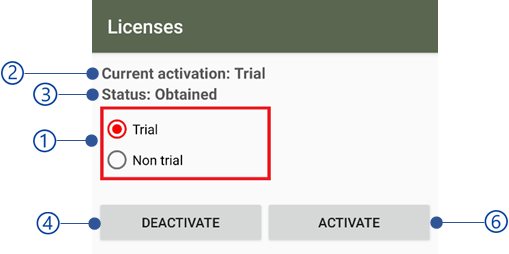
Figure 40 Notification when server is ready¶ |
Tray icon tooltip
Tray icon tooltip shows the following information.
Status of the NCheck service
Status of the NCheck On-premises server
NCheck On-premises server database path
NCheck On-premises server port

Figure 41 NCheck tray icon tool tip
Tray icon menu

Figure 42 NCheck tray icon menu
Configuration
Open NCheck On-premises server configuration as mentioned in On-premises server configuration section.
Start
Start NCheck On-premises server.
Stop
Stop NCheck On-premises server.
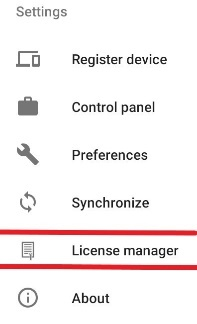
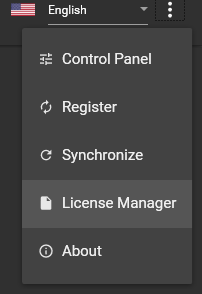
Control panel
Open the NCheck Control panel.
NCheck
Open NCheck client application for Windows.
Application logs
Open NCheck logs files folder.
License manager
Open NCheck licensing window.
Generate diagnostic info
Diagnostic info can be generated to keep track of existing problems and bugs in the NCheck On-premises server or windows client application for NCheck developers. The diagnostic file is generating in “C:/ProgramData/NCheck/Diagnostic” folder.
Exit
Exit NCheck On-premises server tray icon.
On-premises server configuration
NCheck On-premises server using the configuration can be applied using the NCheck configuration window. It has the following configuration sections

Figure 43 Windows service configuration window
Load default button
Load default values to configuration dialogue.
Save button
Save the configuration and restart the server. The error messages could appear when saving configuration has shown below.
Error code |
Description |
1001 |
Could not connect with MYSQL/MSSQL {server url}: {port} server. |
1002 |
Could not connect with the email server {host name}: {port}. |
2006 |
Invalid SSL certificate file. |
2007 |
Invalid key store password or SSL key alias. |
2008 |
Invalid port number. Please select the valid port. |
2009 |
Port is used by another application. |
2010 |
Invalid SQLite database or password. Please recheck the database file or password. |
2012 |
{database name} could not be found. |
2013 |
Invalid MYSQL/MSSQL username and password. |
1002 |
Could not connect with the email server {host name}: {port}. |
2016 |
Could not connect with the email server {host}: {port}. Invalid username or password. |
Server
The Server configuration section allows to add SSL certificate to the NCheck On-premises server. SSL certificate is significance to,
Encrypt the data sent across internet so that only the intended recipient can access it
Authentication to ensure that you communicate with the right server
Note
You are allowed to use self-signed certificate without purchasing a certificate. NCheck server uses a self-signed certificate to enable SSL features.
The SSL configuration settings are,

Figure 44 NCheck Windows SSL configuration
Key store file
SSL certificate file path
Key store password
Password of the certificate file.
SSL key alias
Port
HTTPS port for NCheck server. The default port is 8443.
Database
NCheck server can be configured with following databases
Proceed through the Setup database section to for more details.
Setup database
HSQL

Figure 45 NCheck Windows SQLIte configuration
Provide the location of the SqLite database file. If the file does not exist, a new database will be created.
Provide the password of the database.
The password should be given to use with the NCheck system. Once the password is given, it will be saved securely by the application.
If the provided HSQL database file is out of date, the database will migrate to the new version automatically when the NCheck server is starting. The status of the database migration will be shown in tray icon tooltip as shown in Tray icon tooltip section. The possible errors on database migration have been shown below.

Figure 46 Confirmation dialogue on password encryption change
Error code |
Description |
2011 |
SQLite database migration has failed with the following errors.
|
MySql
NCheck on-premises server compatible with MySql product version 5.6 onward.
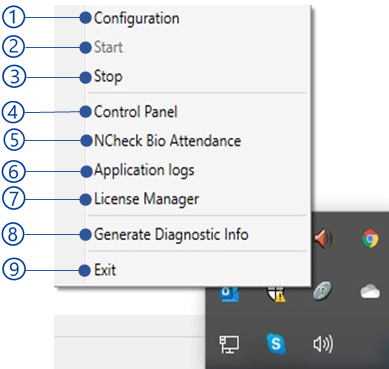
Figure 47 NCheck Windows MySql configuration
Provide MySql Server name or IP address
Provide the MySql server TCP port. This is 3306 by default
Provide existing database names in the server. Otherwise, you must create a database first
provide a username with all privileges on the database
Provide the password of the users
MSSQL
NCheck on-premises server compatible with MSSql version 2014 onward.

Figure 48 NCheck Windows MsSQL configuration
Provide MSSql Server name or IP address.
Provide the MSSql server TCP port. This is 1423 by default
Provide existing database name in the server. Otherwise, you must create a database first
provide a username with all privileges on the database
Provide the password of the users
Note
NCheck connect to MSSql server using TCP/IP protocol. TCP/IP protocol for the SQL server should have enabled in the SQL server Network configuration
Oracle
It is required to install and configure Oracle database as mentioned in here. After installing the Oracle database,
Create a full privileged user for the oracle db
Configure service and network as mentioned in this link.
To configure Oracle database with NCheck server,
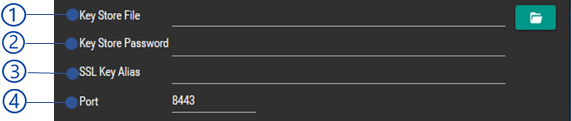
Figure 49 NCheck Windows Oracle configuration
Provide Oracle Server name or IP address.
Provide the Oracle server port. This is 1521 by default
Provide existing database name in the server. Otherwise, you must create a database first
provide a username with all privileges on the database
Provide the password of the users
Restore database
The database can be restored back to NCheck server.
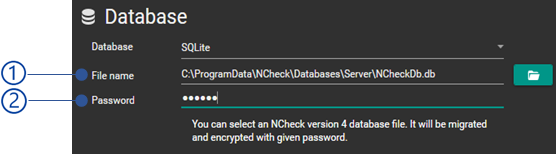
Figure 50 NCheck Windows database restore configuration
Backup file
Select the database backup (zip file format) to restore. The database backup can be created as mentioned in Backup data section.
Password
Enter the database backup password
Database restore status are shown in the trey icon tooltip as shown in Tray icon tooltip section. The possible error messages when restored database are shown below.
Error code |
Description |
2015 |
Data restore has failed. Could not decrypt the file with the given password. |
2014 |
Data restore has failed. Invalid backup file. |
4002 |
An unidentified error occurred during data restore. Please contact administrator or NCheck support for more details. |