WEB CONTROL PANEL
NCheck Bio Attendance administration and configuration application is NCheck Bio Attendance control panel application. This is a web-based application can be accessed using popular web browsers using following URL.
Start web Control panel
URL |
Remarks |
|
Cloud |
||
On Premises |
|
|
Standalone |
Simple administration functions are provided in build with NCheck Bio Attendance Standard client application. |
NCheck Bio Attendance control panel launcher application with extended data capture capabilities are available with the NCheck Bio Attendance Server and NCheck Bio Attendance Standard client installations. This application can be launched from
Server |
|
Windows Standard client |
|
Android Standard Client |
|
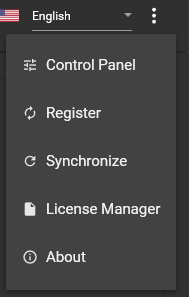
Figure 55 NCheck Bio Attendance Windows Standard client main menu
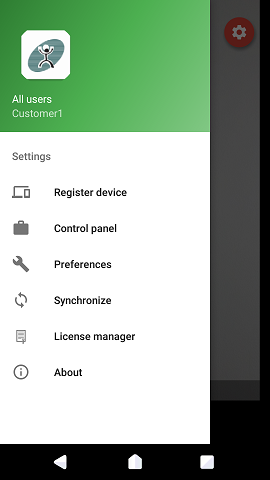
Figure 56 NCheck Bio Attendance Android Standard client main menu
Note
NCheck Bio Attendance server interface will work with recent versions of Mozilla Firefox, Google Chrome, Microsoft Edge, Opera and most common web browsers. It does not work with Internet Explorer browser.
Sign in to web Control Panel
Once the NCheck Bio Attendance control panel sign in is triggered in on-premises mode, you may see browser warning as shown in Figure 57 because it fails to validate the SSL certificate with trusted certificate authority. To prevent this warning
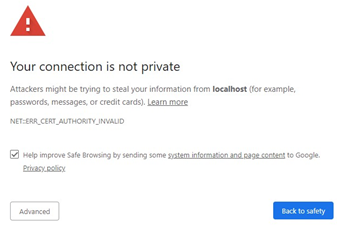
Figure 57 Browser warning without SSL certificate
You may use browser option to skip and proceed to the site.
You may use valid SSL certificate as mentioned in the On-premises server configuration section.
You may add your server to trusted server list.
Once the warning has resolved as mentioned above, user will be asked to login to NCheck Bio Attendance control panel as shown in Figure 58 .
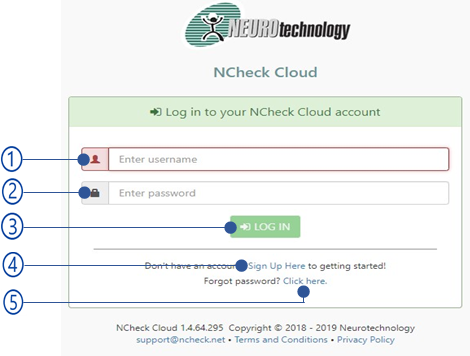
Figure 58 NCheck Bio Attendance control panel sign in
Username
Password.
Login button
After successful login in, you will be landed in the NCheck Bio Attendance Control Panel Dashboard. The possible error messages after select login button are shown in Table 17
Sign up link
This is available only on NCheck Bio Attendance Cloud. It loads the signup page for subscribing to NCheck Bio Attendance Cloud.
Forget password link
The forgot password view appears as shown in Figure 59 .
Email address
Security check for human
Continuer button
Password reset email will be sent to the email address if that is specified to a user in NCheck Bio Attendance. In on-premises mode Administrator allows to reset user password as mentioned in Change password section. The error message could be appeared as shown in Table 18
Note
For NCheck Bio Attendance on-premises server, the default admin username and password are “admin”.
Error code |
Error message |
2018 |
Invalid username or password. |
Error code |
Error message |
2019 |
Could not find the user associated with {email address} email address. |
After signing in, those who have administrator privileges will be landed in the NCheck Bio Attendance Control Panel Dashboard. If the initial required data is not set up, it will be notified to perform the initial setting up. Once the initial setting up has done, users will be able to access the NCheck Bio Attendance control panel as assigned roles mentioned in Web Control Panel Roles section.
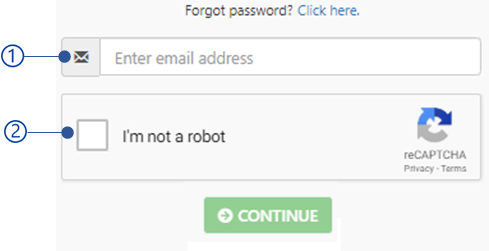
Figure 59 Request password reset
WebControl Panel Roles
Current role of the control panel logged in user is shown in the login options. It can be
Account administrator
Account administrator is the owner of the account. He has full authority and can perform all administrative operations.
Administrator
System users can also be assigned administrative privileges. These administrators can do all the admin operations except subscription management and account detail editing.
Admin Auditor
Admin auditor can access all control panel data like administrator. But cannot change and save them.
Group Administrator
Group administrator is an Administrator who can manage an assigned group of users.
Group admin auditor
Group admin is also can access all the data which can accessed by a group administrator. But cannot change and save
Standard user
NCheck Bio Attendance Control Panel provides self service functions for standard users.
Web Control Panel View
NCheck Bio Attendance Control Panel has following components
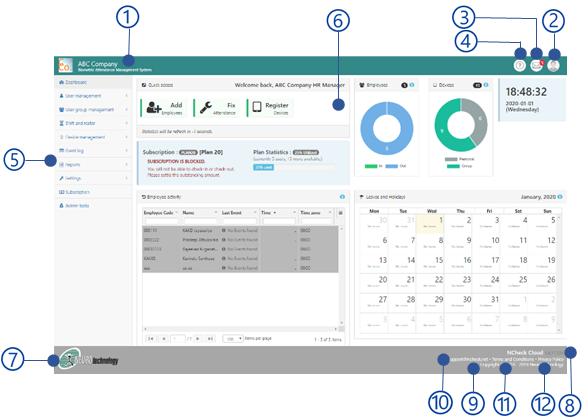
Figure 60 NCheck Bio Attendance control panel
Attendance system name and logo
Sign in user account options control
Notifications Launcher control
NCheck Bio Attendance Help launcher control
Menu
Content area
Neurotechnology company logo
Product name and version
Product copyright
Support email
Product Terms and conditions
Product privacy policy
Attendance system name and logo

Figure 61 NCheck Bio Attendance control panel name and logo
Company Logo
Administrator can change this by changing account settings.
Company name
Sign in user account options
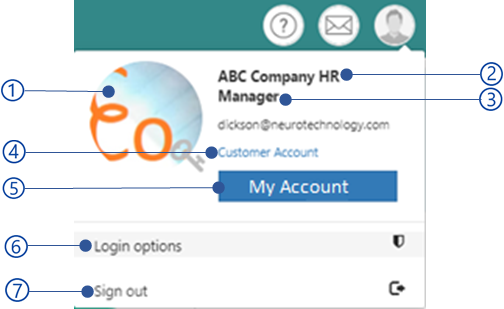
Figure 62 NCheck Bio Attendance sign in user account view
Profile picture of the account
Sign in username
Current role
One user can have different roles. Roles can be changed from the Login options . Depend on the current role, NCheck Bio Attendance Control panel operations can be changed.
Signed in email
My Account
Button to view/edit your company details
Sign out
My Account
My Account button in sign in user account options can be used to edit your account details. Depend on the current role, this view is different.
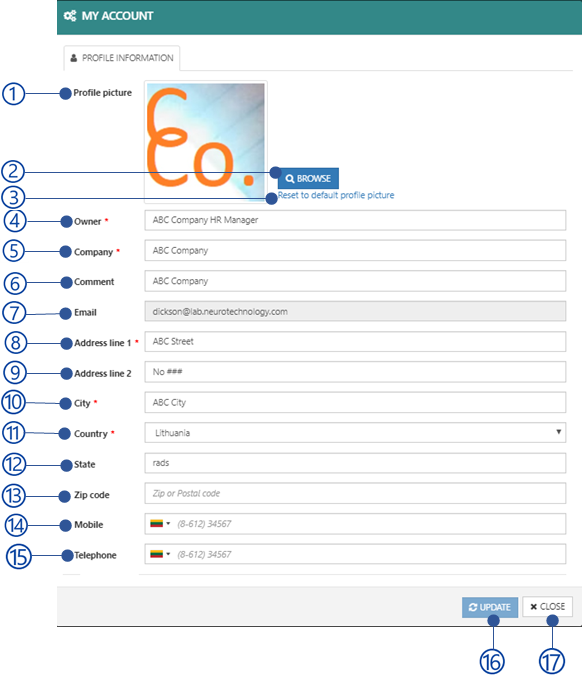
Figure 63 Edit account details
For normal users, it will show his/her details. If you are an account administrator, you will get the account details. For other administrators cannot access account details.
Profile picture
Browse button
Select the profile picture from the local file system.
Reset to default profile picture
Rest the profile picture to the NCheck Bio Attendance default profile picture as shown in Figure 510
Owner
Owner of the attendance system account
Company name
Comment
If any
Email
The email address of the owner
Address line 1
Address line 2

Figure 64 Default profile picture
City
Country
State
Zip code
Mobile
Telephone
Update button
The update button will be disabled if the Validation errors exists. All error messages could be appeared are sown in Table 19
Close button
Error code |
Error message |
3001 |
Mobile/telephone number is not valid for the selected country/region. |
3002 |
Invalid email address. |
Login options
Login options window allows doing the following operations.
Figure 65 Login options
Role management
Figure 66 Role management view
Available roles for the user
Selected role
Hint for switch account
Switch button
Select the role and select switch button. The following error messages could be appeared when switch role.

Change customer password
Figure 68 Change customer password view
Customer account details
Hint to change password
Password
The password must have at least 6 characters with one digit
Confirm password
Update button
The update button will be disabled if data Validation errors exists. All error messages are shown in below table.
Error code |
Description |
3003 |
Password does not match. |
3004 |
Password must contain at least 6 characters with one number. |
Change customer profile picture
Figure 69 Change customer profile picture view
Selected profile picture
Browse button
Brose the picture from the file system
Update button
The error messages could be shown when updating profile picture are shown in below.
Table 21 Error messages of updating customer profile picture in login options view¶ Error code
Description
2020
Selected file is not a valid image file.
Control panel notifications
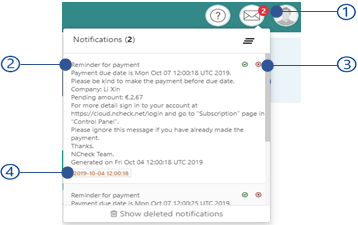
Figure 70 Notifications view
New notifications
Old Notification messages
Delete notification
Date and time of notification
Web Control Panel Menu
NCheck Bio Attendance web Control Panel Menu is used to access main functions of control panel. Control panel provides following functions through the menu.
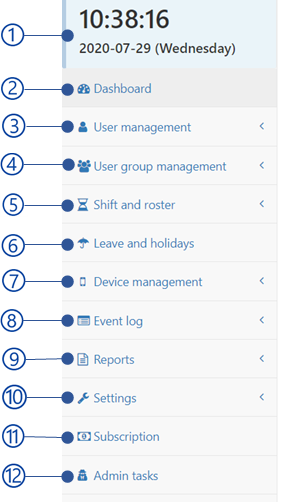
Figure 71 Web control panel menu
Date and time
Dashboard
User Management
User Group management
Shift and Rosters
Leaves and holidays
Device Management
Event log
Reports
Settings
Subscription
Admin tasks
Based on the current role, available menu items may be different. Also, the functionality inside the menu item are also different.
Menu Item |
Role |
|||||
Account Admin |
Admin |
Admin Auditor |
Group Admin |
Group Admin Auditor |
Standard User |
|

|
|
|
|
|
|
|
|
|
|
|
|
|
|
|
|
|
|
|
|
|
|
|
|
|
|
|
|
|
|
|
Manage leaves and holidays |
|
|
|
|
|
|
|
|
|
|
|
|
|
|
|
|
|
|
|
|
|
|
|
|
|
|
|
|
|
|
|
|
|
|
|
|
|
|
|
|
|
|
|
|
|
|
|
|

|
|
|
|
|
Dashboard
The dashboard provides a graphical summary of the customer account activities of the NCheck Bio Attendance account. Customer account administrator and users marked as administrators can access the Dashboard. Summary includes
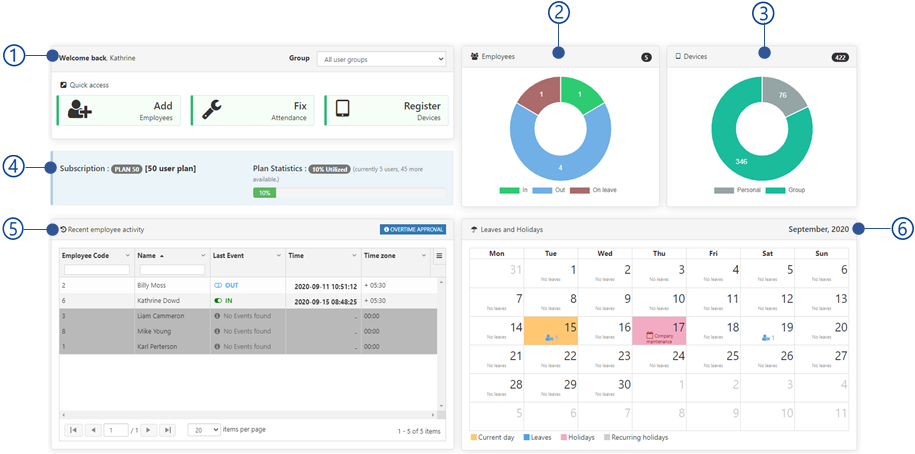
Figure 72 Web control panel dashboard
Subscription summery (NCheck Bio Attendance cloud only)
Quick access
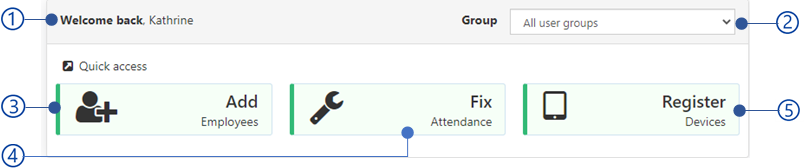
Figure 73 Quick access view of the Dashboard
Welcome note for the logged in user
Selected user group for the dashboard statics
Add user
Invoke Add new user function and open Add/Edit users user form
Fix attendance
Invoke event log function and apply error event filter to fix errors in attendance events.
Register device
Invoke user group function and open register device form to register a NCheck Bio Attendance client application for a user group.
Employees Summary
This is a real time graph present number of checked-in and checked-out employees
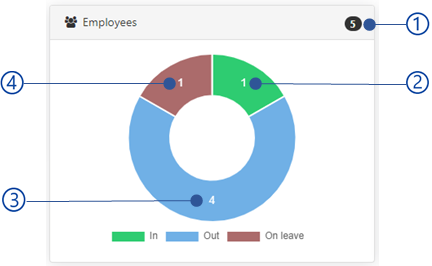
Figure 74 Employee summery view of the Dashboard
Total number of users
No. of users Checked-in
No. of users Checked-out
No. of users on leave
Check-in, check-out and on leave) users will be shown in a dialogue when clicking on each region.
Devices summary
This graph presents number of devices registered with users and user group
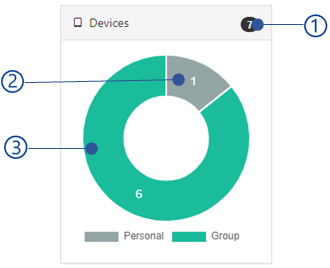
Figure 75 Device summery view of the Dashboard
No of connected client devices
No of devices registered to users
No of devices registered to user groups
User will be redirected to the Manage devices when click on a devices chart.
Recent Employee activity
Recent user event list is shown ordered with latest event first. This is limited to 20 users maximum and 24 hours.
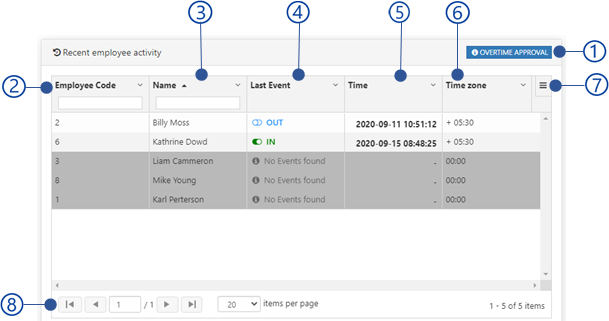
Figure 76 Employee activity view of the Dashboard
Overtime approval button
The user will be redirect to the Overtime view
Employee code
Name
Last event type
Data and time
Time zone
Leaves and holidays summary
All employee leaves and holidays for the current month are shown.
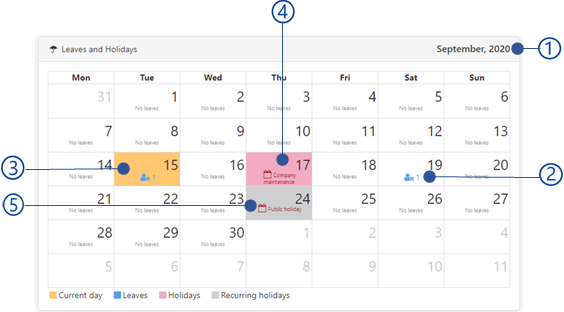
Figure 77 Laves and holidays summary view of the Dashboard
Current month
Number of leaves for the day
Current date
Holiday
Recurring holiday
The holidays appears in recurring (weekly, monthly or annually) identified as recurring holiday
Mouse hover on each date in the calendar will show a summary of available holidays and leaves as mentioned in Leaves and holidays summery view section.
Leaves and holidays summery view
Leaves and holiday summery view is showing the available holidays and leaves for the day as follows.
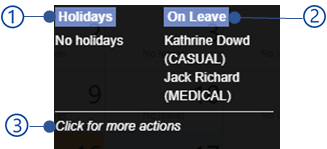
Figure 78 Leaves and holidays summery view
Holidays
Name of all available holiday(s)
No leaves
User names and leave types
Click for more actions
Click on each date to more details about the events, leaves and holidays as mentioned in Daily statistics view section.
Daily statistics view
User will be shown a view to see events, leaves and holidays as follows when click on each day in th3e calendar view.
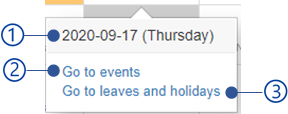
Figure 79 Daily statistics view
Selected date
Go to events
User will be redirected the Event logs management section to monitor all the events in the selected date.
Go to leaves and holidays
User will be redirected to the leaves and holidays management section to monitor all leaves and holidays in the selected date.
Subscription summery
Note
This view is not available for NCheck Bio Attendance cloud control panel

Figure 80 Subscription summery view of the Dashboard
Subscription details
Plan code
Plan name
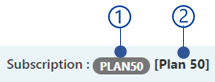
Figure 81 Subscription details view of the subscription summery view
Plan statistics
Percentage of the added users with respect to number of all users available for the plan
Number of current users
Number of users available to add
Progress bar showing the utilized users
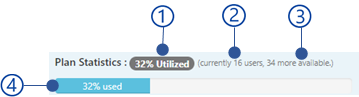
Figure 82 Plan statistics view of the subscription summery view
Manage Users
The following options are available in this view.
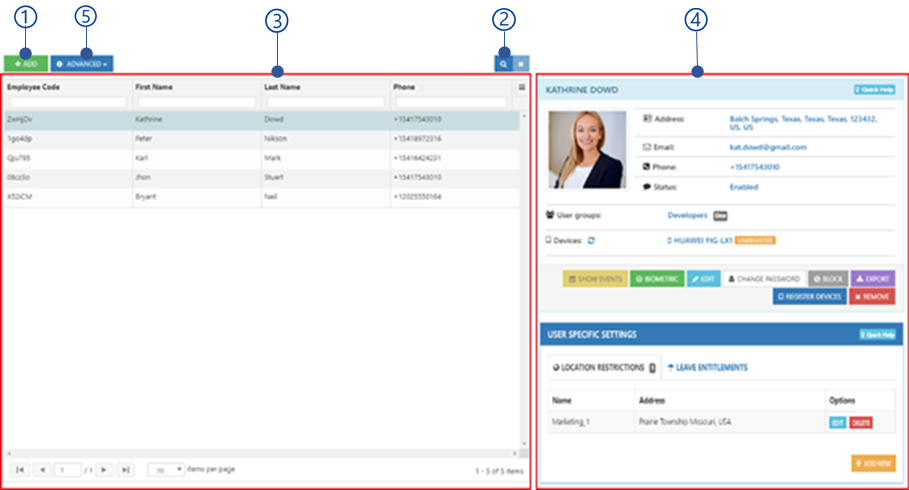
Figure 83 User management view of the web control panel
Add button
Refer Add/Edit users section for more details.
Search users
Filter user from the user table
Advanced button
Refer Advanced options section for more details.
Add/Edit users
This view allows to add a new user to the NCheck Bio Attendance system or edit existing user
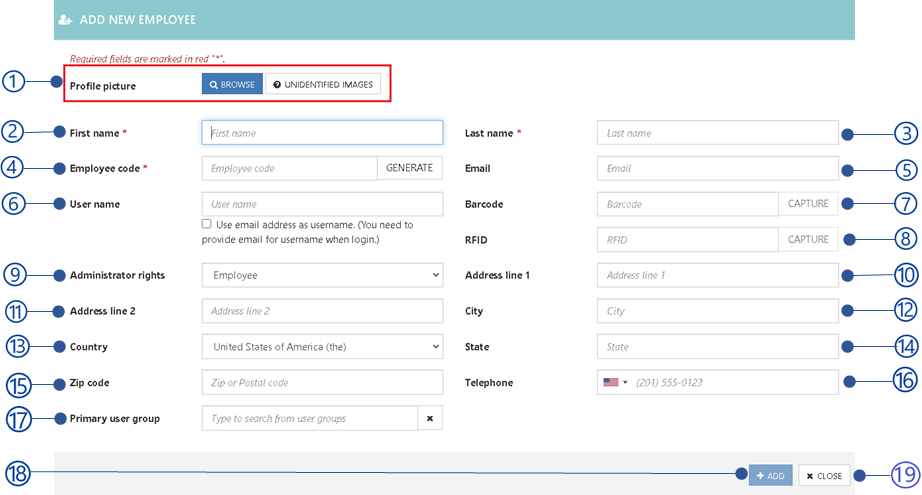
Figure 84 Add user view
.
First name
Last name
Email
Username
The username to allow to login users to the NCheck Bio Attendance control panel. Select User email address as username option to use the email address as the username.
Administrator right
Admin right as Employee (Standard user), Admin or Admin auditor as mentioned in Web Control Panel Roles section.
Address line 1
Address line 2
City
Country
State
Zip code
Telephone
Primary user group
Select the primary user group user belongs if the user is available in several user groups. Refer Manage user Groups section for more details.
Add button
The add button will be disabled if the mandatory data fields are empty or Validation errors exits. Refer Table 23 for all error messages could be appeared.
Close button
Error code |
Description |
3001 |
Mobile/telephone number is not valid for the selected country/region. |
3002 |
Invalid email address. |
2020 |
Selected file is not a valid image file. |
2021 |
Employee code already exists. |
2022 |
Barcode ID is already available for different user |
2023 |
RFID is already available for different user |
Employee code
Unique ID to identify employees. Administrator allows to specify an employee code or generate code as shown in below.
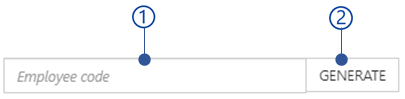
Figure 85 Employee code view
Employee code field
Generate button
Select Generate button to generate code with 6 characters
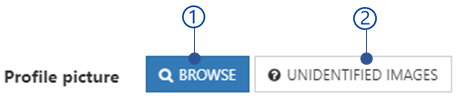
Profile picture from the local file system
Select the profile picture from the local file system. After select the image, crop view allows to crop the user image as shown in figure
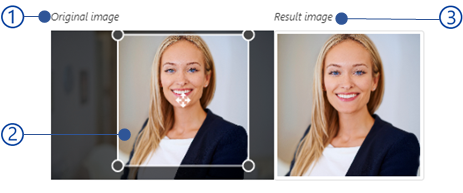
Figure 87 Profile picture crop view
Original image view
Cropping rectangle
User can change the margin of the rectangle to crop the image
Result image view after cropping
Profile image from unidentified image
Face images failed to identify user when recording the attendances are known as unidentified images. User can select the user profile image from these unidentified images.
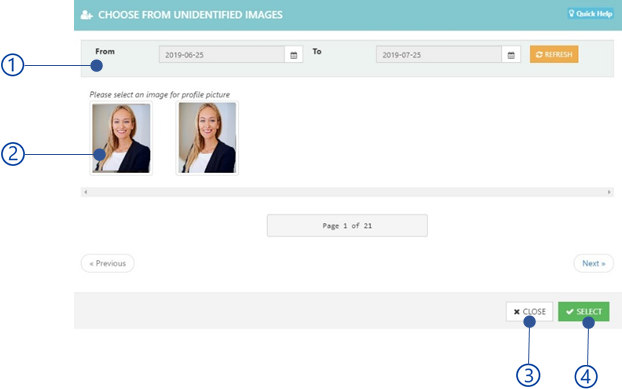
Figure 88 Select profile picture form unidentified image view
Date filter
Retrieve unidentified images between selected date range
Unidentified images list
Close button
Select button
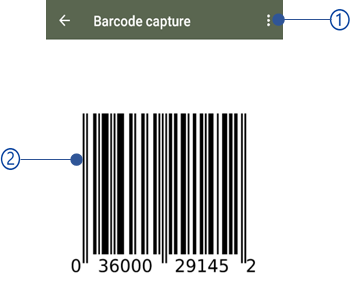
Capture barcode
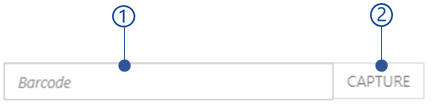
Figure 89 User barcode ID view
Barcode text field
Capture button
Select Capture button to scan the barcode from the client application as mentioned in Table 24
Android client |
The Table 25 is showing the error message could be appeared. |
Windows client |
The Table 25 is showing the error message could be appeared. |
|
Description |
3005 |
Barcode scanner could not be found. |
2039 |
Could not capture barcode. The device has been blocked |
Capture RFID
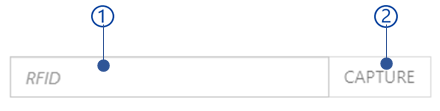
Figure 91 User RFID capture view
RFID text field
Capture button
Select Capture button to scan the RFID from the client application as mentioned in Table 26 .
Android client |
The Table 26 is showing the error message could be appeared. |
Windows client |
The Table 26 is showing the error message could be appeared. |

Error code |
Description |
3006 |
RFID scanner could not be found |
2040 |
Could not capture RFID. The device has been blocked |
Users list view
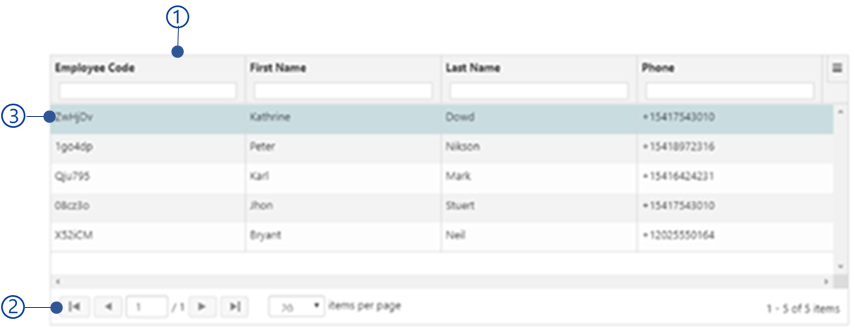
Figure 93 User table view of the user management
Selected user
The selected user details are shown in User details view
User quick view
This section allows to control all user specific functions when recording attend
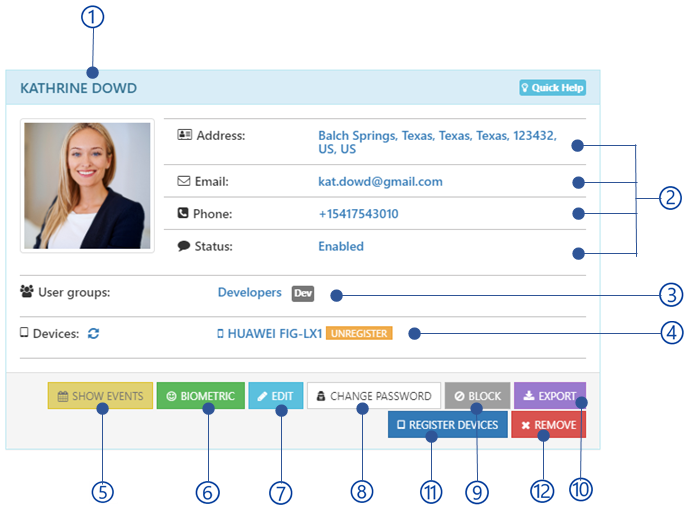
Figure 95 User management quick view
Username
User details
Address
Email
Phone
User status
User
Added user groups.
Devices
Registered devices. Select Unregister button to unregister each device.
Show events button
Show all events of the user.
Biometrics button
Refer Change biometrics section for more details.
Edit button
Refer Add/Edit users section for more details.
Change password button
Refer Change password section for more details.
Block/Unblock button
Refer section Block/unblock users for more details.
Export button
Export following details for selected user.
Register button
This option allows to generate registration token to register the device for the selected person. Once select the button, the Client registering view will be appeared.
Remove button
Refer Remove users section for more details.
Change password
After assigning a username as mentioned in Add/Edit users section, the password can be changed. Password must be consisted with one digit and 6 characters.
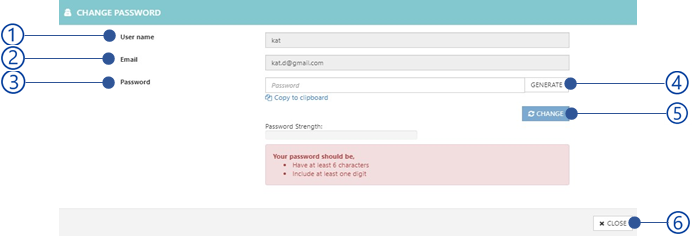
Figure 96 Change user password view
User name
Email
Password
Password must have atleast 6 characters and one digit.
Generate button
Generate a password.
Change button
Change button will be disabled if the Validation errors exits. Table 28 is showing the error messages could be appeared.
Close button
Error code |
Description |
3003 |
Password does not match. |
3004 |
Password must contain at least 6 characters with one number. |
Change biometrics
In the Biometric data dialogue, new biometrics can be enrolled using the below options.
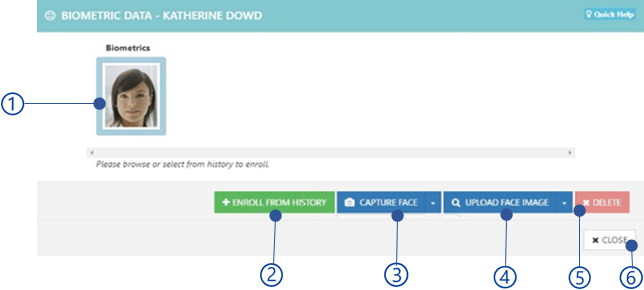
Figure 97 Add biometrics view
Enrolled biometrics
Menu for capture from client applications
Menu for Upload biometric image
Delete button
Close button
Enroll from history
The face, fingerprint, and iris images, unable to identify the user while recording attendances, are kept in NCheck Bio Attendance server. These biometric images can be used to enroll users. In the Select from history window,
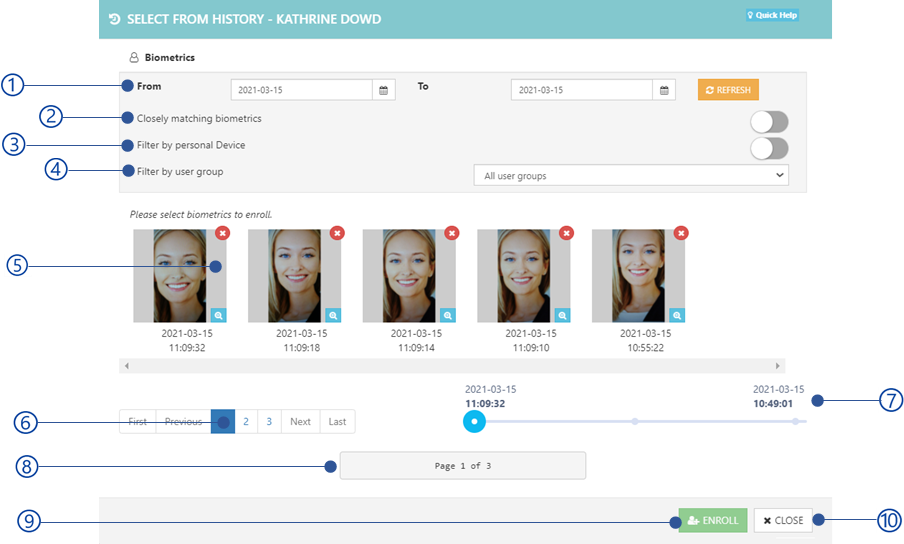
Figure 98 Select biometrics from history view
Date range
Biometrics will be retrieved within the selected date range.
Closely matching biometrics
NCheck Bio Attendance server will filter out the closely matching biometrics for the user from history.
Filter by device
Filter out the biometrics matching for the device.
Filter by user group
Biometrics used to enroll for the selected user group.
Biometric quick view as shown in Figure 99
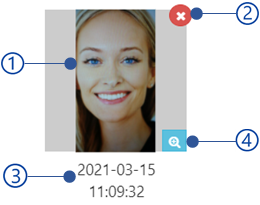
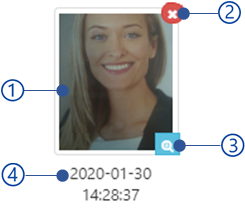
Figure 99 Biometric image view of select biometric from history view
Biometric thumbnail
Delete button
Date and time biometric captured
View button
To show the Biometric detail view.
Paging details
Functionalities to navigate through all face images in ach page.
Time line
show the latest updated image date and time of each page between date time of recently updated image and first updated image.
Next button
Current page number of available pages.
Enroll button
Enroll button will be disabled if no biometric image has selected. The table is showing all error message could be appeared.
Close button
Error code |
Description |
2024 |
Could not enroll selected face/finger/iris image. |
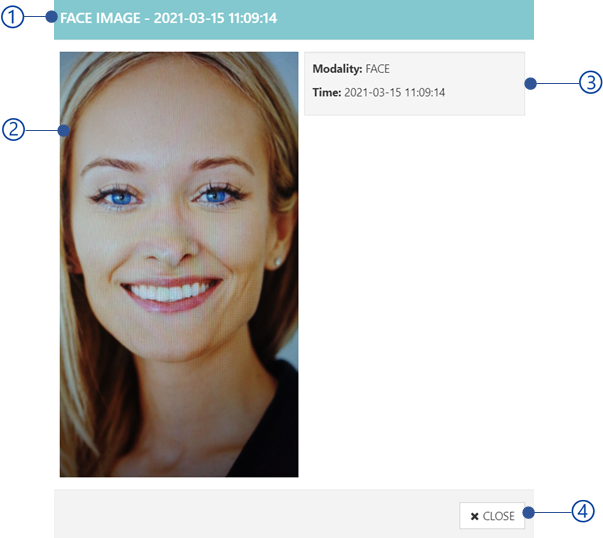
Biometric detail view
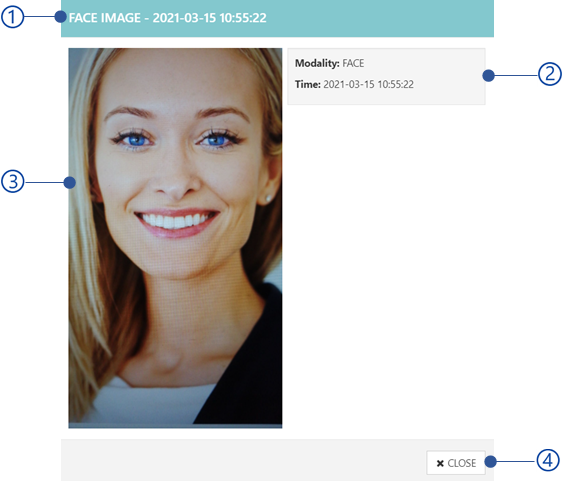
Figure 100 Biometric detail view
Biometric event date and time
Biometric details
Modality
Face, Fingerprint, or Iris
Time
The date and time of the event the biometric image had uploaded.
Close button
Capture from client applications
Biometrics can be enrolled through the NCheck Bio Attendance client applications such as NCheck Bio Attendance Lite for Windows and Android and NCheck Bio Attendance Standard for Windows and Android. To capture
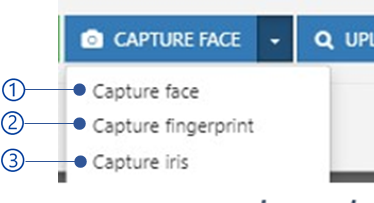
Figure 101 Menu for capture biometrics from client applications
Select biometric capture type form the list
Capture face
Capture fingerprint
Capture iris
Capture the selected biometric when the capture view is appeared as mentioned in
The error messages could be appeared when capture biometric from clients are showing below.
Error code |
Description |
3007 |
Camera could not be found. |
3008 |
Fingerprint scanner could not be found |
3009 |
Iris scanner could not be found |
2025 |
Capture face with enough lighting |
2026 |
The biometric image has already enrolled for another user |
2038 |
Could not enroll biometrics. The device has been blocked |
Capture face from lite clients
Windows lite client |

Figure 102 Windows lite client face capture view¶ |
Android lite client |
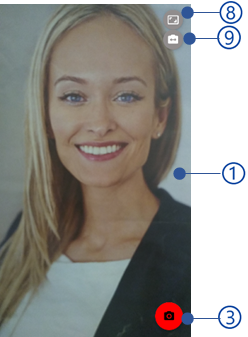
Figure 103 Android lite client face capture view¶ |
Camera preview
Face rectangle (Standard client only)
Capture button
Select capture button to capture face image in lite client. In Windows Standard, select capture button when the user has prepared to capture the face.
Camera name
Captured face list
Windows clients allows to capture multiple face images before upload. Android clients allows to capture a single image before upload.
Cancel button (Windows clients only)
Continue button
In windows clients, select continue button to upload captured face list to the server. In Android client captured image will automatically uploading to the server.
Android lite client resolution menu
Change front/back camera button
Capture face from standard clients
Windows Standard client |
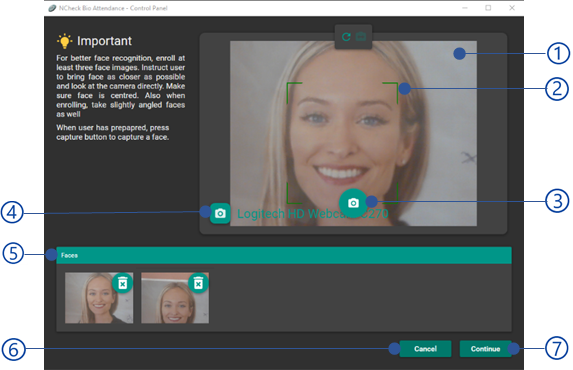
Figure 104 Windows standard client face capture view¶ |
Android Standard client |
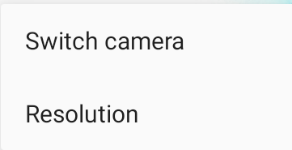
Figure 105 Menu of Android standard client face capture view¶ 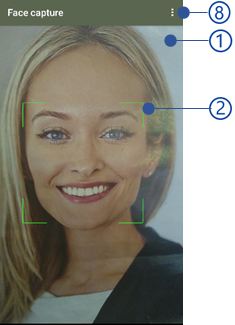
Figure 106 Android standard client face capture view¶ |
Camera preview
Face rectangle (Standard client only)
Capture button
Select capture button to capture face image in lite client. In Windows Standard, select capture button when the user has prepared to capture the face.
Camera name
Captured face list
Windows clients allows to capture multiple face images before upload. Android clients allows to capture a single image before upload.
Cancel button (Windows clients only)
Continue button
In windows clients, select continue button to upload captured face list to the server. In Android client captured image will automatically uploading to the server.
Menu of Android standard client face capture view as shown in Figure 105
Switch camera
Change front/back camera
Resolution
Camera resolutions dialogue
Capture fingerprint from Standard clients
Standard client |
|
Windows |
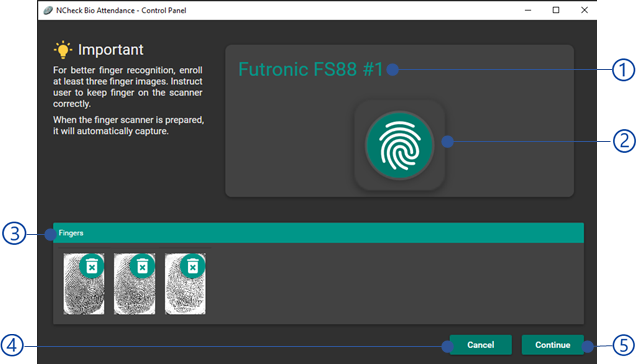
Figure 107 Windows standard client fingerprint capture view¶ |
Android |
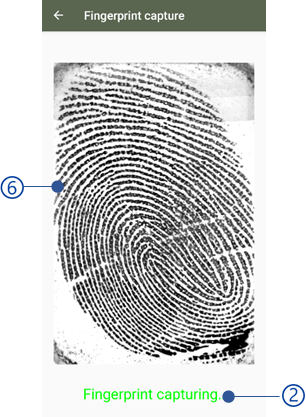
Figure 108 Android standard client fingerprint capture view¶ |
Fingerprint scanner name (Windows standard client only)
Fingerprint scanner status
Android Standard client is Showing “Fingerprint capturing” message if the scanner is available. Otherwise “Fingerprint reader not available”
Windows standard client is showing finger print icon as shown in Figure 107 if the fingerprint scanner is available. Otherwise “Unable to detect the fingerprint scanner. Please verify the finger scanner is connected and functioning correctly.”.
Captured fingerprint images list
Windows standard client allows to capture multiple fingerprint images. Android standard client allows to capture only single fingerprint image before upload.
Cancel button (Windows client only)
Continue button
In Windows standard client, select continue button to upload captured fingerprint images. Android standard client will upload the fingerprint image automatically once it captured successfully.
Capture iris from Windows standard client
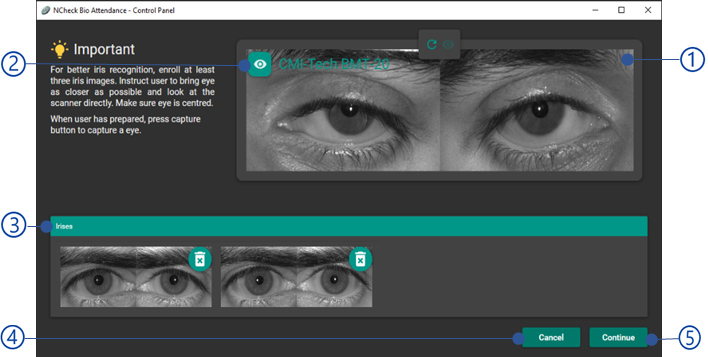
Figure 109 Windows standard client iris capture view
Iris preview
Iris scanner name
Captured iris image list
Cancel button
Continue button
Upload captured iris images to the server.
Upload biometric image
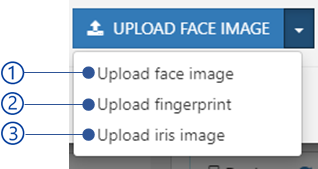
Figure 110 Menu for upload biometric images for user
Select biometric upload type from
Upload face image
Upload fingerprint
Upload iris image
Select selection to upload the biometric image from your file system. The following errors could be occurred uploading selected biometrics
Error code |
Description |
2020 |
Selected file is not a valid image file. |
Block/unblock users
The selected user can be block/unblock using this option. Blocked users are not allowed to enroll biometrics or record attendances.
Remove users
Remove selected user from the users list.
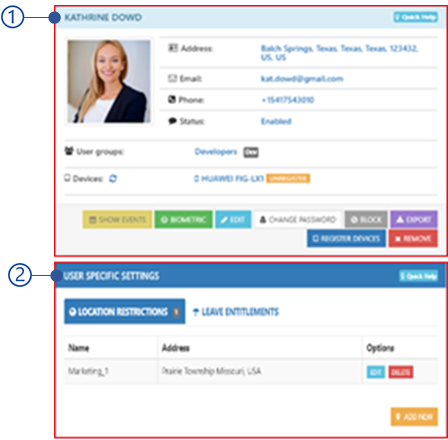
User specific settings
User specific settings allows to
Manage location restrictions for user
Refer Location restrictions section for more details.
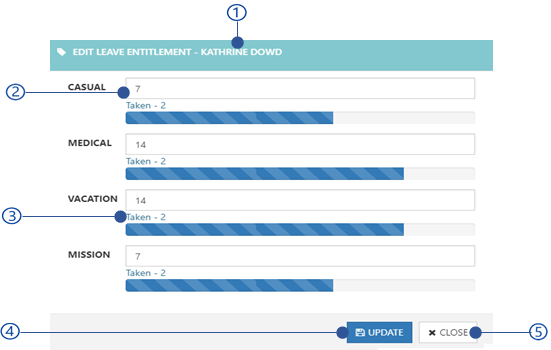
Leave entitlement
This view is showing the number of leaves user has taken and number of remaining leaves from each Leave type. Also, user leaved entitlement can be updated.
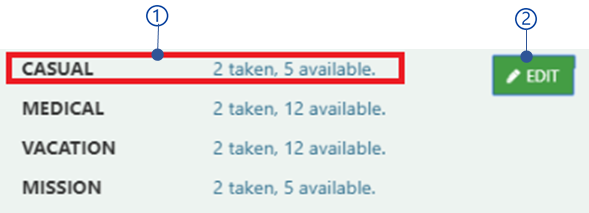
Figure 111 Leave entitlement view
Edit button
Refer Edit leave entitlement section for more details
Leave type summery
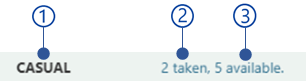
Figure 112 Leave type summery view
Leave type
Refer Configure leave type section for more details.
Number of leaves taken by the user
Number of available leaves
Advanced options
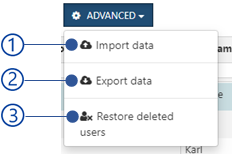
Figure 114 Advanced options of User management
Import data
This option allows to import all user data as mentioned in Import and Export information section. Tio import data,
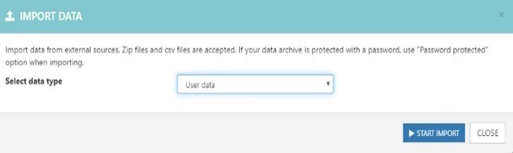
Figure 115 Import users data view
Select information to be imported from the list
Select Import button to select the import location.
Refer Select import location section for more details.
Export data
This option allows export all user data as password protected zip file as follows
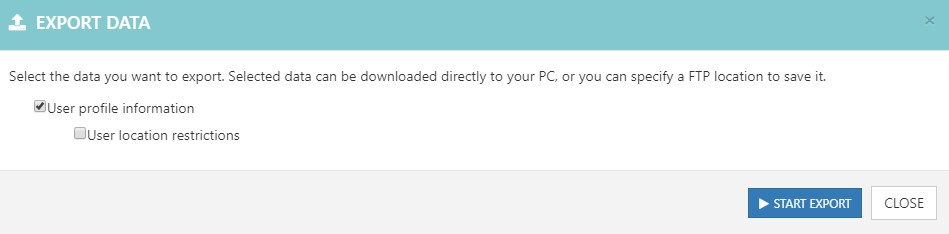
Figure 116 Export users data view
Select information to be imported from the list
Select Export button to select the export location.
Refer Select export location for more details
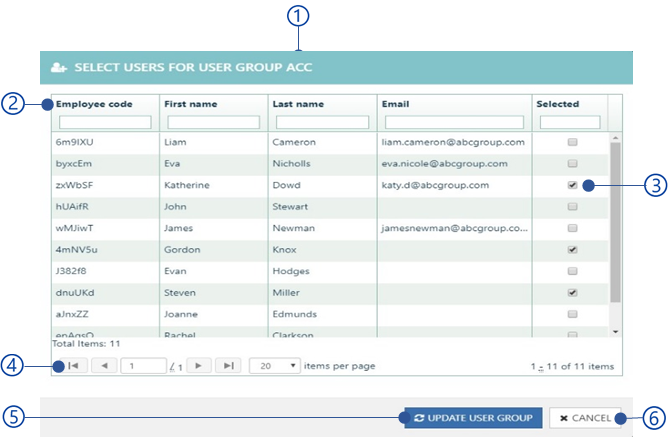
Manage user Groups
Administrator and user group administrators allow managing users as user groups. All user group is the default user group including all users and it is accessible for administrator only. In the user group management dialogue.
Figure 118 User group management view of web control panel
Add button
Refer Add/Edit user group section for more details.
Search
Search user group by group name
Advanced button
Refer Advanced options section for more details.
Add/Edit user group
This view allows to add a new user group or edit existing user group.
Figure 119 Add/edit user group view
Profile picture
User group code
Unique code to identify user group
Description
Add button
Add button will be disabled If the mandatory fields are empty or Validation errors exists. Refer Table 35 for more details of error massagers could be occurred.
Cancel button
Note
All user group could not be edited.
|
Description |
2020 |
Selected file is not a valid image file. |
2027 |
User group code has already existed. |
User groups list view
Figure 120 User groups list view
All user group
All user group is the default user group including all the users.
Selected user group
Selected user group details are shown in User group details view .
User group quick view
This view is showing user group details and allow user to perform user group specific functions
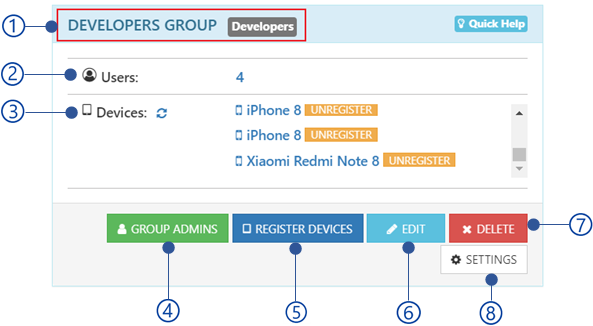
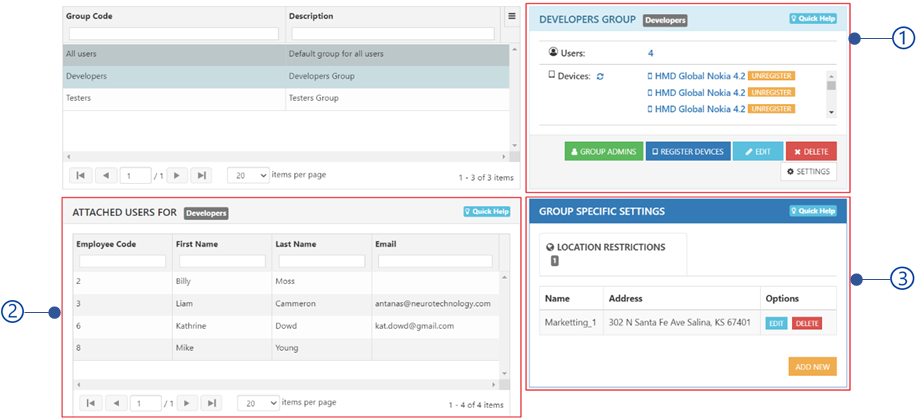
Figure 122 User group quick view
Group name and code
Number of users
Devices registered to the group
Select Unregister button to un-register the device
Group admins button
Edit group admins of the user group. Refer Group admins section for more details
Register device button
Generate registration token to register a device for selected user group. Once select the button, the Client registering view will be appeared.
Edit button
Edit the user group. Refer Add/Edit user group section for more details.
Delete button
Delete the selected user group. All user group could not be deleted.
Settings button
User group specific settings. Refer General settings section for more details.
Delete user group
Delete selected user group from the user group list.
Group admins
User group admin allows to manage users in the user group according to the assign permission level.
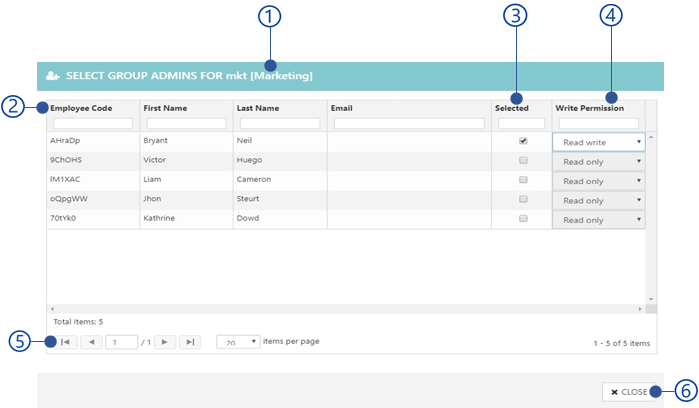
Figure 123 User group admins view
User group name and code
Check box to add/remove group admin
Write permission
Refer Group admin permission section for more details.
Close button
Note
Group admins are not available for the All users group.
Group admin permission
Group admins can be created with following permissions.
Read Write
Group admins can manage users assigned to group.
Read only
Group admins can review users assigned to particular group.
Attached users
All users attached to the selected user group are showing in this view as follows.
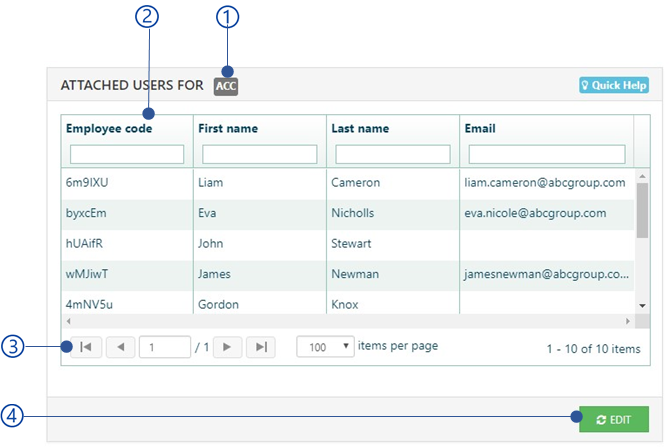
Figure 124 Attached users view
Selected user group code
Edit button
Select edit button Refer Edit attached users section for more details.
User group specific settings
General settings
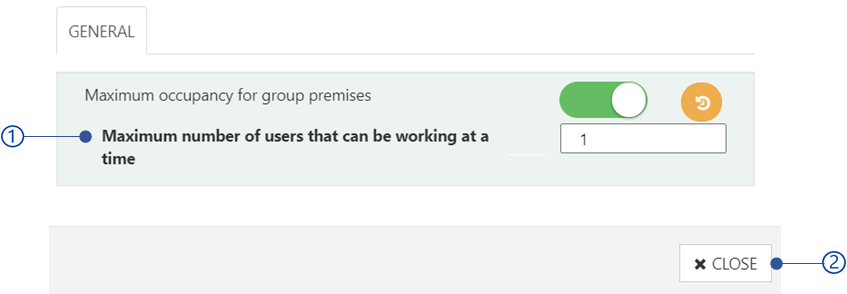
Figure 126 General settings of the user group
Maximum occupancy for group premises
Administrator/user group administrator allows to limit the number of employees/users of the user group in the premises. To limit users, enable this setting and add the number of allowed users. The users who are entitle to the user group as the primary user group will be count when check-in to the premises. If the check-in count is greater than the maximum occupancy for group premises, the check-ins will be restricted. Refer Add/Edit users section to change the primary user group of the users.
Manage location restrictions for user group
Refer Location restrictions section for more details.
Advanced options of user group view
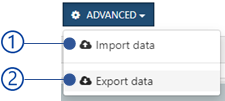
Figure 127 User group management advanced options
Import user group data
Import all user group data as mentioned in Import and Export information section, To import,
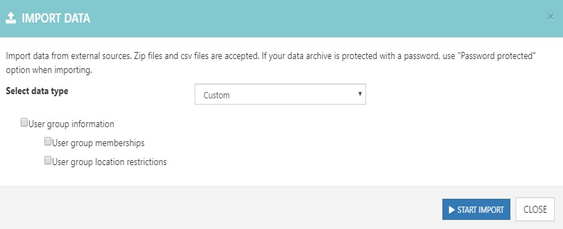
Figure 128 Import user groups data view
Select data from the list to be imported
Select start import button
Refer the Select import location section for more details
Export user group data
Export all user group data as a password protected zip file as follows,
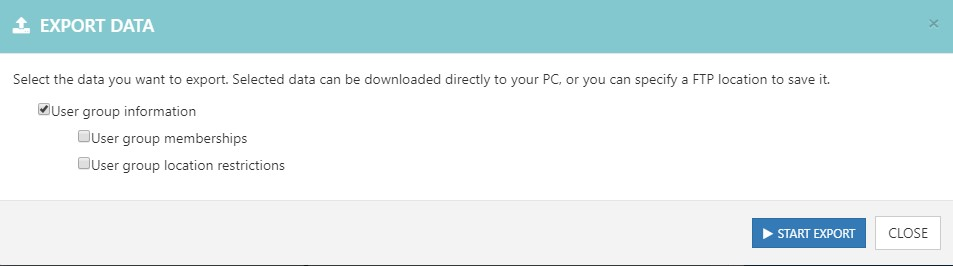
Figure 129 Export user group data view
Select data from the list to be exported
User group location restrictions information
Select start export button
Refer Select export location for more details
Manage Shifts and Rosters
Work schedule of the users/user groups in the organization can be managed in this section.
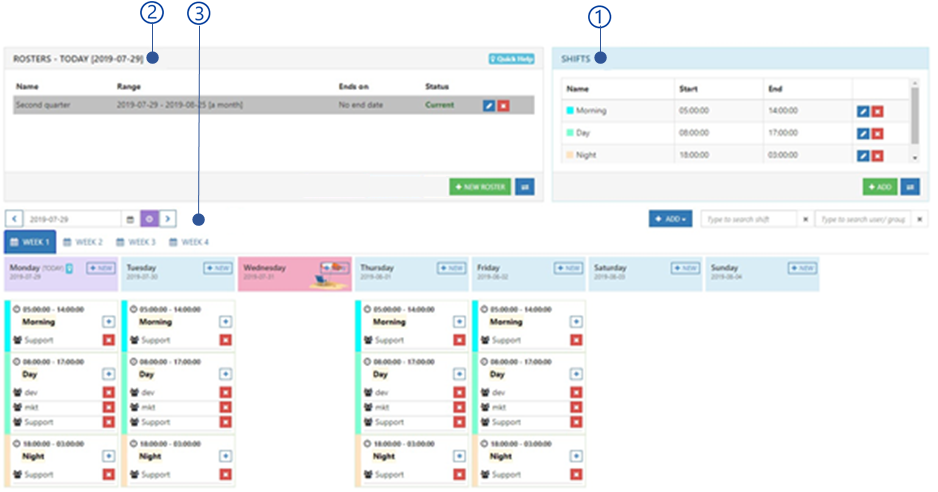
Figure 130 Shift and rosters management view
Shift management view
Daily work schedule can be created with shifts. Shift can be created with specific start time and end time with restrictions such as work hours should be covered, check-in, check-out, and OT hours. Shift management view as follows
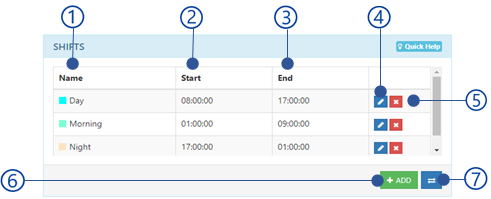
Figure 131 Shift management view
Shift name
Shift start time
Shift end time
Edit button
Edit the shift. Refer Add/Edit shifts section for more details.
Delete button
Delete the shift.
Add button
Refer Add/Edit shifts section for more details.
Add/Edit shifts
This view allows to add new shift or edit existing shift details
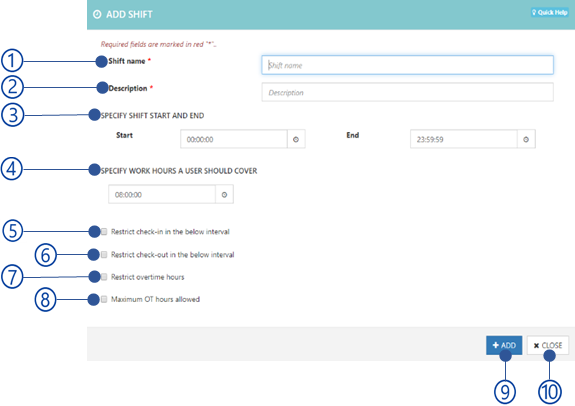
Figure 132 Add/edit shifts view
Shift name
Description
Shift start and end time
Work hours
Select checkbox to add time duration to restrict check-ins
Select checkbox to add time duration to restrict check-outs
Select checkbox to add time duration to restrict overtime hours
Select checkbox to add maximum overtime hours allowed
Add button
Add button will be disabled if the mandatory fields are empty or Validation errors exists. Refer Table 37 for more details about error messages could be occurred.
Close button
Error code |
Error message |
2028 |
The shift name has already existed. |
Import/export shifts
Import shifts
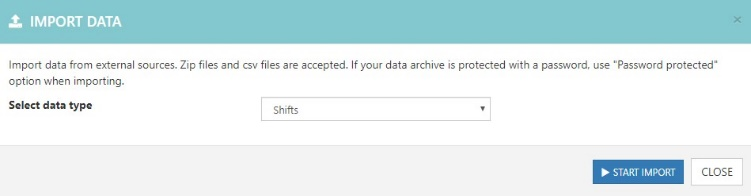
Figure 133 Import shifts view
Shift information can be imported as mentioned in Import and Export information section. To impot,
Select the Shift to import Shifts information
Start Import button to select the import location.
Refer Select import location section for more details.
Export shifts
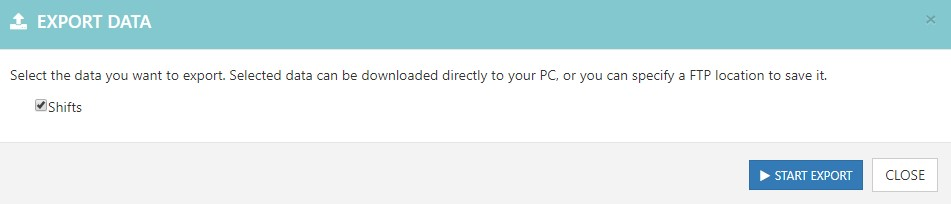
Figure 134 Export shift view
Shift information can be exported as a password protected zip file as follows.
Select Shifts to export Shifts information
Start Export button to select export location.
Refer Select export location for more details.
Roster management view
Rosters are specific duration in weeks to plan the organizational activities with shifts for certain time periods.
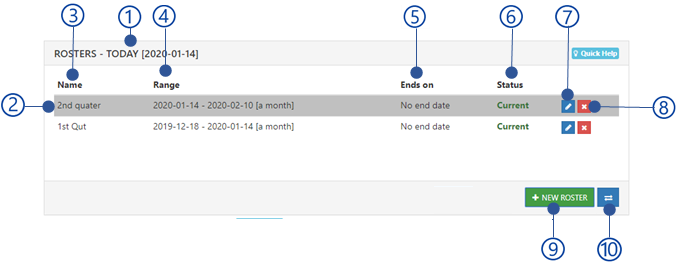
Figure 135 Roster management view
Manage rosters view allows to,
Current date
Selected roster
Roster name
Roster range
Ends on
Roster end date if specified. Otherwise “no end date” will be shown
Status
Whether the roster is currently in user or not.
Edit button
Refer Add roster section for more details.
Delete button
Delete selected roster.
New roster button
Refer Add roster section for more details.
Add roster
This view allows to add new roster.
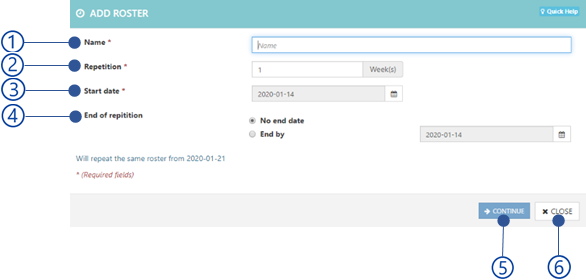
Figure 136 Add roster view
Roster name
Repetition
How many weeks the roster should span - Default is 1 week. Maximum 4 weeks.
Start date of the roster
You may select any day, but the starting day will be Monday of the selected day’s week by default.
End of repetition
If no end date specified, the roster will iterate infinitely. If you specified the end date, the roster would end on the specified date and thereafter you will not be able to add roster items to it.
Continue button
Continue button will be disabled if the mandatory fields are disabled or Validation errors exists. Refer Table 38 for more details about error messages could be occurred.
Close button
Error code |
Error message |
2029 |
The roster name has already existed. |
Import/export rosters
Import rosters
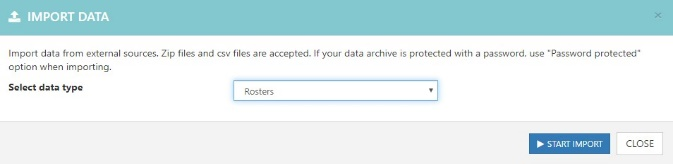
Figure 137 Import rosters view
Roster information can be imported as mentioned in Import and Export information section. Tip import,
Select data from the list to import
Select Start Import button to select the import location
Refer the Select import location section for more details.
Export rosters
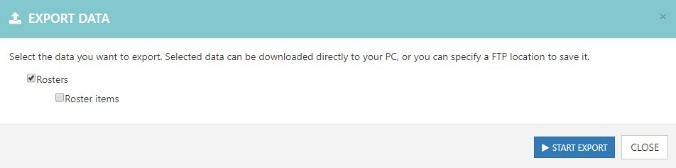
Figure 138 Export rosters view
Roster information can be exported as password protected zip file as follows.
Select data from the list to export
Select Start Export button to select the export location
Refer the Import and Export information section for more details
Roster item management view
After configuring rosters and shifts, roster items can be added for specific dates with user/user groups assigning shifts as follows.
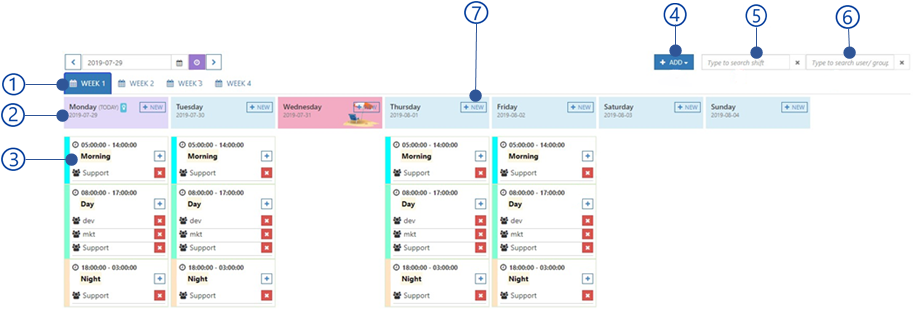
Figure 139 Shift and roster management roster item management view
Weeks
Calendar view
Roster item
Filter by Shift
Filter roster items by shift
Filter by user/user group
Filter roster items by user/user group
New button
Add roster item. Refer Add roster item section for more details
Roster item view
Following details and operation are available in the roster item view.

Figure 140 Roster item view
Shift name, start time and end time
Assigned user/user group list
Assigned user/user group
Refer Add additional staff section for more details
Delete user/user group
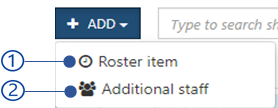
Add roster item
This view allows to add new roster item to the roster.
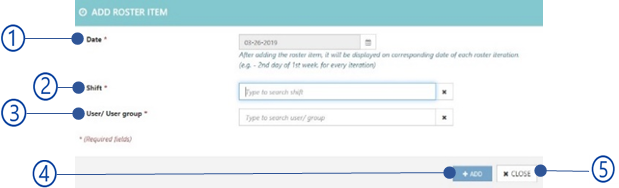
Figure 142 Add roster item view
Date
Shift
User/user group
Add button
Add button will be disabled if the mandatory fields are empty or Validation errors exists. Refer Table 39 for more details about error messages could be occurred.
Close button
Error code |
Error message |
2033 |
A roster item already existed on {date} with {shift name} shift and {user group name} user group. |
Add additional staff
Additional staff view allows to add multiple user/user group for a roster item.
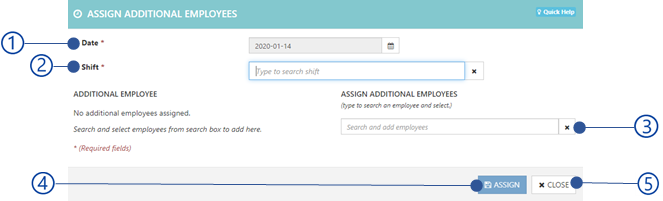
Figure 143 Add additional staff view
Date
Shift
Select user/user group
Assign button
Assign button will be disabled if the mandatory fields are empty or Validation errors exists. Table 40 is showing error message could be appeared when add additional staffs.
Close button
Error code |
Error message |
2033 |
A roster item already existed on {date} with {shift name} shift and {user group name} user group. |
Manage Leaves and holidays
Leaves and holiday management of NCheck Bio Attendance web control panel allows to manage all user leaves and holidays. The Leaves and holiday management view as follows.
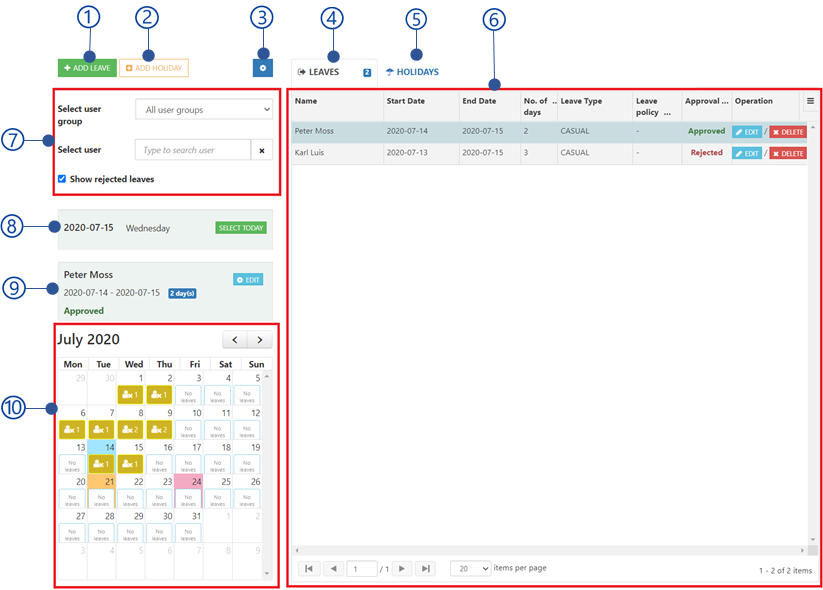
Figure 144 Leaves and holidays management view
Table view of Leaves and holidays
Add leave
This allows to add new leave for the selected employee.
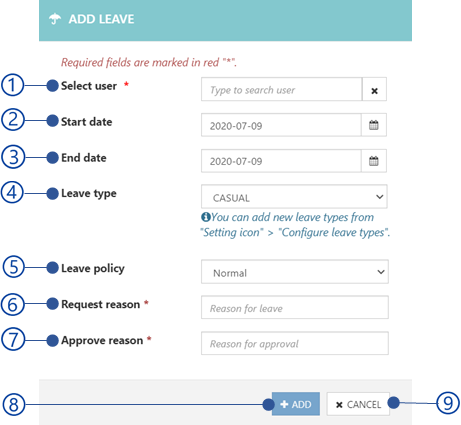
Figure 145 Add leave view
Select user
Select the username who need to apply the leave.
Start date
Start date of the leave.
End date
End date of the leave
Leave type
The default leave types are Casual, Medical and Annual. Administrator allows to add custom leave types as mentioned in Configure leave type section.
Leave policy
There are two available leave policies.
Normal
This is the default leave policy. No restriction will be applied for the leave.
Restricted
Once the leave is approved, user will not able to check-in or check-out while on leave.
Request reason
The reason for the leaves.
Approve reason
The reason for leave approval.
Add button
Add leave
Cancel button
Cancel the leave dialogue.
Edit leave
Edit leave is required in following cases.
Edit leave details such as leave approved duration, leave type etc.
Once a user submits a leave request, the approval status must be changed as approved or rejected. When user submit a leave request administrator will be get notified as below.
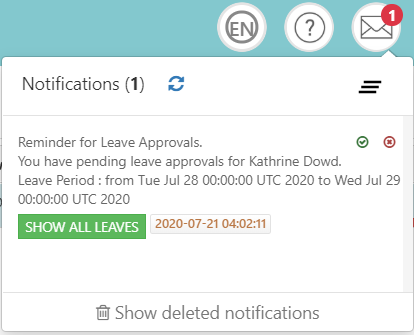
Figure 146 User leave request notification
Requested leaves can be edited as follows.
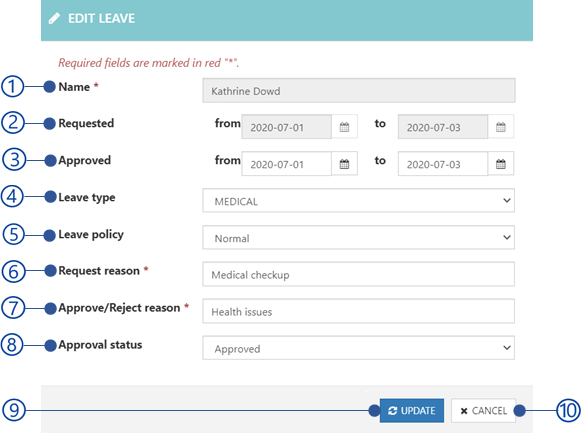
Figure 147 Edit leave view
Name
Name of the user. This field is not editable
Requested
The leave requested period by user.
Approved
Approval period of the user leaves by the administrator. When administrator select update button only this period will be approved.
Leave type
The default leave types are Casual, Medical and Annual. Administrator allows to add custom leave types as mentioned in Configure leave type section.
Leave policy
There are two available leave policies.
Normal
This is the default leave policy. No restriction will be applied for the leave.
Restricted
Once the leave is approved, user will not able to check-in or check-out while on leave.
Requested reason
The reason for the leave
Approve/reject reason
Leave approval or rejection reason by the administrator.
Approval status
Leave approval reason as follows.
Requested
Once the user requested a leave, the approval status will be shown as requested.
Approved
To approve the leaves requested by users, set the approval status as approved. Once the leaves are approved, the user will be get notified.
Rejected
To reject the leaves requested by users, set the approval status as rejected. Once the leaves are rejected, the user will be get notified.
Update button
Update the changes.
Cancel button
Cancel the edit dialogue.
Approve leave
The requested leaves by the user can be approved or rejected by the administrator as shown in below.
Figure 148 Approve leave view
Name
The name of the user
Leave days
The period leaves applied
Leave type
Leave type as Casual, Medical, Annual or custom leaves as mentioned in Configure leave type section.
Policy
The policy as
Normal
Restricted
User are not allowed to check-in or check-out while on leave.
Reason
The reason for the leave.
Approve/reject comment
Comment for leave approval or rejection
Calendar
The calendar view shows periods the leaves are requested.
Accept button
Approved the leaves.
Decline button
Reject the leaves
Edit leave
Edit requested leave as mentioned in Edit leave section.
Cancel button
Cancel the approve leave dialogue.
Add holiday
This allows to add a holiday for the selected date as below.
Normal holiday type
Recurring holiday type
Normal holiday type
The normal holiday type as follows.
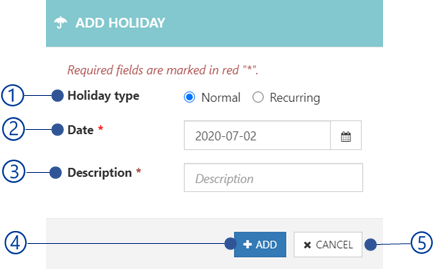
Figure 149 Add normal holiday view
Holiday type
Holiday type as Normal
Date
Holiday date
Description
Add button
Add holiday
Cancel button
Cancel add holiday dialogue
Recurring holiday type
The recurring holiday can be added as follows.
Figure 150 Add recurring holiday view
Holiday type
Holiday type as recurring
Recurring type
Recurring type as
Weekly
Add the holiday for once every week
Monthly
Add the holiday for once every month
Yearly
Add the holiday for once a specified month in every year. A field will be appeared to select the specified month.
Day
Select the date to apply the holiday
Start
The start date of the recurring holiday. Select start from option and specify the start date if required.
End
The end date of the recurring holiday. Select ends on option and specify the end date if required.
Description
Add button
Add the recurring holiday.
Cancel button
Cancel the add holiday dialogue.
Leaves table view
Leaves table shows all user leaves for the selected leave in calendar view.
Figure 151 Leaves table view
Name
Start date
Leave start date
End date
Leave end date
No of day
No of days leave applied
Leave type
Leave type as Casual, Medical, Annual or custom leave type as mentioned in Configure leave type section.
Leave policy
Leave policy as
Normal
Restricted
Users are not allowed to check-in or check-out while on leave.
Approval status
Approval status as Requested, Approved or Rejected.
Operation
Edit leave
Approved or rejected leaves can be edit as mentioned in Edit leave section. The requested leave can be approved as mentioned in Approve leave section.
Delete leave
Delete the leaves
Holiday table view
Holiday table view shows holidays for selected date in Calendar view .
Figure 152 Holiday table view
Date
Date of the holiday
Description
Operation
Delete the holiday
Leave filters view
This view allows to filter all leaves for selected date in the calendar view as follows.
Figure 153 Filter view of leaves
Select user
Display all leaves for the selected user group
Select user
Display all leaves for the selected user
Show rejected leaves
Check this option to display the rejected leaves of users.
Selected date view
The details of the date are shown as selected leave from the Leaves table view or holiday from the Holiday table view .

Figure 154 Selected date view
Date
The date of the selected date from the Calendar view or date of the selected leave from the Leaves table view or date of the selected holiday form the Holiday table view .
Day
Select today button
Select the current date form the Calendar view
Holiday name
This will appears if a holiday selected from the Holiday table view .
Summery view of the selected leave
This view is showing the leave summery of the selected leave from the Leaves table view as follows.
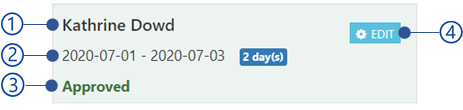
Figure 155 Summery view of the selected leave
Username
Leave period
Start and end date of the leave with number of days
Approval status of the leave
Approval status as Requested, Approved or Rejected.
Edit button
Approved or rejected leaves can be edit as mentioned in Edit leave section. The requested leave can be approved as mentioned in Approve leave section.
Calendar view
Calendar view allow user to select the specific date from the selected month and it also represents details of the leaves and holidays across the selected month as showing below.
Figure 156 Calendar view of the Leaves and holiday mangement
Button to navigate to previous month
Button to navigate the next month
Selected month
Selected date
Number of leaves of the day
Current date
Holiday
Settings of leaves and holidays management
Configure leave type
Instead of the default leave types (casual, medical, and annual), Administrator allows to add custom leave types as follows.

Figure 157 Leave type view
Show deleted leave type
Check this option to show deleted leave types
Delete button
Delete selected leave type form the table.
New leave type button
Add new leave type. Refer Add/edit leave type section for more details.
Close button
Close leave type dialogue
Add/edit leave type
Add a new leave type or edit existing leave types follows.
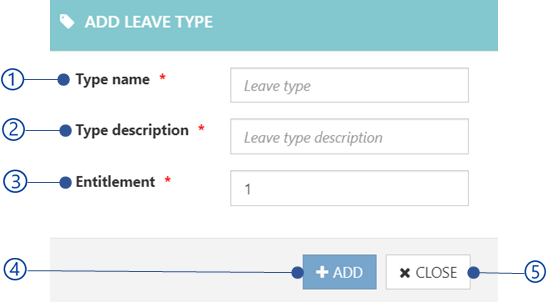
Figure 158 Add leave type dialogue view
Type name
Name of the leave type. This is not editable when editing the leave type.
Type description
Entitlement
Number of leaves available for users.
Add button
Add leave.
Close button
Close Add leave type dialogue.

Import data
This option allows to import leaves and holidays as mentioned in Import and Export information section. Tio import data,
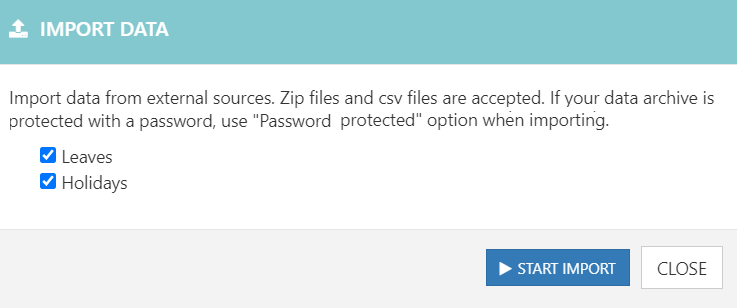
Figure 160 Import leaves and holiday data view
Select information to be imported from the list
Select Start Import button to select the import location.
Refer Select import location section for more details.
Export data
This option allows export all leaves and holidays as password protected zip file as follows
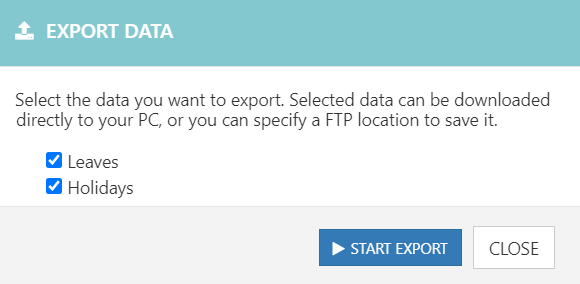
Figure 161 Export leaves and holidays data view
Select information to be imported from the list
Select Start export button to select the export location.
Refer Select export location for more details
Manage devices
Device management page allows managing all NCheck Bio Attendance client devices and API registered with the NCheck Bio Attendance NCheck Bio Attendance server.
Figure 162 Device management view of web control panel
Search device by name
Generate API access
Refer Generate API access credentials section ofr more details
Devices/APIs list view
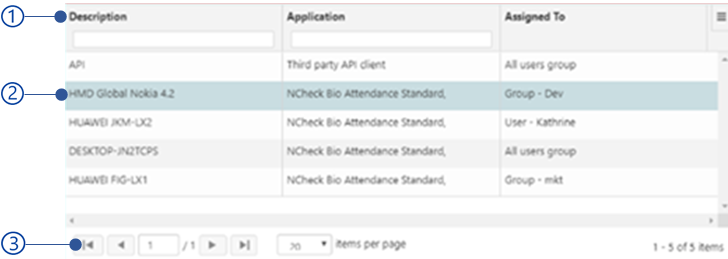
Figure 163 Devices/APIs table view
Selected device/API
Details of the selected device/API are shown in Devices/APIs details view .
Devices/APIs details view
This view represents the selected device/API details.
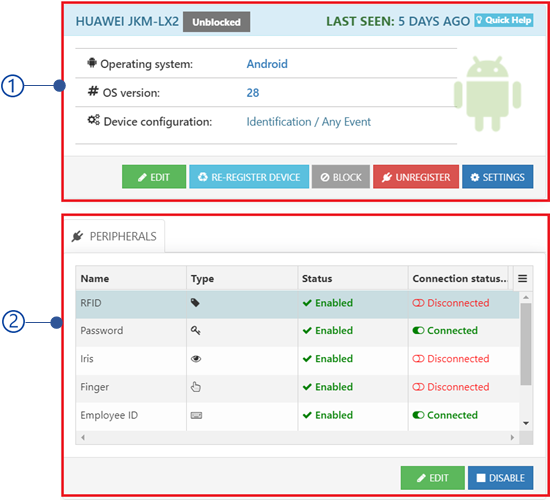
Figure 164 Device/API details view
Device/API quick view
This view shows available details and operations for the selected device/API.
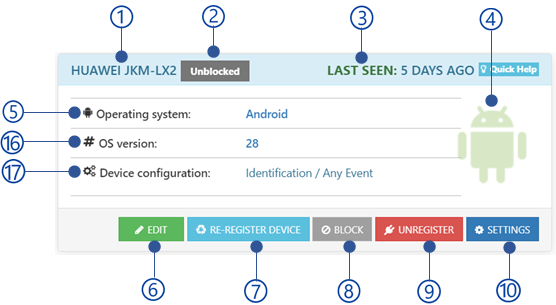
Figure 165 device quick view
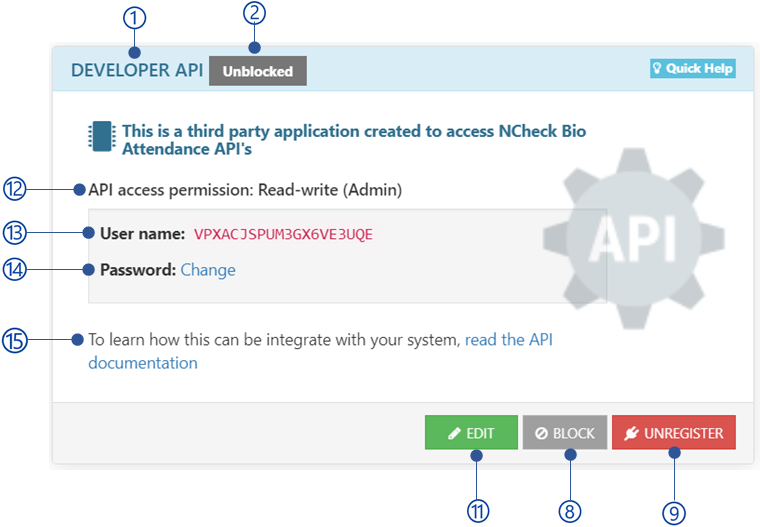
Figure 166 API quick view
Selected device/API description
Device/API block/unblock state
Last seen
Last seen date of the client application
Logo of the OS
Operating system
Operating system of the device, client application has installed.
Edit button
Refer Edit device section for more details.
Re-register button
Re-register device for user/user group. Refer Re-register device section for more details.
Block/unblock button
Refer Block/unblock device/API section for more details.
Unregister device
Refer Unregister device section for more details.
Device settings button
Refer Device settings section for more details.
Edit button
Refer Edit API section for more details
API access permission
Read-only
Read-only permissions to execute the GET APIs
Read-Write
Read-writer permission to execute all available APIs
Username for API access credential
Change the password of API access credentials
Link to open NCheck Bio Attendance API documentation.
OS version
version of the operating system
Device configuration
The device configuration as mentioned in section
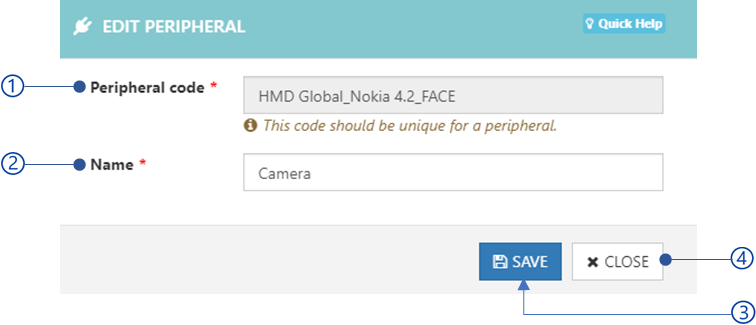
Edit device
This view allows the edit the device details.
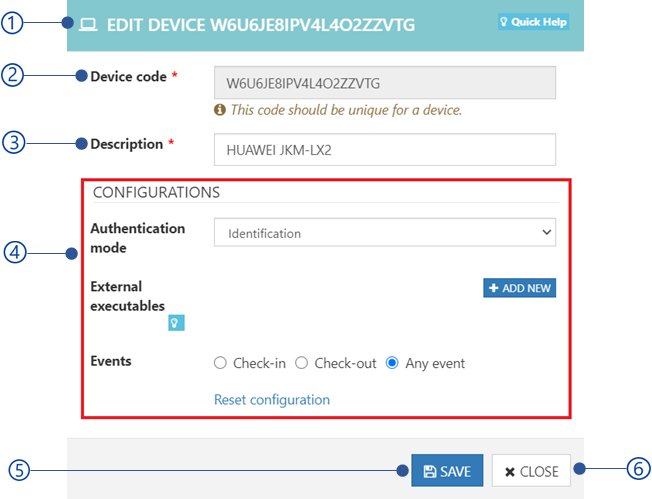
Figure 167 Device management edit device view
Device code
Device code
Device description
Device configuration
Refer Device configuration section for more details
Save button
Save button will be disabled if the mandatory fields are empty or Validation errors exists.
Cancel button
Device configuration
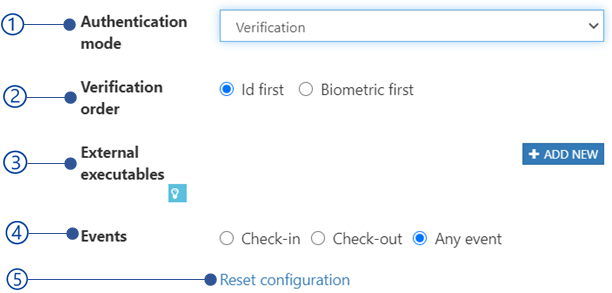
Figure 168 Device configuration view
Device configuration view as follows.
Events
Event type as check-in, check-out, and any events.
Reset configuration
Authentication mode
Authentication mode can be applied to authenticate user to identify or verify user. Available authentication modes are,
Identification
The identification is the default authentication mode. Identification is performed on biometric and user id data as mentioned below.
Biometric data
User biometric data such as face, fingerprint and iris are comparing against the database with previously collected biometric samples depending on the Recognition threshold . If the matching score is greater than the Recognition threshold value, user is considered as identified. Therefore, this mode may demand large processing time.
User id data
User id data such as user id, barcode and QR code are comparing against the database and giving the matching users.
Verification
The verification mode can be applied with a user id peripheral and a biometric peripheral to verify the user against the previously collected biometric sample. To get verified, matching score should be greater than Verification threshold .
Figure 169 Device management verification mode combination
None
Attendances are not recording when the authentication mode is none.
Verification order
As mentioned in Authentication mode section, if the verification mode is selected, the verification order can be set as either the “id first” to enter the user id(employee code, barcode, RFID) first or the “Biometric first” to capture the biometric first.
External executables
System can be configured to run external programs (either from external executable or API) during user identification. For an example, an automatic door opening program can be executed upon successful user identification. This view allows to add new external executable or edit existing external executable.
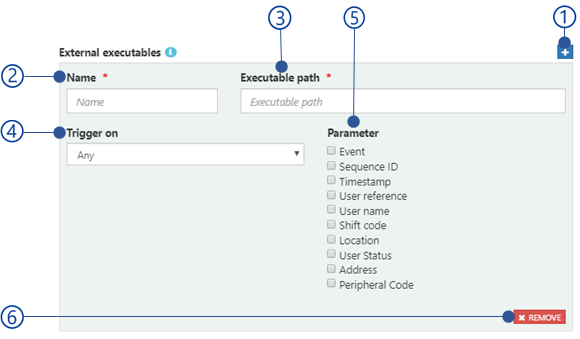
Figure 170 Device management add/edit external executable
Add new external executable
Name
Unique name for the external executable.
Executable path
API URL or absolute path for the external executable
Trigger on
Trigger the external executable on,
Check-ins
Check-outs
Any events
Unidentified events
Parameters
Following parameters with values can be passed to the URL or executable.
Event (EVENT)
Event type as CHECKIN, CHECKOUT or UNIDENTIFIED.
Sequence id (SEQUENCE_ID)
Id of the event.
Time stamp (TIMESTAMP)
Date and time of the event.
User reference (USER_REF)
Employee code of the user.
Username (USER_NAME)
First name and last name of the user event recorded.
Shift code (SHIFT_CODE)
Shift code of the NCheck Bio Attendance Standard clients. In the standalone mode shift code is DEFAULT.
Location (LOCATION)
Longitude and latitude of the event geo location. example: {Longitude, latitude}
User status (USER STATUS)
User is blocked or not. Pass 0 if the user has blocked otherwise 1.
Address (ADDRESS)
Address of the user.
Peripheral code (PERIPHERAL_CODE)
Unique identified number of the peripheral.
Remove button
Remove external executable.
Edit API
This view allows to edit the API details.
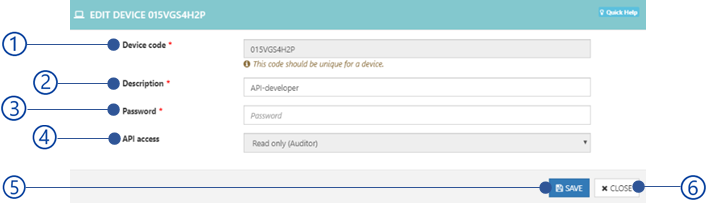
Figure 171 Device management edit API view
API code
Description
Password
API access permission
Save button
Save button will be disabled if the mandatory fields are empty or Validation errors exists.
Close button
Re-register device
This view allows to re-register the selected device.
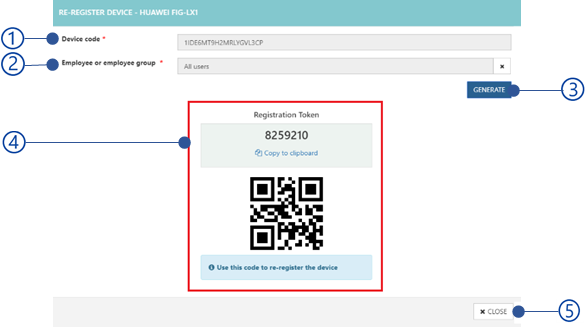
Figure 172 Device management re-register device view
Device code Employee/username or group name
Generate button
To generate registration code. Generate button will be disabled if the employee/group code has not selected.
Registration code and QR code
Use this code to register the NCheck Bio Attendance client device.
Close button
Block/unblock device/API
Block/unblock selected device/API from the list. If the device/API has blocked
User could not be able to enroll biometrics or record attendances from the blocked devices.
User could not be able use APIs
Unregister device
Unregister the selected device/API from the list. Unregister devices should reregister to record attendances.
Device settings
This view allows to add client or biometric settings to the selected device from the device lit.
Client settings
Client settings can be applied for the Lite/Standard client as below
Client setting |
Lite client |
Standard client |
|
|
|
|
|
|
|
|
|
|
|
|
|
|
|
|
|
|
|
|
|
|
|
|
|
|
|
|
|
|
|
|
|
|
|
|
|
|
|
|
|
|
|
|
|
|
|
|
|
|
|
|
|
|
|
|
|
|
|
|
|
|
|
Peripherals view
Peripheral view shows all available peripheral of the selected device.
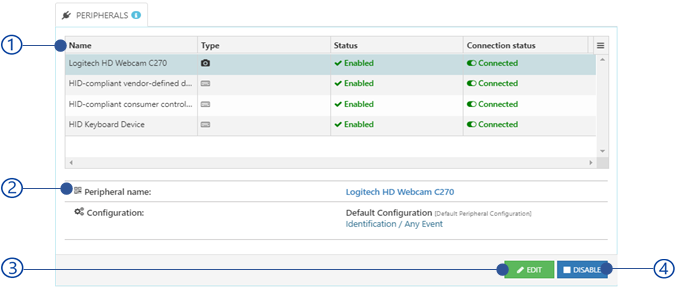
Figure 173 Device management manage peripheral view
Edit button
To Edit selected peripheral. Read Edit peripheral section for more details.
Disable button
Enable/disable selected peripheral.
Peripheral table
Peripheral table represents all detail of the available peripherals.
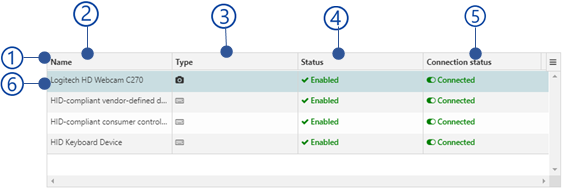
Figure 174 Peripheral table view
Name
Peripheral name
Type
Face
Fingerprint
Iris
User id
Barcode
RFID
Status
Enable/disable status of the peripheral.
Connection status
Connected
When the peripheral is available with the device.
Disconnected
When the peripheral is not available with the device.
Table peripheral
Selected peripheral details are shown in Peripheral quick view .

Generate API access credinitals
NCheck Bio Attendance server has given the API access to access user, biometric, event data across given user group to use in third party applications.
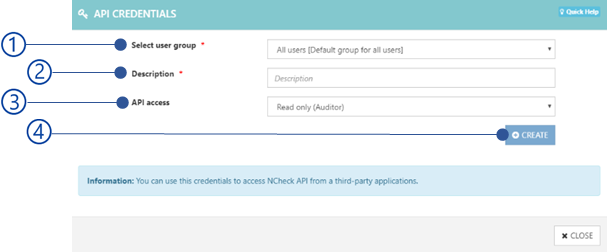
Figure 177 Device management API credentials view
Selected user group
The default is All user group
Description
API access
Assign permission to use API
Read only (Auditor)
Assigned user group allows only to retrieve data from the API.
Read-Writer (Admin)
Assigned user group has permission to retrieve and alter data.
Create button
Create button will be enabled if the API description has added. After create API, user name and password which is required for API access will appear as shown in Figure 5127. For more details refer API Documentation section.
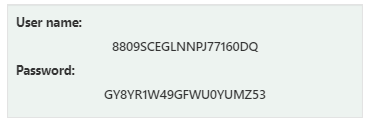
Figure 178 API access credentials view
The error messages could be appeared when creating API are showing below.
Error code |
Error message |
2036 |
Peripheral configuration name has already existed. |
Manage Event logs
Event logs can administrator to add, edit, delete and review all event logs recorded.
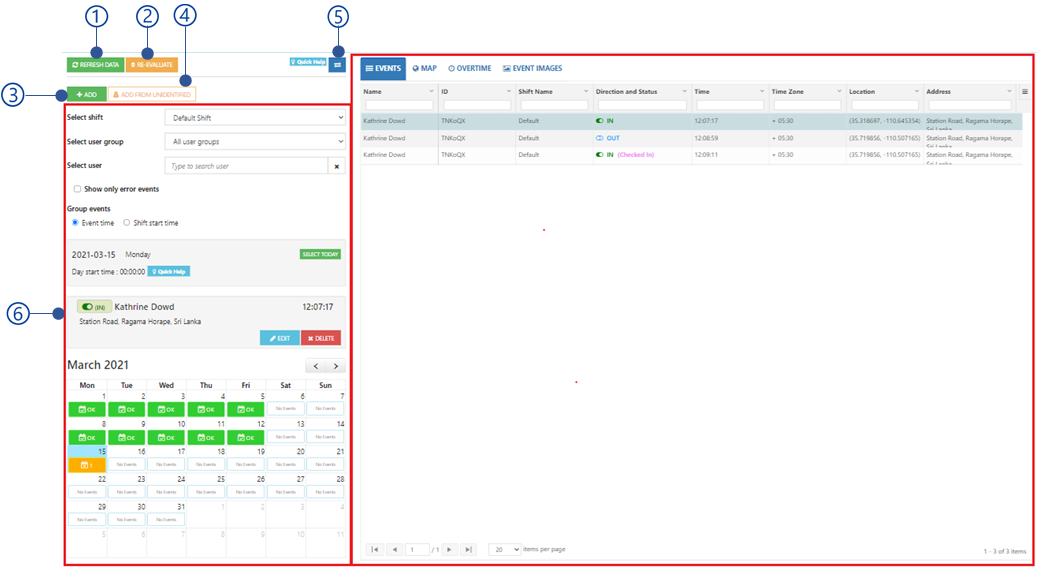
Figure 179 Event log management view
Refresh data
Re-evaluate button
Evaluate all the event logs to fix events with missing check-ins/check-outs.
Add button
Add new event log. Refer Add event log section for more details
Add from unidentified button
Add event log
This view allows to add new event log.

Figure 180 Add event log view
Username
Status
Check-in or Check-out
Selected date
Selected time
Time zone
Shift
Shift date
When an employee Check-in or Check-out not in the same date as the event date, (E.g. Working overtime or Shift spans for two days) shift date should be specified. Otherwise the event will belong to current day’s shift.
Location
The coordinates(Latitude and longitude)of the event location.
Description
Add event button
Add event button will be disabled if the user of the event has not been selected. Table 44 is showing the error messages could be appeared when add events.
Close button
Error Code |
Error message |
2037 |
Could not record events. The device has been blocked |
2042 |
Could not record events. The user has been blocked. |
2043 |
Could not record event. Check-in time has restricted. |
2044 |
Could not record event. Check-out time has restricted. |
Add from unidentified
The events failed to identify users are called unidentified events. This feature allows to add events from unidentified events.
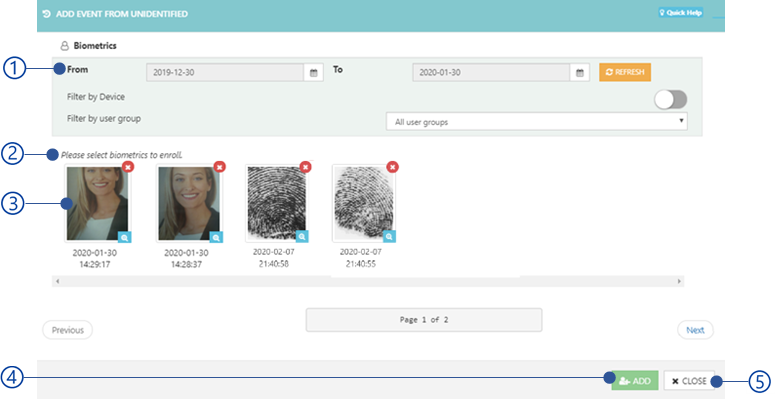
Figure 181 Add event from unidentified event view
Date filter
Unidentified event list
Add button
Add button will be disabled if no biometric image will be selected from the list. Add event log view will be shown to give details of user after select the add button.
Close button
Event log detail view
Event/map view
Event view show all user event for the selected date.
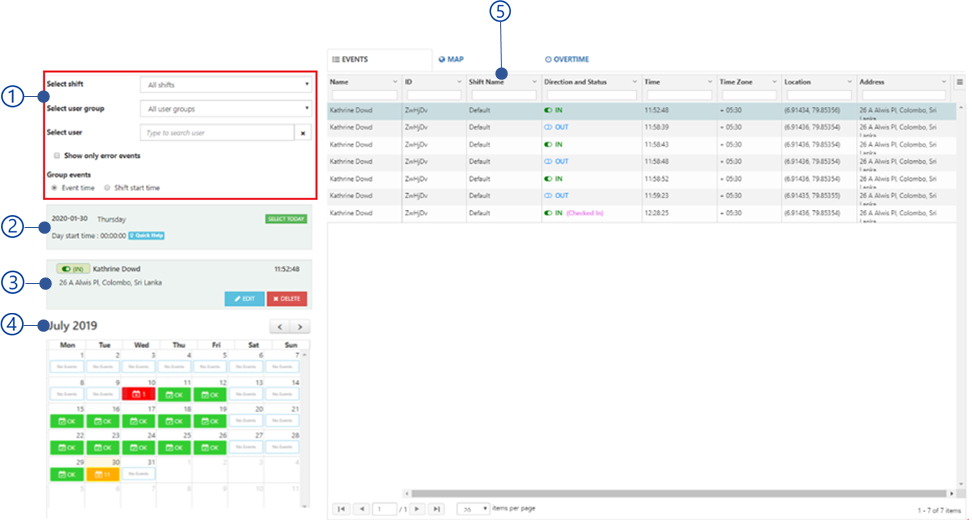
Figure 184 Events view
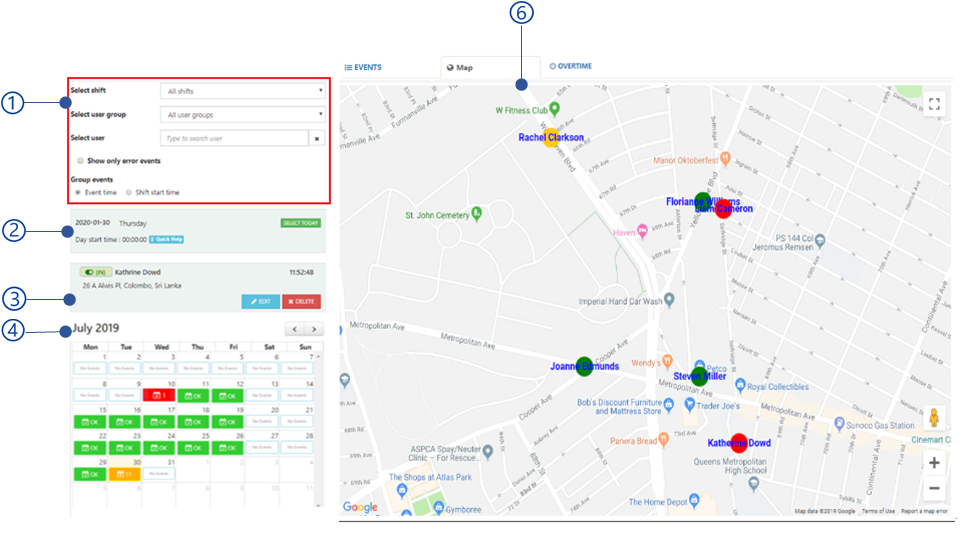
Figure 185 Map view
Event filters view
All events can be filtered as follows,
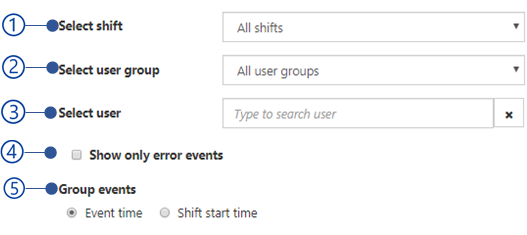
Figure 186 Event filters view of event/map view
Select shifts
Filter events by shifts. Default shift is All shifts.
Select user groups
Filter events by user group. Default user group is All user group.
Select user
Filter events by selected user.
Show only error events
Filter check-ins without check-outs and check-outs without check-ins.
Group events
Event time: Events will be displayed according to the check-in/checkout time in the day.
Shift time: Events will be displayed based on the shift start time and shift end time.
Selected date view
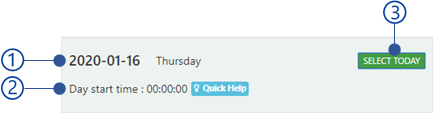
Figure 187 Selected date view of event/map view
Selected date
Select today button
Select this button to select the current date from the calendar view.
Selected event quick view
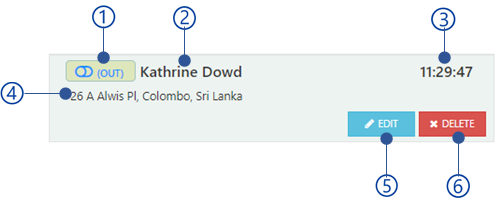
Figure 188 Event log management selected event quick view
Event type
Username
Event time
Event location
Edit button
Refer Edit event section for more details.
Delete button
Event calendar view
Event calendar is representing following details.
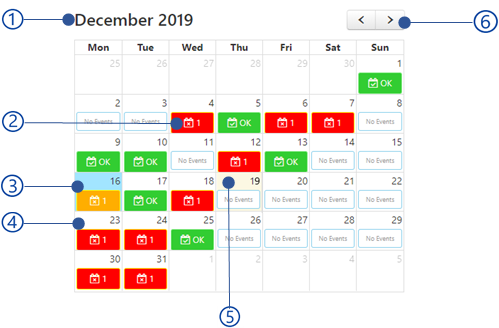
Figure 189 Calendar view of event/map view
Selected month
No. of missing check-outs
Events recorded with correct check-ins and check-outs sequence.
No. of missing check-ins
Current date
Calendar month navigation buttons
Events table
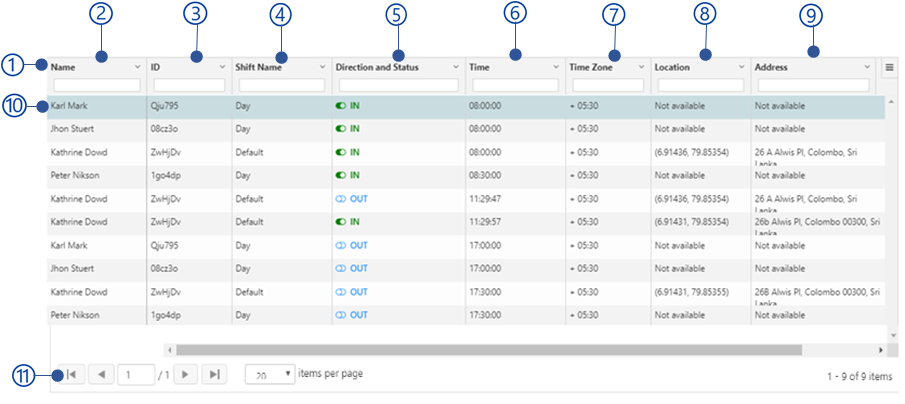
Figure 190 Event table view
Name
User ID
Shift name
Direction and status
Event type as check-in or check-out
Event time
Event time zone
Location
Longitude and latitude coordinates of the event location.
Address
Address of the event location
Selected event log
To edit event, double click on event log row. Refer Edit event for more details.
Edit event
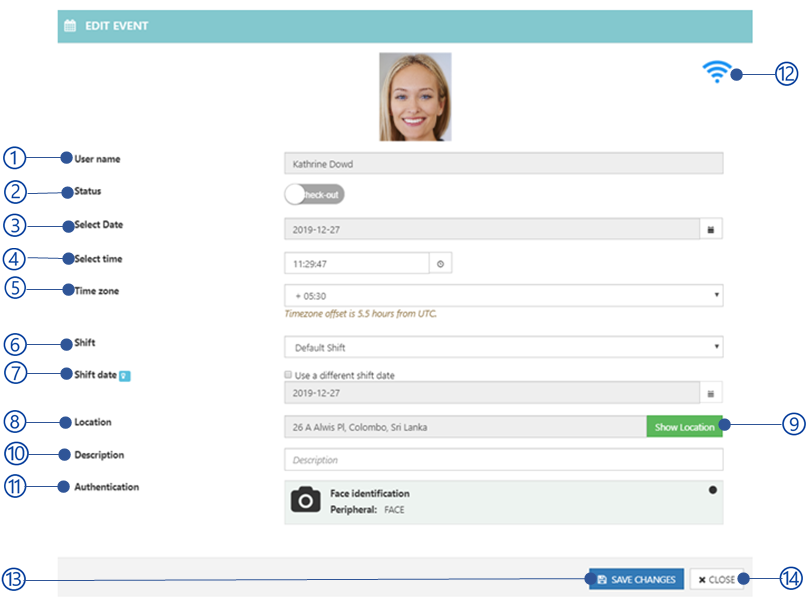
Figure 191 Event log management edit event
name
Status
Event date
Event time
Event time zone
Shift
Shift date
Event location
Show location button
Show the event location on the google map.
Description
Authentication
Authentication as face, fingerprint, iris, barcode, RFID, or user id
Event record type
Event recorded by admin
Event added by admin
Online recorded event
Event recorded from NCheck Bio Attendance client application.
Save changes button
Following errors could be occurred when save changes of event logs.
Close button
Error Code |
Error message |
2037 |
Could not record events. The device has been blocked |
2042 |
Could not record events. The user has been blocked. |
2043 |
Could not record event. Check-in time has restricted. |
2044 |
Could not record event. Check-out time has restricted. |
Map view
The event map is showing the location of user’s recent event for the selected date. All checkout events are shown in red color and check-in events are shown in green color. Selected event will be shown in yellow color.
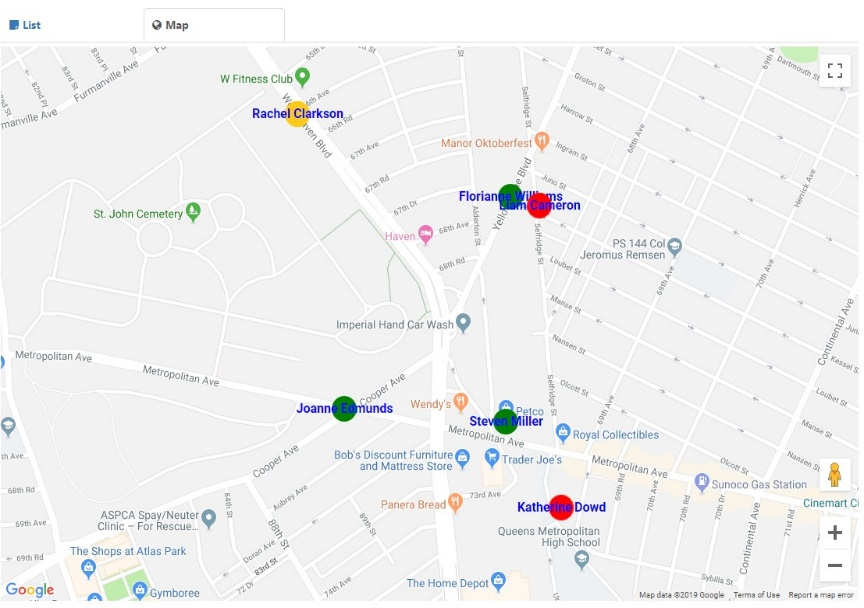
Figure 192 Event log management Map view

|
Check-in events are showing in green color |

|
Checkout events are showing in red color |

|
Selected event is showing in yellow color |
The map view can be configured as follows
The event log map can be configured using following map services
After obtain a map key, go to Settings > Web and select map provide from Event log location map provider setting and set the obtained API key for Map API key setting.
Google map
To configure google maps obtain a google map API key as mentioned here. If you can see “For development purposes only” water mark on the event log map once you have configured with Google map, you have to make sure that.
Billing has not been enabled on your account.
The provided billing method is invalid (for example an expired credit card).
API access daily limit has been reached
To remove the watermark, you need to log in to Google cloud services console (https://console.cloud.google.com/project/_/billing/enable) and check the status of particular project created for Map API access. If the API key is correctly provided, you should see Google maps loaded properly. If it’s still showing some error on top as follows, you need to check whether the API key is correct.
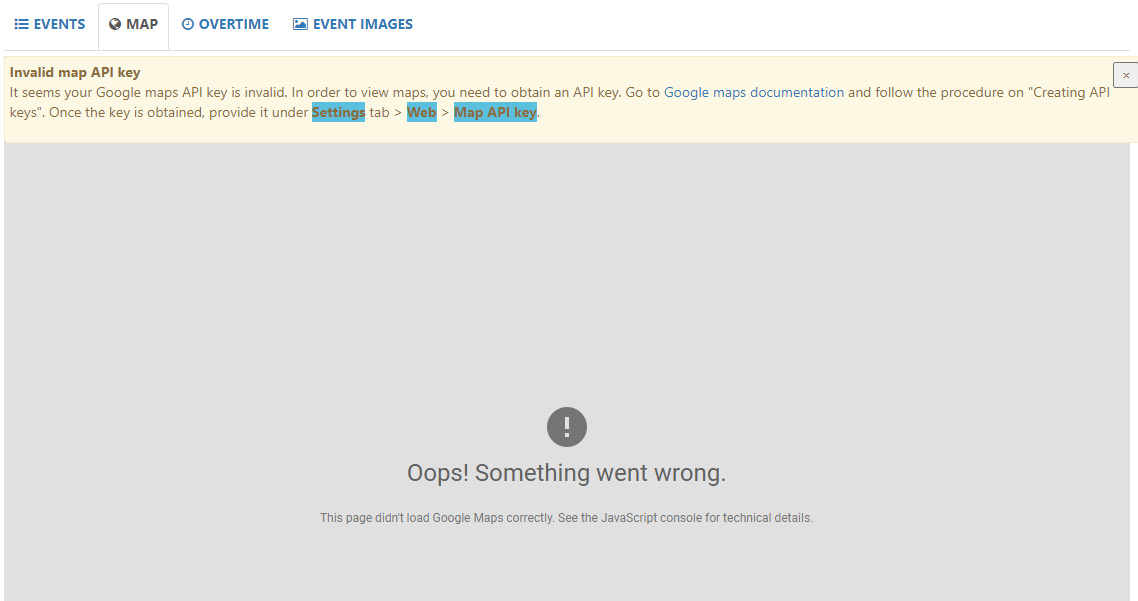
Figure 193 Eventlog map view for invalid google map API key
Baidu map
To configure Baidu map, obtain API key as follows,
Create an account at https://passport.baidu.com/v2/?login
Set up an developer account at http://developer.baidu.com/user/reg.
Click the “I agree button”
Choose “Browser” as the application type
Overtime view
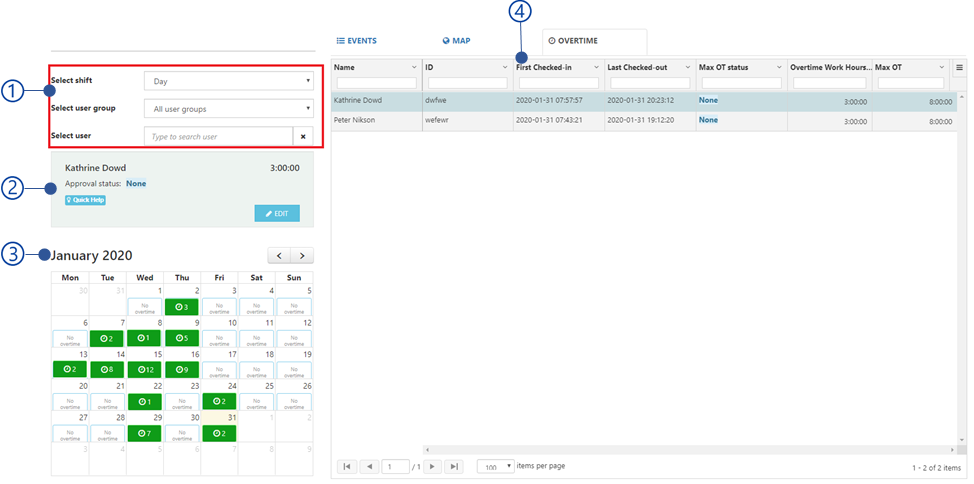
Figure 194 Overtime view
Overtime filter view
Overtime filter view shows following filters
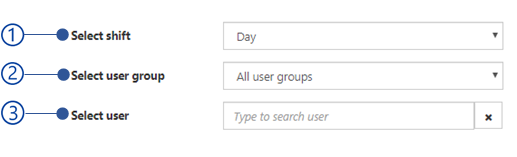
Figure 195 Filter view of the Overtime view
Select shifts
Filter events by shifts. Default shift is All shifts.
Select user groups
Filter events by user group. Default user group is All user group.
Select user
Filter events by selected user.
User overtime quick view
Overtime quick view shows following details.
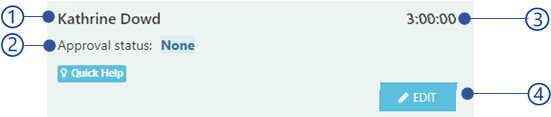
Figure 196 User overtime quick view
Username
Overtime hours
Edit button
Overtime calendar view
Overtime calendar shows following information for each day.
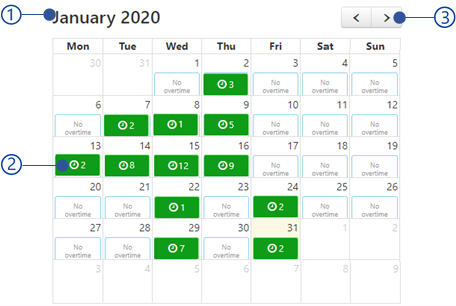
Figure 197 Overtime calendar view
Selected month
Number of overtime entries submitted to approval or rejection
Calendar month navigation
Overtime table
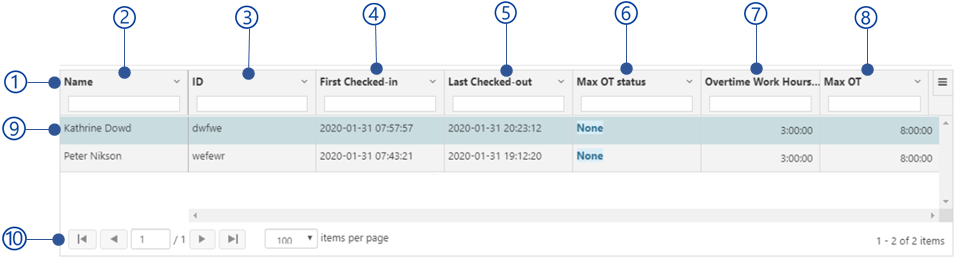
Figure 198 Overtime table view
Table header
Username
employee code
First checked-in date and time
Last checked-out date and time
Number of overtime work hours user has worked
Number of Max OT hours allowed for the shift
Selected overtime
Selected overtime details are shown in User overtime quick view
Edit overtime
This view allows to edit overt time details.
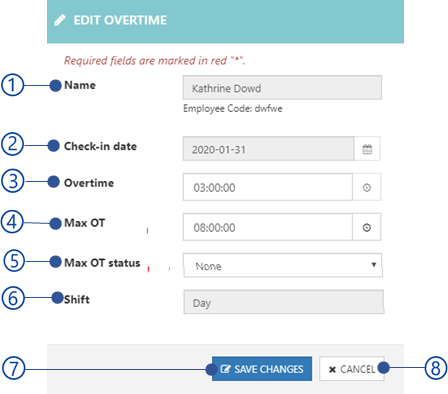
Figure 199 Edit overtime view
Username
Username cannot be adapted.
Check-in date
Check-in date cannot be adapted.
Overtime hours
Number of overtime hours user has worked. This entry cannot be updated.
Max OT
Number of maximum overtime hours allocated for user.
Shift
Shift cannot be updated
Save changes button
Save changes button will be disabled if the Validation errors exists. Table 46 shows all error messages.
Cancel button
Error code |
Error message |
3010 |
Could not record overtime. Overtime should not be greater than the max overtime hours. |
Max overtime status
None
Once user completed the events for the day, approval status will be none if the overtime hours exist. Administrator will mark the overtime as approved or rejected.
Approved
Accepted overtime by administrator.
Rejected
The rejected overtime by administrator.
Event image view
Event image view is showing all event images for the selected date in Event calendar view .
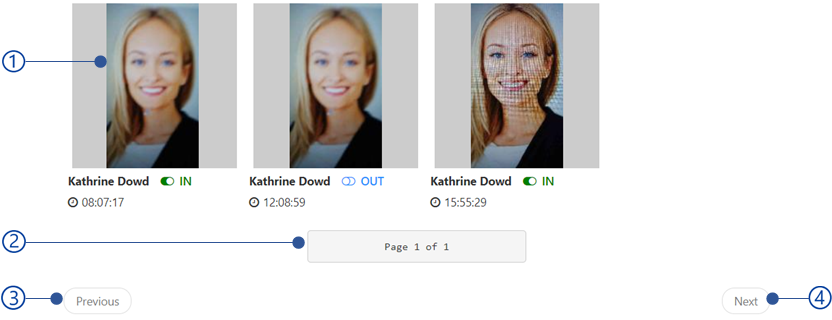
Figure 200 Event image view
Event image thumbnail
Select the thumbnail to edit event as mentioned in Edit event section.
Current page of available page
Previous button to navigate previous page
Next button to navigate next page
Import/export event logs
Import event logs
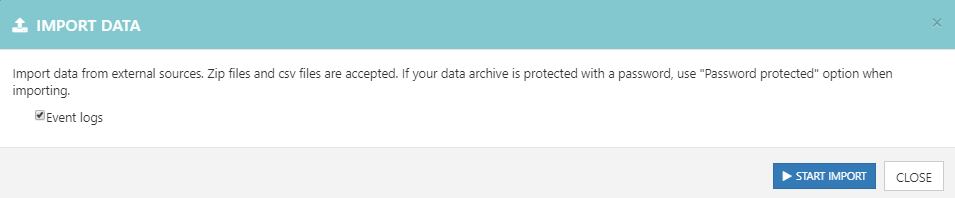
Figure 201 Import event logs view
Import event logs information can be imported as mentioned in Import and Export information section. To import event logs,
Select event logs
Select Start import button
Select Start import button to select event logs file. Refer Select import location for more details.
Export event logs
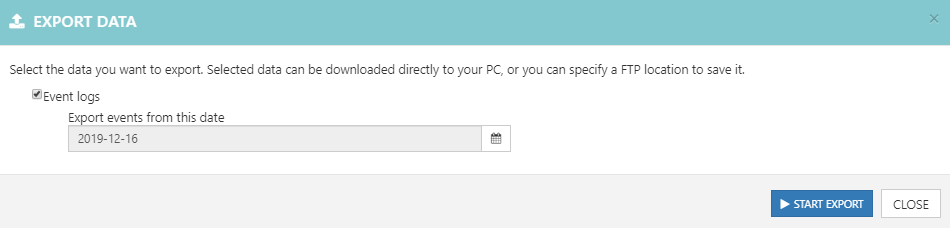
Figure 202 Export event logs view
Event log details can be exported as password protected zip file as below.
Export event log information for selected date.
Start export button
Select start export button to select the event log export location.
Refer Select export location for more details.
Reports
Report page provides a set of standard reports on employee time attendance. Report view as follows,
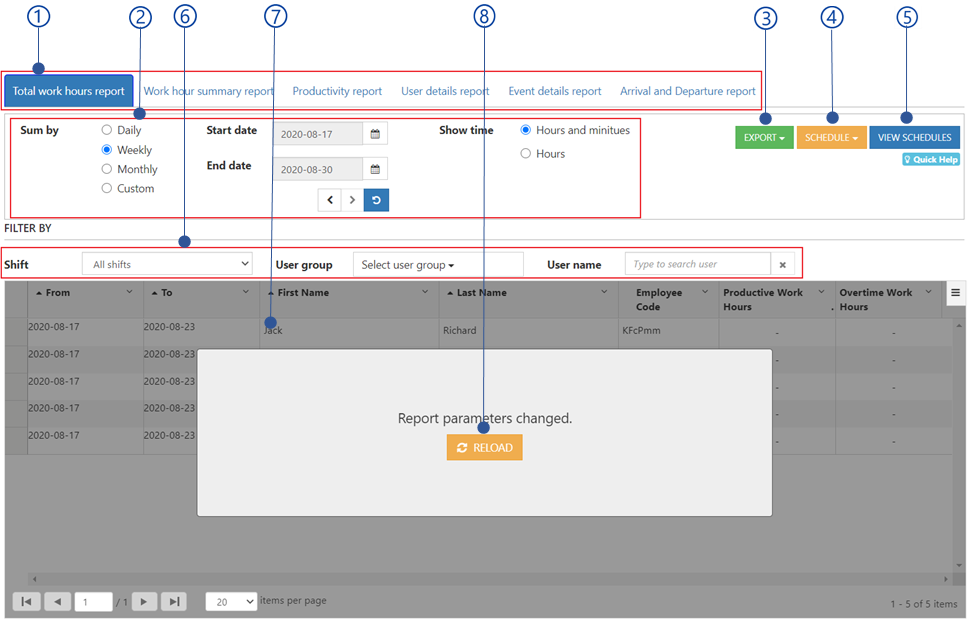
Figure 203 Report view of Web control panel
Export menu
Refer Export report data section for more details.
Schedule menu
Refer Schedule reports section for more details.
Report area
Reload page
Report types
The available reports are,
Total work hour report
The Total work hours report provides work hours details for a selected date range. That details can be calculated by daily, weekly, monthly basis. The important parameters are
From
Date range start
To
Date range end
First name
Last name
Employee code
Work hour summary report
This report provides the details as follows for users/employees.
Name
Employee code
Shift hours
Productivity report
Productivity report is generated for a selected time period with user/employee productivity parameters as follows.
First name
Last name
Employee code
From
Date range start
To
Date range end
User detail report
The user details report provides a list of user’s information. The available details are
User code
First name
Last name
Deleted
Whether the user has deleted or not
Active
Whether the user is blocked or not
Address
City
Email
Country
Zip/postal code
State
phone number
Event details
Event details represent all users/employees event details information as follows.
Name
ID
Shift name
Shift starts
Start time of the shift.
Direction and status
Event type as check-in or check-out.
Time
Event time
Time zone
Time zone difference in hours with respective to UTC.
Location
Longitude and Latitude coordinates of the event location.
Arrival and Departure report
Arrival and departure report contain all arrival, departure, and absentee data. It also includes information about Roster items, Additional staff adding, Replacements, Holidays and Leaves for all employees. Using this report, you can track, • Shift details for the employee (Shift name, start and end time)
Date
First name
Last name
Employee code
Availability
Preset or absent
Shift name
Shift start
Shift end
First checked-in
First checked-in time
Last checked-out
Last checked-out time
Additional
Additional staff
Leave policy
Leave policy as normal or restricted.
Report settings

Figure 204 Report settings
Report calculation strategy
Change the calculation based on Daily, Weekly and Monthly basis.
Date range
Date range can be changed daily, weekly, and monthly according to the report calculation strategy selected above.
Show
This setting allows to add following columns to the Workhour report
Show time
Show report time wither in hours and reports or hours.
Report filters

Figure 205 Report filters view
Shifts filter
Filter report by shift.
User groups filter
Filter report by user group.
Username filter
Filter report by user.
Export report data
Before export report, make sure to hide columns from the report view those are not needed in the exported report. This can be done using the table menu as mentioned in Table menu section. Report can be exported as follows
PDF format
Download the selected report in PDF format. When select PDF format, it will ask the font size of the pdf as follows.
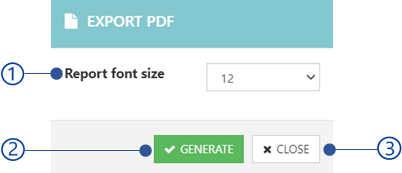
Figure 206 Configure PDF font size in the report
Report font size
Set the font size of the PDF report between 9 and 15.
Generate button
Generate report
Close button
CSV format
Download the selected report in CSV format.
Schedule reports
Note
Schedule report feature is not available for work hour summery report.
Schedule export option allows to
Send reports in CSV format for the selected users daily weekly or monthly basis
Backup CSV report in FTP daily, weekly, or monthly
Schedule report configurations are showing below.
Figure 207 Schedule reports view
Report configuration
This view is showing the specific configurations applied from Report settings and Report filters to the selected report
Send date
Report sending date
Send time from
The time report must be sent
Frequency
Every day
Send the report on every day at the schedule time
Every week
Send the report once a week in above scheduled date time
Every month
Send the report once per month based on the scheduled date and time
Checking at advanced option allow to configure the period in days to send the report at once.
Schedule end
No end date
Report will send continuously
Have end date
Specify the date to stop receiving the report
Save changes button
Table 47 shows error messages after select save changes button.
Close button
Error code |
Error message |
1003 |
Unable to connect with the FTP server {server name} |
2045 |
Could not email reports for the recipients. |
2046 |
Invalid FTP file path |
2047 |
Invalid FTP username or password |
Sending options
Following sending option(s) can be selected
Email
The report will be emailed to the selected recipients

Figure 208 Email configuration of the schedule report view
Enter recipients’ email(s) separated by commas
Find recipients from employee using the name
Find recipients using the user group
FTP configuration
The report will be saved in the FTP location.
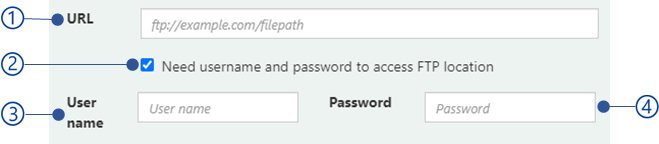
Figure 209 FTP configuration of the schedule report view
FTP URL
Check this if the FTP access credentials is required
FTP Username
FTP password
Local folder
The report will be downloaded into the given file path in the local file system.
View schedules
This feature allows to view/edit all report schedules as follows.
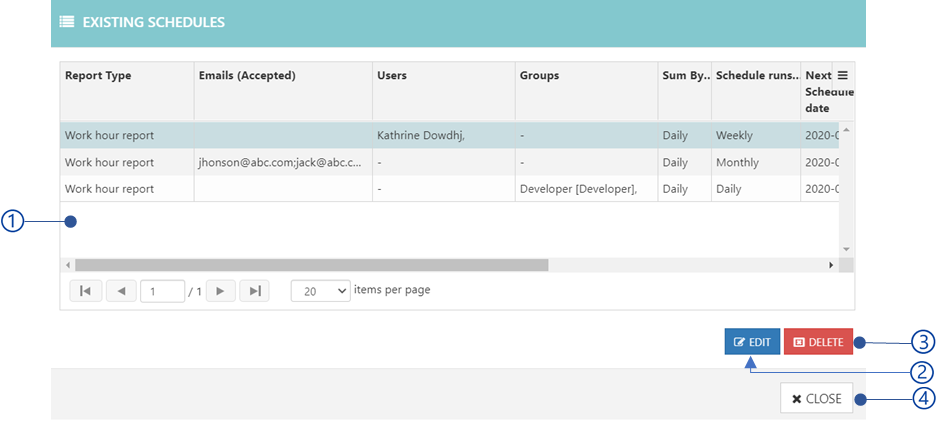
Figure 210 View report schedules
Report schedule table
Edit button
Edit report schedules as mentioned in Schedule reports section
Delete selected report schedule
Close button
Report schedule
Report scheduled table is showing following information.
Report type
Type of the scheduled report
Emails
Email(s) of the recipients
Users
Username(s) of the recipients
Groups
Group names to send the reports for all users in the groups
Sum by
Report frequency daily, weekly, or monthly
Next schedule date
Next schedule time
Ends on
Report end date if specified
Send time base
FTP export
Created time
Created time of the report schedule
Settings
NCheck Bio Attendance server control panel settings are
Biometric settings view
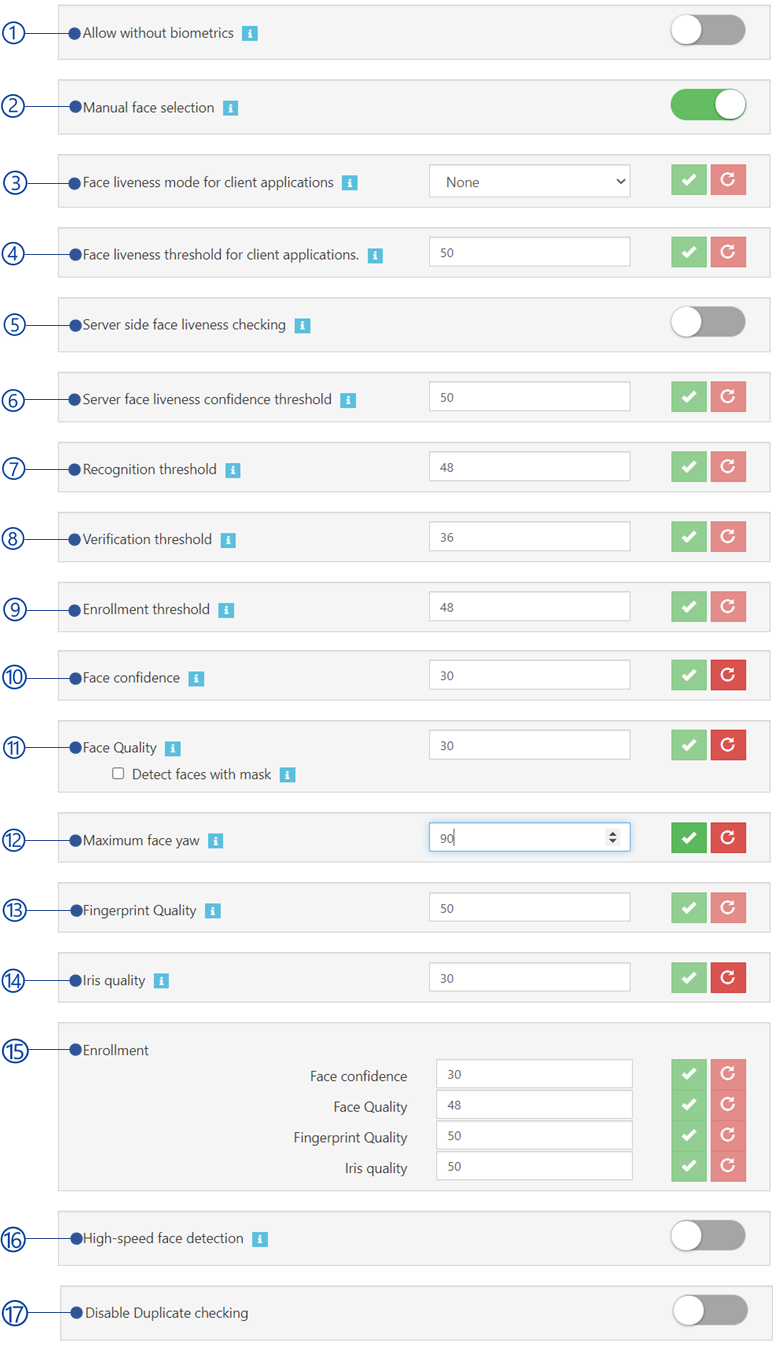
Figure 213 Biometric settings view of settings
-
Iris quality
Enrollment
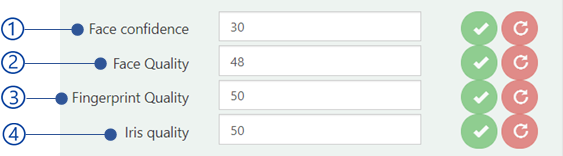
Figure 214 Enrollment thresholds
Notifications
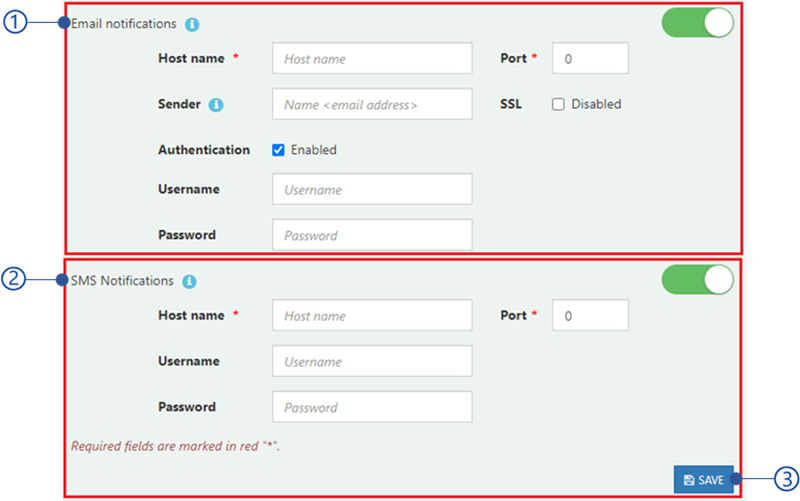
Figure 216 Notification settings view of settings
Save button
Save email and SMS notification settings changes.
Email notification settings
Email server can be configured with NCheck Bio Attendance On-premises server to receive notifications such as change login details, share device registration token, schedule reports. The following settings need be added to enable emails.
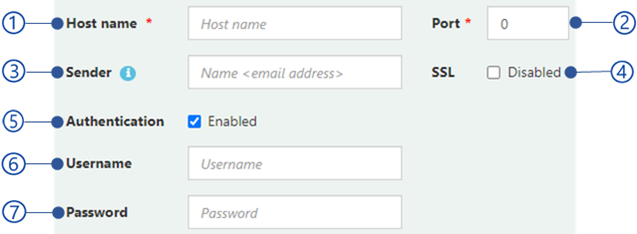
Figure 217 Email notification settings
Host name
SMTP server to manage emails.
Port
SMTP Server port. The default port is 25.
SSL
Enable SSL2 configuration to ensure the safety and security of the emails
Authentication
Enable disable authentication for email server
Username
The Username of the host server. This is also the sending email address for all email notifications.
Password
The password of the host server
Sender
Sender should be configured in order to display the sender details of the receiving emails in the email client. There are two formats can be used for sender
Name <Email address>
ex: Kathrine <Kathrine@abc.com>
Email address <Email address>
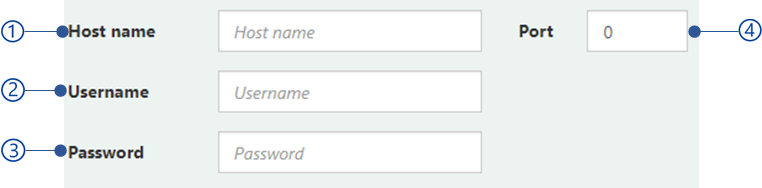
Admin Tasks
NCheck Bio Attendance admin tasks view as follows,
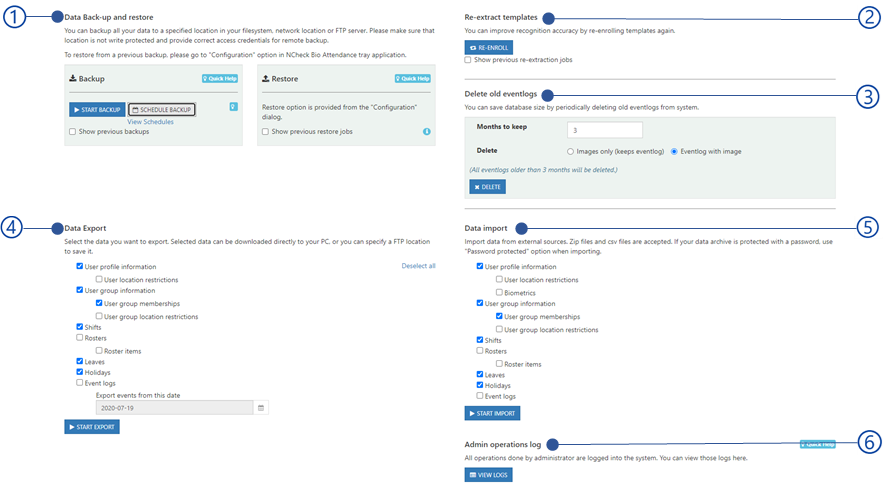
Figure 219 Bio Attendance admin tasks of Web control panel
Data backup and restore
Note
This feature is not available for NCheck Bio Attendance Cloud server
NCheck Bio Attendance server allows the administrator to backup/schedule backup all data in the specified location securely in JSON format.
Backup information
The backup file must contain following details
File name |
details |
AuthentcationData.json |
|
Customer.json |
Organization details as given in My Account section |
CustomerLeaveTypes.Json |
Leave types as configured in Configure leave type section. |
CustomerSettings.json |
Customer settings as mentioned in Settings section |
Device.json |
Device/API details as mentioned in Devices/APIs details view , |
FileData.json |
|
Holiday.json |
Holiday details as mentioned in Manage Leaves and holidays section. |
OAuth2User.json |
|
Peripheral.json |
All peripheral details of each device as mentioned in Peripherals view section |
PeripheralConfiguration.json |
Peripheral configurations details |
Person.json |
User details |
Roster.json |
All roster details as mentioned in Roster management view section. |
RosterItem.json |
All roster item details as mentioned in Roster item management view section. |
Task.json |
All shift details as mention in Shift management view section. |
UserGroup.json |
All user group details as mentioned in Manage user Groups section. |
UserGroupMembership.json |
All users of user groups detail as mentioned in Attached users section. |
Note
It is strongly recommended to not alter backup files in order to restore data successfully.
Backup database
This view allows to backup NCheck Bio Attendance database.
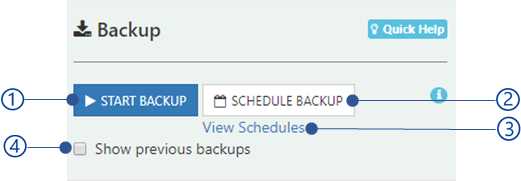
Figure 220 Database backup view
Start backup button
Refer Backup configuration section for more details.
Schedule backup button
Refer Schedule backup section for more details.
View schedules
Refer View schedules section for more details.
Show previous backup
Backup configuration
Database can be backed up in different locations as follows,
Save backup in local folder
Save backup in FTP location
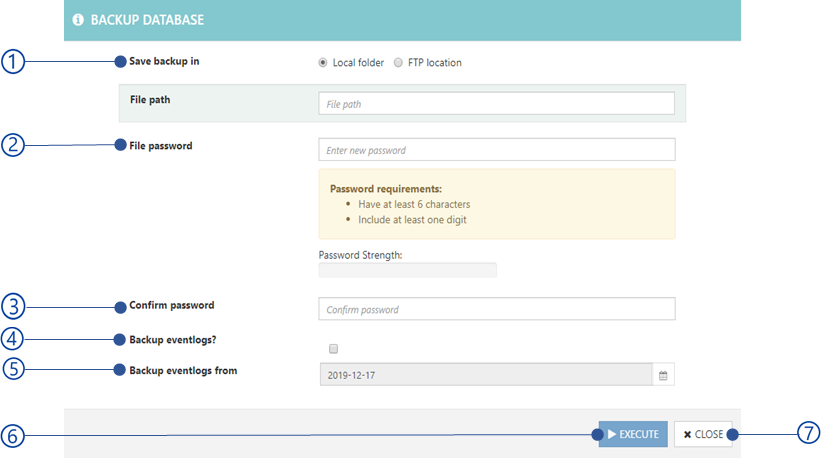
Figure 221 Backup database view
Save backup either in FTP or local folder. Refer
File password
The Password must have at least 6 characters with one digit.
Confirm password
Backup event logs
Check this option to backup all event logs
Backup event logs from
If the Backup event log option is checked, select the date from which date event logs must be included.
Execute button to start
Execute button will be disabled if the mandatory fields are empty or Validation errors exist. Table 49 Following errors could be occurred.
Close button
Error code |
Error message |
1003 |
Unable to connect with the FTP server {server name} |
3003 |
Password does not match. |
3004 |
Password must contain at least 6 characters with one number. |
2045 |
Could not email reports for the recipients. |
2046 |
Invalid FTP file path |
2047 |
Invalid FTP username or password |
4001 |
Unidentified error occurred during data restore. Please contact administrator or NCheck Bio Attendance support for more details. |
Schedule backup
This feature can be used to automate database backup as daily, weekly, and monthly in following locations.
Schedule backup in local folder
Schedule backup in FTP location
Schedule backup in local folder
Schedule backup in FTP location
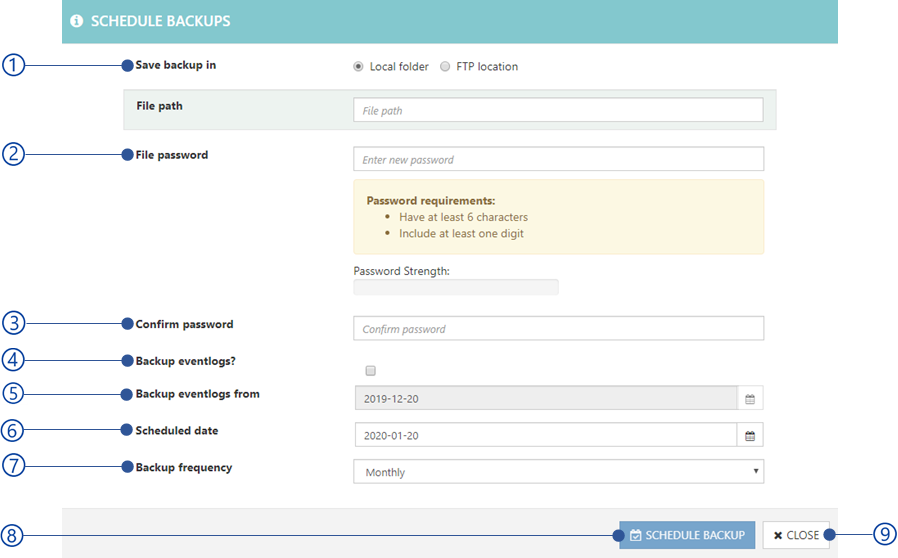
Figure 222 Schedule backup in local folder view
Saving backup in either local or FTP folder. Refer
File password
Password must have at least 6 characters with one digit.
Confirm password
Backup event log
Check this option to backup all event logs
Backup event log from
If the Backup event log option is checked, select the date from which date event logs must be included.
Schdule date
Backup frequency
Backup fequency as daily, weekly or monthly.
Schdule backup button
Execute button will be disabled if the mandatory fields are empty or Validation errors exist. Table 50 is showing the errors could be occurred.
Close button
Error code |
Error message |
1003 |
Unable to connect with the FTP server {server name} |
3003 |
Password does not match. |
3004 |
Password must contain at least 6 characters with one number. |
2045 |
Could not email reports for the recipients. |
2046 |
Invalid FTP file path |
2047 |
Invalid FTP username or password |
View schdules
This view shows the existing email schedules and operations as follows.
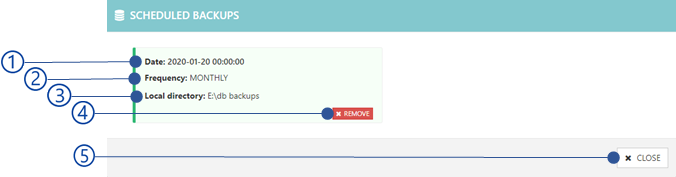
Figure 223 View schedules view
Date
Schdule date
Frequency
Directory
Local or FTP directory path
Remove button
Remove schduled backup
Close button
Local folder configuration

Figure 224 Local folder configuration view
File path
File path to the local folder
FTP folder configuration
Following details are required to enable FTP configuration.

Figure 225 FTP details view of the schedule report view
FTP host address
File path in the file system
Check this if the FTP access credentials is required
FTP Username
FTP password
Restore server databases
Refer Restore database section for more details.
Re-extract template
Note
This feature is not available for NCheck Bio Attendance Cloud server
Re-extract users biometric templates from biometric engine and re-enroll to improve recognition accuracy.

Figure 226 R-extract templates view
Re-enroll button
Refer Re-enroll templates section for more details.
Show previos extraction jobs
Re-enroll templates
Re-enorll template is a long running task depending on the number of biometric templates templates to re-enroll. But your are allowed to work as it runs on the backround. You will be asked a confirmation dialog before proceed as shown in the Figure.

Figure 227 Re-extract template confirmation window
Error code |
Error message |
2002 |
License cannot be obtained |
2048 |
Biometric re-extraction has failed on following images.
|
Delete old eventlogs
NCheck Bio Attendance Server keeps daily eventlogs of each user in the database and its causes to increase the database size with the time. Delete event logs feature can be used to manage unwanted eventlogs details in the database as follows.
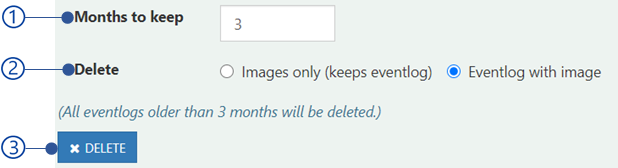
Figure 228 Delete old eventlogs view
Months to keep
Number of months to keep eventlogs in the database
Delete
Delete image log either with image or delete the eventlog image.
Delete button
Import data
Following information can be imported as a zip with the file hircahy as mentioned in Import and Export information section.
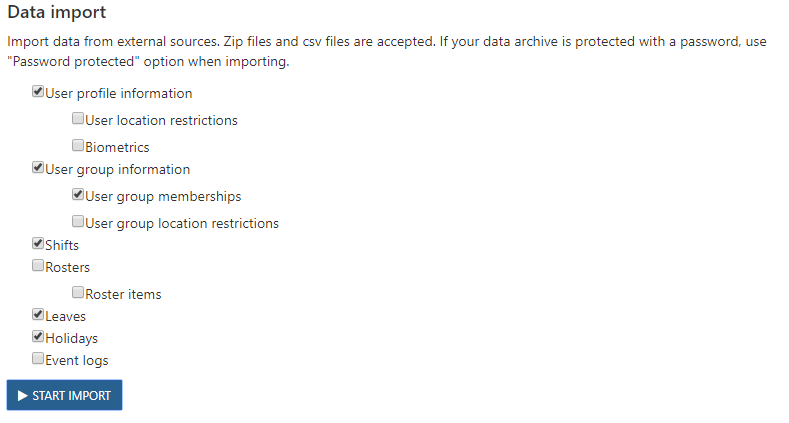
Figure 229 Admin tasks import data view
To import,
Select information need to import
Select Start import button to select import location as mentioned in Select import location section.
Export data
You are allowed to export following information as password protected zip file.
-
Select the date to export event log form the date
To export,
Select information need to export
Select the Start export button to select export location as mentioned in Select export location section
Admin operation logs
Administrator operation logs in the NCheck Bio Attendance On-premises server control panel such as login, logout, add event logs, modify event logs, delete event logs, add person, modify person, delete person can be seen from this feature.

Figure 230 Admin tasks admin operations logs
View logs button
Refer View logs section for more details.
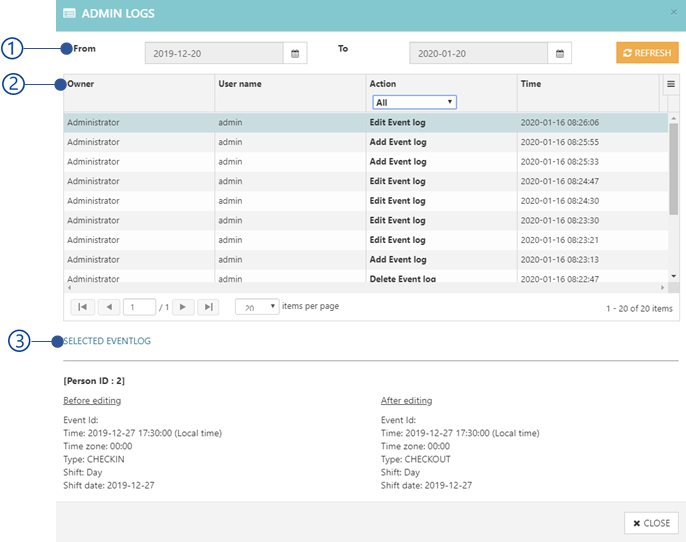
Admin logs table
Admin logs table presents all available admin logs as follows.
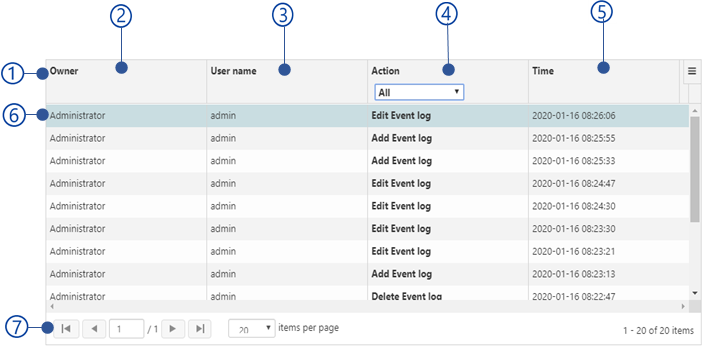
Figure 232 Admin logs admin logs table view
Owner
The role name who performed the admin operations.
Username
Name of the administrator.
Action
Login
Logout
Add event log
Modify event log
Delete event log
Add user
Edit user
Delete user
Date and time
Selected admin log
Selected admin log detail are shown in admin log quick view.
Subscription
Note
Subscription is not available on NCheck Bio Attendance On-premises server.
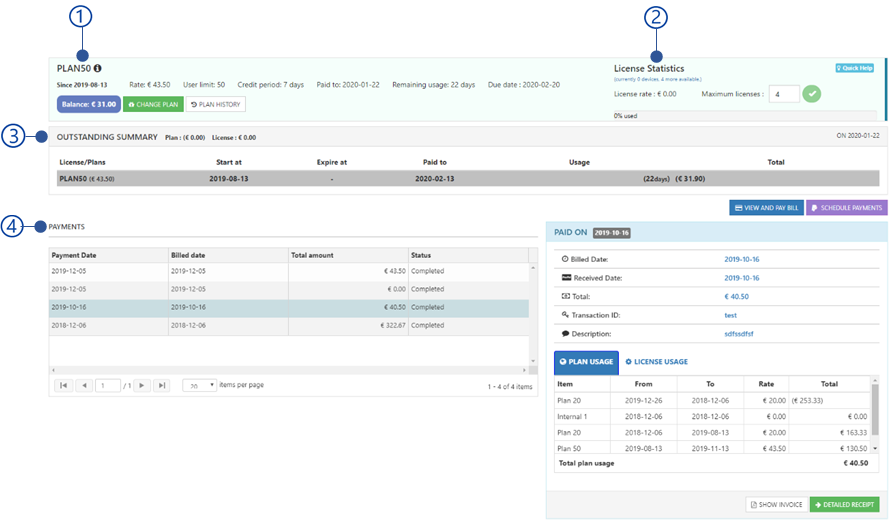
Figure 233 Cloud subscription view of web control panel
Plan statistics

Figure 234 Subscription plan statistics
Plan code
Plan started date
Rate
Price per month in euros
User limit
Maximum number of user limits of the plan.
Credit period
Extension period to make the payment once the plan has expired. The account will be blocked automatically exceed the credit period.
Paid to
The plan has been purchased for this date.
Remaining usage
Remaining usage of the plan for the existing balance.
Due date
Expiration date of the plan after exceeding the Remaining usage and credit period.
Balance
Balance for the current date.
5.18.1.1 Change plan
This view allows to change the NCheck Bio Attendance plan as follows.
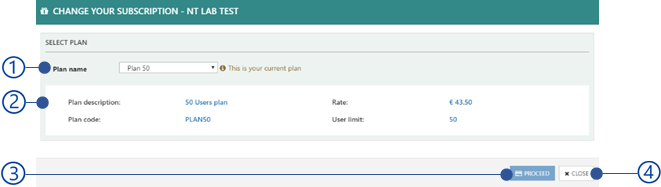
Figure 235 Change plan window
Cloud plan list
Refer Cloud plans section for more details about cloud plans. The available plans are
Free plan
Plan 20
Plan 50
Plan 100
Plan 200
Plan statistics
Proceed button
Proceed button will be disabled with the errors are shown in Table 52 .
Close button
Error code |
Error messages |
2049 |
Your current subscription has blocked. Please settle the outstanding amount and try again. |
2050 |
Customer has blocked. Please contact NCheck Bio Attendance support. |
5.18.1.2 Plan details history
Plan history window shows following information.
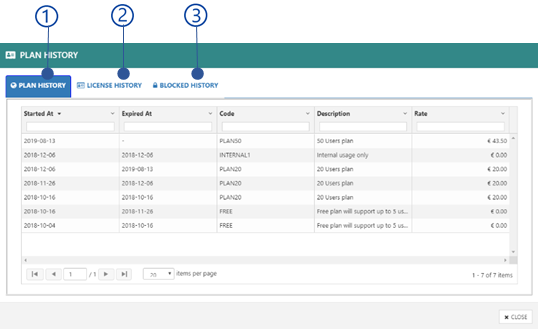
Figure 236 Plan history window
Plan history
Plan history is showing all the plans used previously and the currently using plan.

Figure 237 Plan history view
Stated at
Expired at
Plan code
Description
Plan rate
License history
License history shows all licenses currently in used and used before with following information.
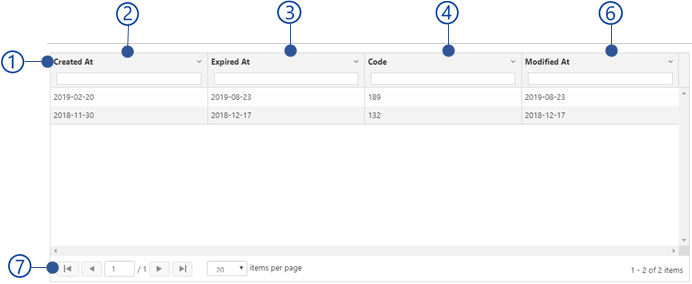
Figure 238 License history view
Created at
Expired at
Plan code
Modified date
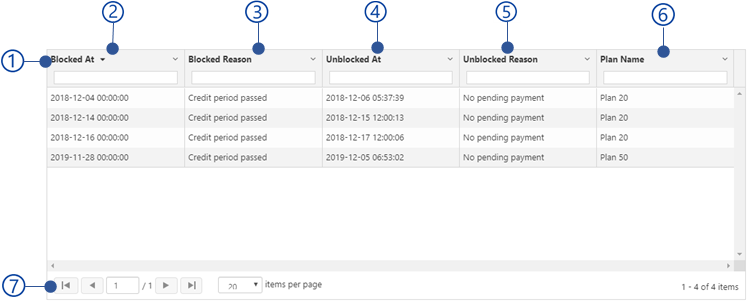
License statistics
NCheck Bio Attendance Internet license(s) ca be purchased in order to use with NCheck Bio Attendance standard clients devices. Administrator allows to change Maximum number of licenses. The amount will be calculated to the maximum License count.
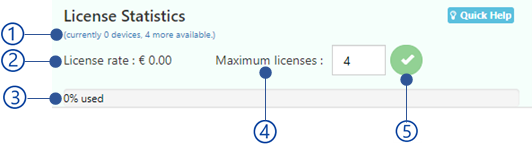
Figure 240 Subscription license statistics view
Number of used license(s) and available license(s)
License rate in Euros.
Maximum number of licenses
Percentage of the used licensees out of maximum number of licenses
Outstanding summery
Outstanding summary is a detail view of all available payments up to current date.
Figure 241 Outstanding summery of the Subscription
Summery table
View and pay bill button
Refer View and pay bill section for more details
Schedule payments button
Refer Schedule payments section for more details
Summery table

Figure 242 Outstanding Summery table
Outstanding plan amount
Outstanding license amount
Licenses/plans
NCheck Bio Attendance Cloud server plans and clients license names with rate.
Start at
Start date of the Licenses/plans.
Expire at
Expiring date of the Licenses/plans.
Paid to
Until which date administrator made the payment Duration between plan start date and expired date/current date.
Total
Total amount for the usage.
View and pay bill
Draft bill of the NCheck Bio Attendance cloud subscription can be generated using this view.
Figure 243 View and pay bill view
Reference number of the bill
Export to PDF
Neurotechnology company logo and contact information
Draft view of the bill
Proceed button
Once you select procced button you will be directed to the detailed receipt. Refer Proceed for payments section for more details. Before proceeding make sure that you have not pay the bill before. Because it will take time to update billings after completed the payments.
Close button
Delete button
Delete the generated bill.
Bill view

Figure 244 Draft view of the bill
Bill generated date
Customer name
Customer email address
VAT number
Customer address
Item description
Plan/licenses name
From
The bill start date, total amount of the plan/license calculated from
To
The end date, total amount for the plan/license calculated to
Plan rate
Total
Total plan usage
Vat
Total amount for plan/license usage in Eur
Proceed for payments
Once select the proceed button, user will be directed to the detailed bill shown as Figure 246 . Once select the Pay bill button, user will be asked a confirmation message as shown Figure 245 before proceed to the PayPal payment gateway.
Figure 245 Payment confirmation window

Figure 246 Detailed bill view
Schedule payments
All the payments can be scheduled on selected date to pay cloud plan outstanding amount automatically using PayPal.
Figure 247 Confirm PayPal subscription window
Current subscription details
Plan rate
User limit
Number of licenses
Current plan
Calendar view to select schedule payments
Selected date
subscribe and schedule button
After select subscribe and schedule button, user will be asked a confirmation messages as shown in Figure 247 . Select OK button to procced PayPal to subscribe the monthly payments.
Close button

Figure 248 create PayPal subscription view
Note
NCheck Bio Attendance will not save your PayPal username and password. Do not close the browser tab until you redirecting to NCheck Bio Attendance after payment completed in PayPal.
Payments
All pending, completed, failed payments are showing in this view.
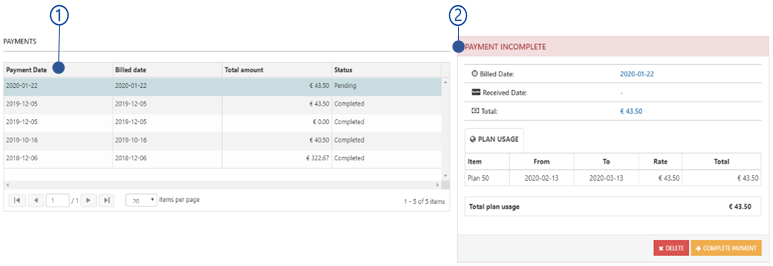
Figure 249 Payments view
Payments table
Payment table presents all failed, pending and completed payment details as follows.
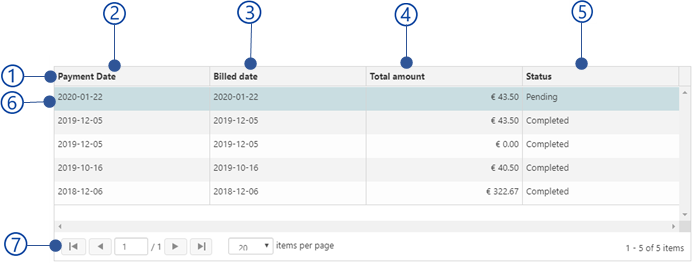
Figure 250 Payments table
Payment date
Billed date
Total amount
Status
Completed
Failed
Pending
Selected payment
Selected payment details are shown in Payment quick view .
Payment quick view
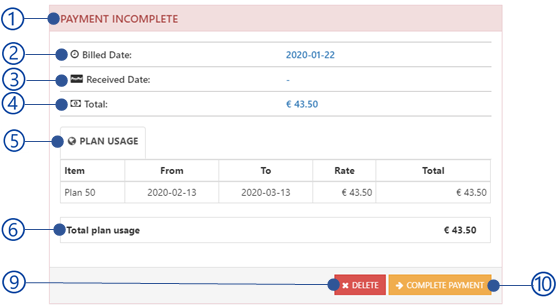
Figure 251 Payment incomplete view
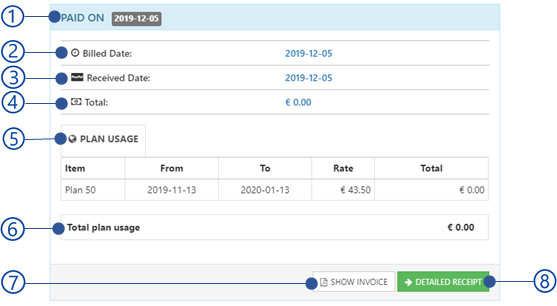
Figure 252 Payment completed view
Payment status
Completed
paid date is appeared
Failed
Pending
Billed date
Bill created date
Received date
Payment received date
Total
Plan usage
Item
Plan name
From
To
Rate
Total
Total plan usage
Show invoice button
Detailed receipt button
Delete button
Delete pending payment
Complete payment button
User will be directed to the detailed receipt to proceed with the payment as mentioned in Proceed for payments section.
Users Service portal
NCheck Bio Attendance Cloud/On-premises server control panel for user allows reviewing user specific data for each user. Following operations are available for users
Manage user account
Select the user icon in the navigation bar.
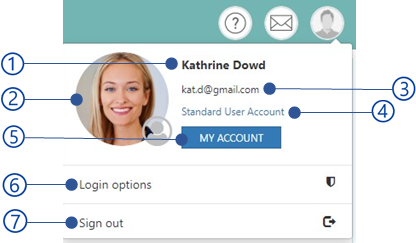
Figure 253 User management view
Username
User profile image
User email address
Account type
My account button
Refer Manage user details section for more details
Sign out
Manage user details
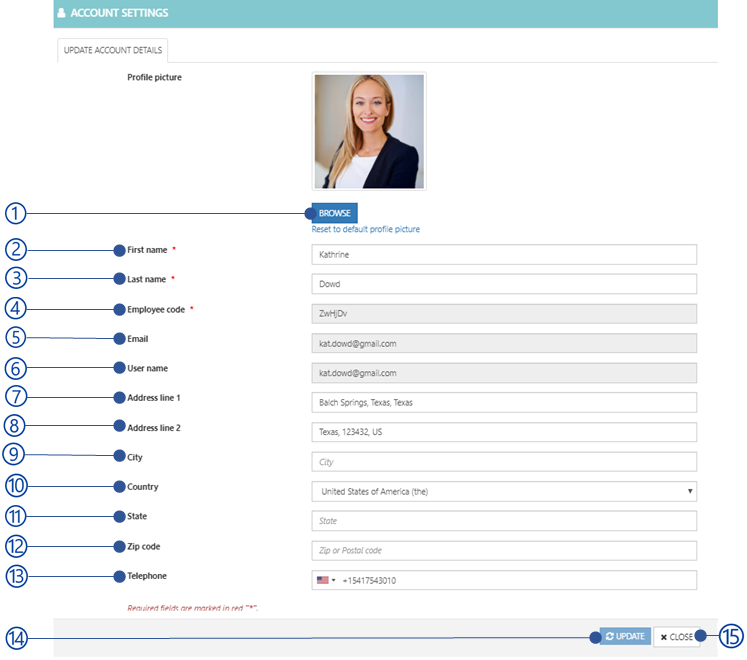
Figure 254 Manage user details
Browse button
Select the user image
First name
Last name
Employee code
Email
Username
Address line 1
Address line 2
City
Country
State
Zip code
Telephone
Update button
Update button will be disabled if the mandatory fields are empty or Validation errors exist. Table 53 is showing error messages could be occurred on updating user details.
Close button
Error code |
Error message |
3001 |
Mobile/telephone number is not valid for the selected country/region. |
3002 |
Invalid email address. |
User event logs
Event logs allow monitoring user attendances. User event log view as follow.
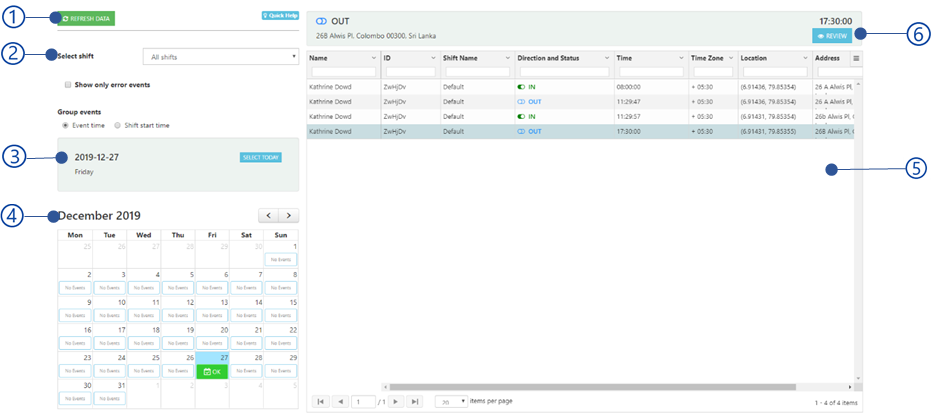
Figure 255 User event logs view of web control panel
Refresh data button
Event logs filters
Filter user event logs as follows.
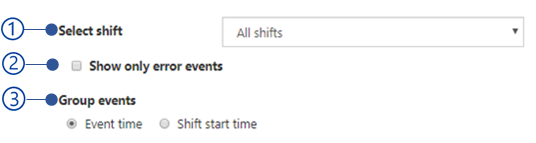
Figure 256 User event log filters view
Select shifts
Filter events by shifts. Default shift is All shifts.
Show only error events
Filter check-ins without check-outs and check-outs without check-ins.
Group events
Event time: Events will be displayed according to the check-in/checkout time in the day.
Shift time: Events will be displayed based on the shift start time and shift end time.
Calendar view
Calendar view shows following details.
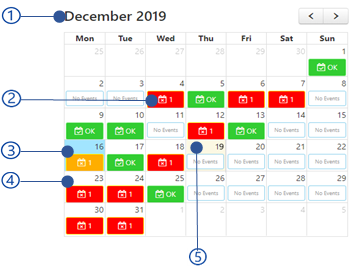
Figure 257 User calendar view
Selected month
No. of missing check-outs
Events recorded with correct check-ins and check-outs sequence.
Number. of missing check-ins
Current date
Calendar date quick view
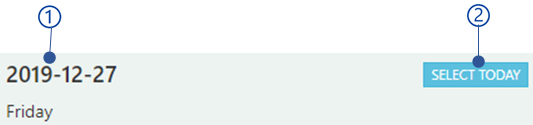
Figure 258 Calendar date quick view
Calendar selected date
Select today button
Select current date from the calendar
Event logs view

Figure 259 User event logs list view
Name
User ID
Shift name
Direction and status
Event type as check-in or check-out
Event time
Event time zone
Location
Longitude and latitude coordinates of the event location.
Address
Address of the event location
Selected event log
Selected event log detail are shown in Event log quick view
Event log quick view
Quick view of the event detail.

Figure 260 User event log quick view
Event type
Check-in
Check-out
Event location
Event time
Review button
View event log details. Refer Event log review section for more details.
Event log review
This view present user event log detail view as follows.
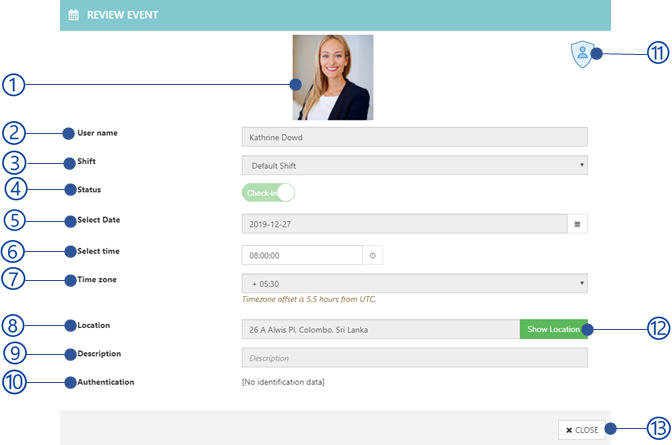
Figure 261 User review event window
Event biometric view
Username
Shift name
Status
Check-in
Check-out
Event date
Event time
Event time zone
Event location
Description
Authentication mode
Face
Iris
Fingerprint
Event recorded type as by admin or online
Show location button
Close button
Roster and schedules
The users able to monitor below details in the rosters and schedules.
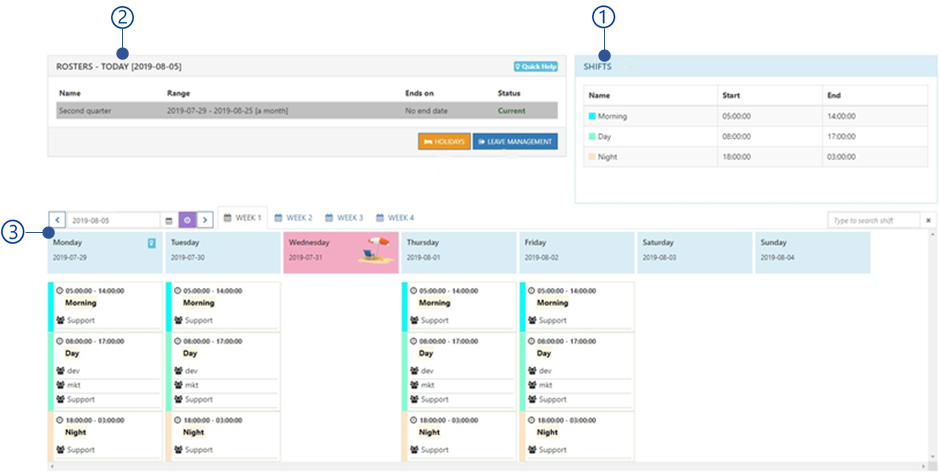
Figure 262 Shift and roster management view of user web control panel
Shifts view
Shift view shows available shifts for user.
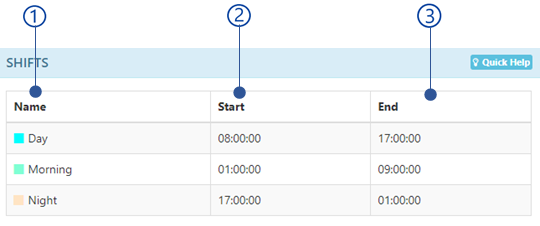
Figure 263 user Shift view
Shift name
Shift start time
Shift end time
Rosters view
All available rosters are showing in this view as follows.
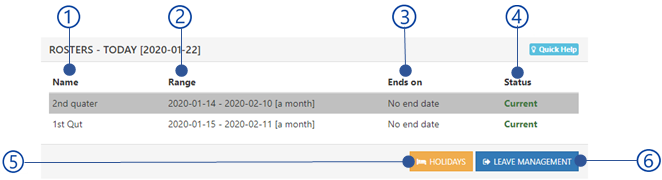
Figure 264 User rosters view
Roster name
Roster duration
End date
Status
Holidays button
Refer View holidays section for more details.
Leaves button
Refer View leaves section for more details.
View holidays
All holidays applicable for organization can be viewed here.
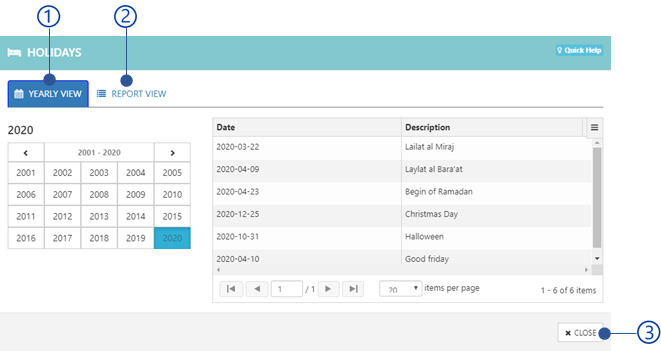
Figure 265 User holidays view
Close button
Yearly view
Yearly view of holidays as follows.

Figure 266 User holidays yearly view
Calendar view
Holiday table of user service portal
Holiday table presents all holiday details as follows.
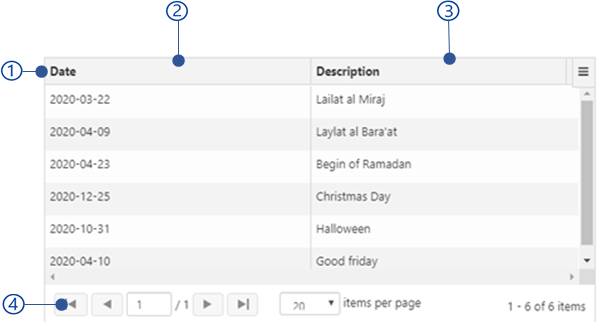
Figure 267 Holiday table view
Date of holidays
Description
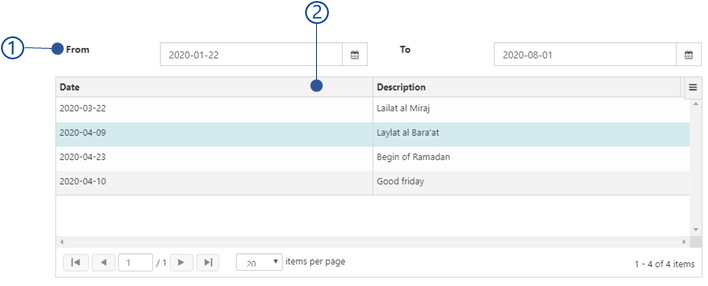
View leaves
All leaves applied by the user can be seen here.
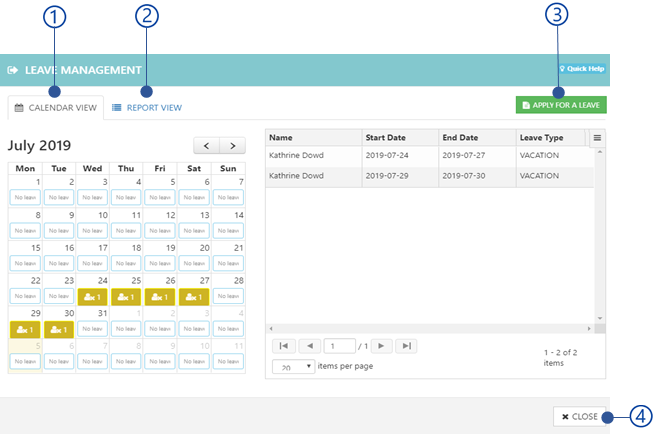
Figure 269 User leaves view
Apply for a leave button
Refer section for more details.
Close button
Calendar view of user service portal
Calendar view of the user leaves as follows.
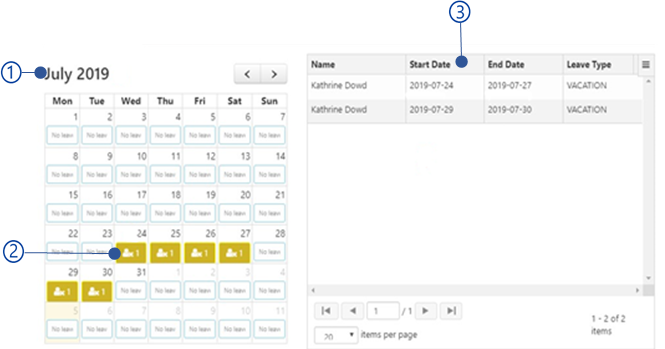
Figure 270 User holidays calendar view
Calendar
No. Of leaves applied by the user
Leaves table of user service portal
Leave table presents all user leaves details in a table as follows.

Figure 271 Leaves table view
Username
Leave start date
Leave end date
Leave type
Refer Configure leave type section for more details
Report view of user service portal
Report view of leaves as follows.
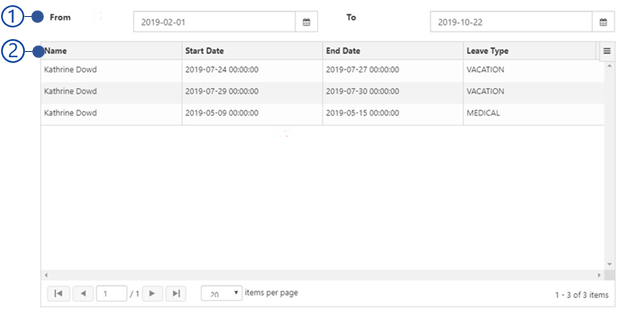
Figure 272 User holidays report view
Date filter
Request leaves
User can apply a leave request to get the approval from NCheck Bio Attendance administrator.
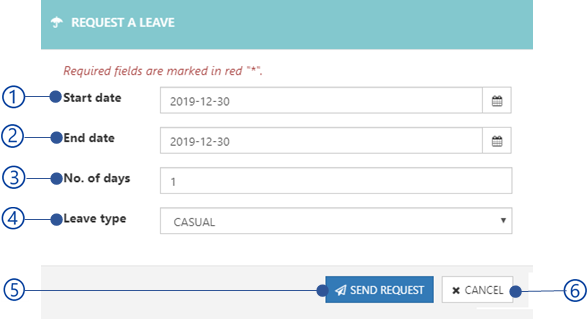
Figure 273 Request leaves view
Leave start date
Leave end date
No. of days
Number of leaves should be applied between start date and end date deprecating holidays.
Leave type
Leave type from the configured leave types as mentioned in Configure leave type section.
Send request button
Table 54 is showing error messages could be appeared.
Close button
Error code |
Error message |
2031 |
You already have applied the leave(s) for start date – end date. |
2032 |
Could not exceed the available number of leaves for {leave type name} leave type. |
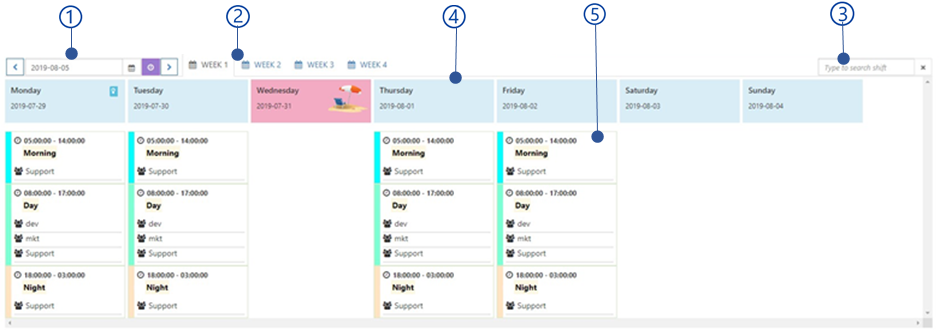
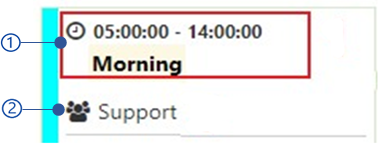
Leaves and holidays
This view allows to view user leaves, holidays and apply leaves.
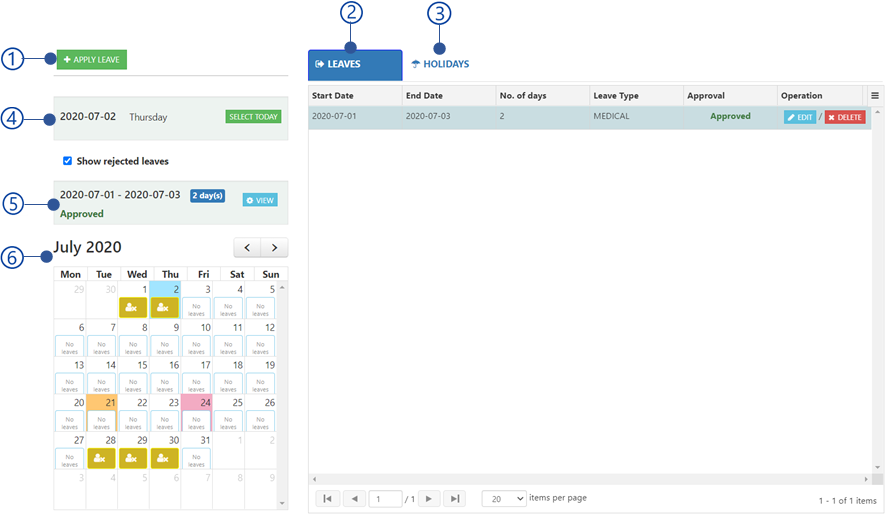
Figure 276 Leaves and holiday management view of user service portal
Apply/edit leave
User allow to apply for a leave as below.
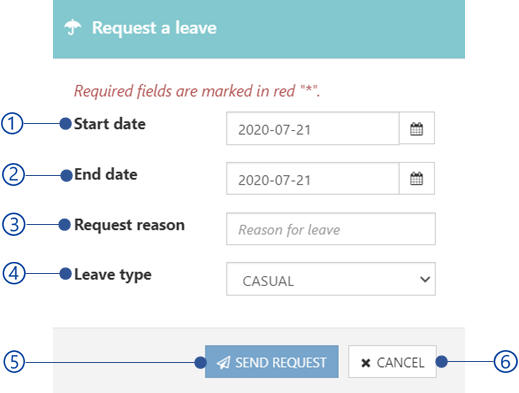
Figure 277 Request a leave dialogue view
Start date
Leave start date
End date
End date of the leave
Request reason
Leave type
Leave type as Casual, Medical, Annual or custom leave type defined by the administrator.
Send request button
Send the leave request for Approval. Once the leave is approved or rejected, user will be get notified as shown in
Cancel button
Cancel the Request a leave dialogue.
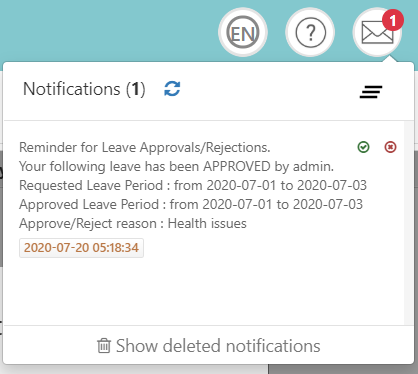
Figure 278 Leave approval notification
Leave table view
Leave table shows leaves applied by the user for the selected date in the Calendar view .

Figure 279 Leaves table view of user service portal
Start date
Leave start date
End date
Leave end date
No of day
No of days leave applied
Leave type
Leave type as Casual, Medical, Annual, or custom leave type created by the administrator.
Approval status
Approval status as Requested, Approved or Rejected.
Operation
Edit leave
Refer Apply/edit leave section for more details.
Delete leave
Delete the leaves
Holiday table view
Holiday table show holidays available for the selected date in the Calendar view .
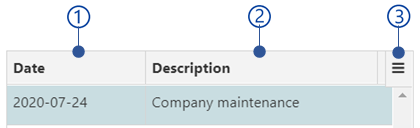
Figure 280 Holiday table view of user service portal
Date
Description
Selected date view
The details of the date are shown as selected leave from the Leave table view or holiday from the Holiday table view .
Figure 281 Selected date view
Date
The date of the selected date from the Calendar view or date of the selected leave from the Leave table view or date of the selected holiday form the Holiday table view .
Day
Select today button
Select the current date form the Calendar view
Holiday name
This will appears if a holiday selected from the Holiday table view .
Summery view of selected leave
Selected holiday view shows the details of the selected leave from the Leave table view as follows.

Figure 282 Summery view of selected leave
Leave period
Start and end date of the leave with number of days
Approval status of the leave
Approval status as Requested, Approved or Rejected.
View button
Refer section for more details.
Leave details
Leve details view shows leave details as below.
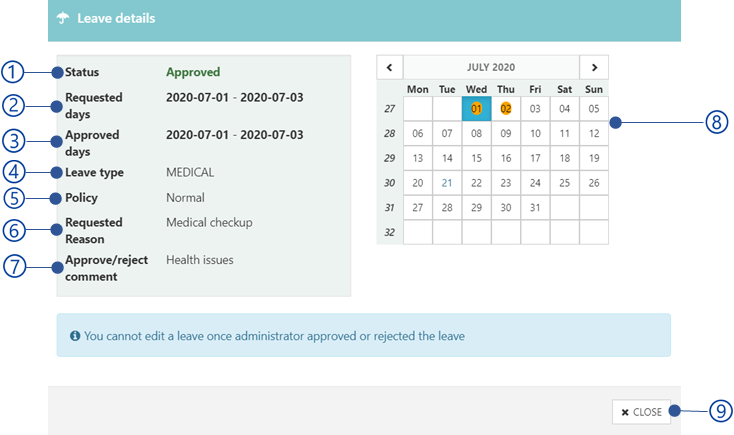
Figure 283 Leave details view
Status
tatus as Approved or Rejected
Requested days
The period leaves requested.
Approved days
The period leaves approved.
Leave type
Leave type as Casual, Medical or Annual
Policy
Leave policy as
Normal
Restricted
User is now allowed to check-in or check-out while on leave
Requested reason
Approve/reject comment
Reason for the approval or rejection from the administrator
Calendar view shows approved leave period
Close button
Close Leave details dialogue view
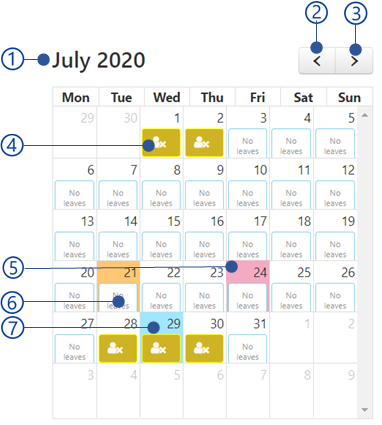
User reports
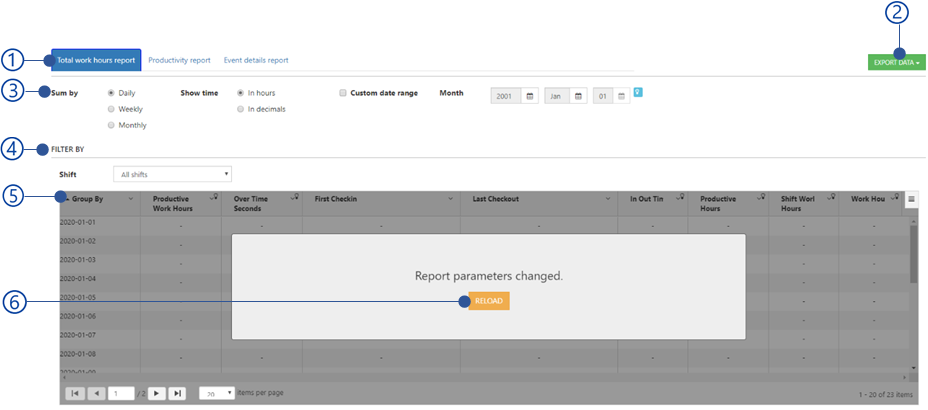
Report type
Filter by shift
Report table
Refresh button
Refresh report after applying report settings.
Report types of user service portal
Total work hour report of user service portal
The Total work hours report provides work hours details for a selected date range. That details can be calculated by daily, weekly, monthly basis. The important parameters are
Date
Name
Employee code
Productivity report of user service portal
Productivity report is generated for a selected time period with user/employee productivity parameters as follows.
Event detail report of user service portal
Event details represent all users/employees event details information as follows.
Name
ID
Shift name
Shift start
Start time of the shift.
Direction and status
Event type as check-in or check-out.
Time
Event time
Time zone
Time zone difference in hours with respective to UTC.
Location
Longitude and Latitude coordinates of the event location.
Report settings of user service portal

Report calculation strategy
Change the calculation based on Daily, Weekly or Monthly basis.
Time filter
Show time ranges in Hours format or Hours and minutes format.
Date range
This filter is not available for user detail report. The date range is changing according to the Report calculate strategy filter.
Report calculate strategy as daily
The report can be generating in months. The custom range can be enabled in days selecting Custom date range setting.
Report calculate strategy as weekly
The report can be generated in weeks. The custom range can be in weeks enabled selecting Custom date range setting.
Report calculate strategy as monthly
The report can be generated in years. The custom range can be enabled in months selecting Custom date range setting.
Export user reports
Export data in PDF and CSV formats. Available options are,
Export all data as PDF
Export complete report as a PDF.
Export all data as CSV
Export complete report as a CSV.
Export visible data as PDF
Export currently visible data in the report as a PDF.
Export visible data as CSV
Export currently visible data in the report
Common functions
Client registering view
Before record attendances in NCheck Bio Attendance Clients for Windows, Android and IOS applications, applications should be registered with a user or user group in the NCheck Bio Attendance server using a registration code. The registration window as follow.
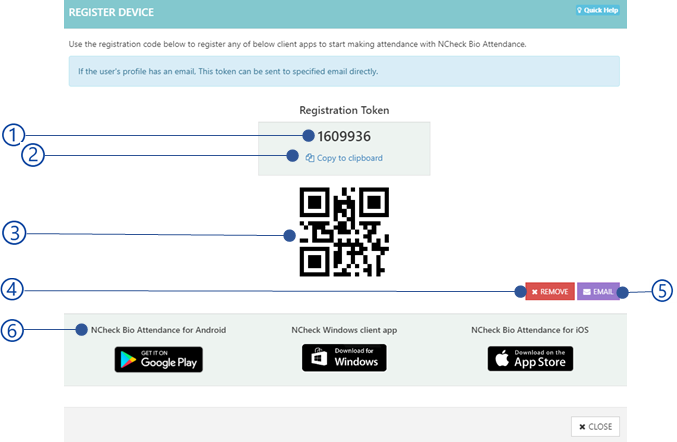
Device registration code
Copy to clipboard
Copy device registration code to clipboard
Device registration code as a QR code
Scan QR code from the client device.
Remove button
Remove current registration code to regenerate new code.
Email button
Email registration code to user/user group. Table 55 is showing the possible error messages when email registration token.
Link to download NCheck Bio Attendance clients for Android, IOS and Windows
Error code |
Error message |
2035 |
Failed to email registration token. |
Location restrictions
Location restrictions can be applied for selected user/user group in order to bound check-in/checkout events to area. Location restrictions view as follows,
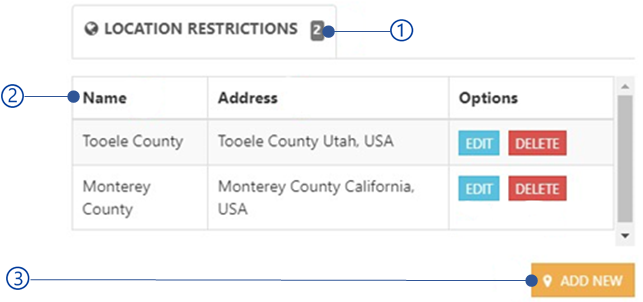
Number of location restrictions applied for user/user group
Location restrictions table
Add new button
Add location restriction. Refer section for more details.
Location restriction table
This view shows all location restrictions and operations as follows
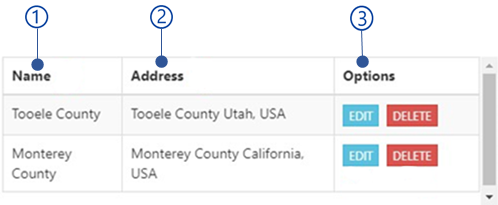
Restriction name
Address where the restriction applied
Options
Delete location restriction
Edit location restriction
Edit existing location restriction as follows.
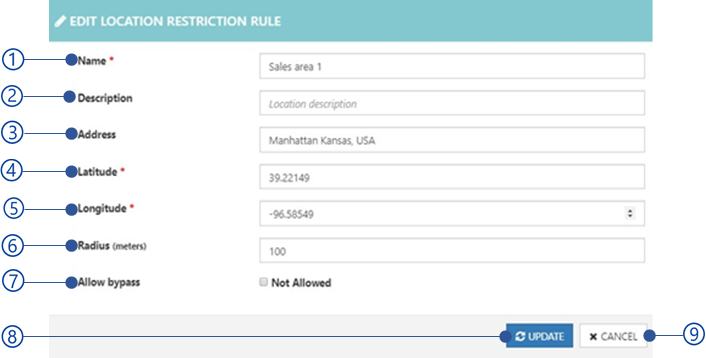
Restriction name
Description
Address where the restriction applies
Latitude
only 5 decimal places are allowed.
Longitude
only 5 decimal places are allowed.
radius
Allow bypass
Check this option to allow user to bypass the location restriction as mentioned in section
Update button
Update button will be disabled if the mandatory fields are empty or Validation errors exit. Table 56 showing error messages could be appeared when updating location restrictions.
Cancel button
Error code |
Error message |
3011 |
Only 5 decimal places are allowed in latitude and longitude values. |
Add location restriction
New location restriction can be added as follow
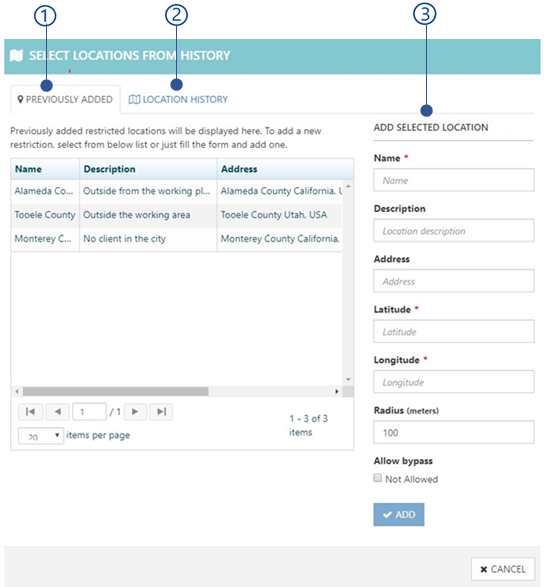
Add from previously added restrictions
Deleted or applied location restrictions can be chosen in this view. Selected location restriction is allowed to edit in the location restriction form.
Add from location history
Users event locations can be selected as location restriction in this view. Selected location restriction is allowed to edit in the location restriction form.
Add new location restriction
Refer Add location restriction section for more details.
Add new location restriction
This view allows to add new location restriction as follows.
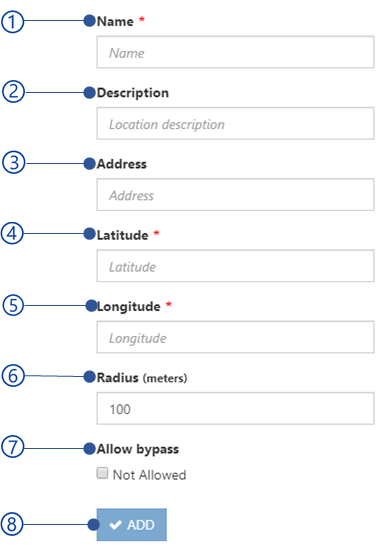
Figure 285 Add new location restriction view
Restriction name
Description
Address where the restriction applies
Latitude
Longitude
radius
Allow bypass
Check this option to allow user to bypass the location restriction as mentioned in section
Update button
Update button will be disabled if the mandatory fields are empty or Validation errors exit. Table 57 shows error messages could be appeared when updating location restrictions
Cancel button
Error code |
Error message |
3011 |
Only 5 decimal places are allowed in latitude and longitude values. |
Import and Export information
NCheck Bio Attendance user information can be export as a zip file with selected information. The zip file hierarchy as showing in Figure 286 . User biometric data is not allowed to export NCheck Bio Attendance allows to import all user information as zip file in the hierarchy as shown in Figure 286 . In addition to that it can import user information in CSV files.
Note
All exporting information is encrypting using AES 256 encryption method with given password to enhance the security of the exported information. Windows default zip extractor is not supporting to extract exported zip file. You must use third party tool which supported AES 256 encryption method to extract exported zip file.
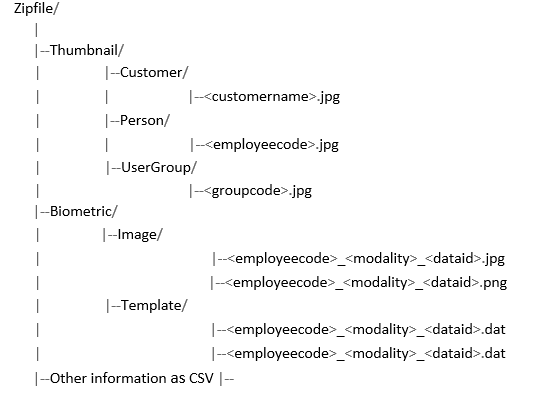
Figure 286 Import/Export zip file folder hierarchy
Note
Thumbnail and biometric cannot be exported.
Modality
Face
Finger
Iris
Data-id
Unique ID to add multiple biometric data in single modality
emp0234_face_1.jpg, emp0213_face_2.jpg, emp0435_face_3.jpg
emp0234_finger_1.jpg, emp0213_finger_2.jpg, emp0435_finger_3.jpg
Information as CSV
Information |
CSV file name |
PersonData.csv |
|
|
|
GroupData.csv |
|
MembershipData.csv |
|
TaskData.csv |
|
RosterData.csv |
|
RosterItemData.csv |
|
HolidayData.csv |
|
LeaveData.csv |
|
EventLogData.csv |
Following restrictions/limitations have been applied to import export data
Folders and images should follow the exact naming convention.
There can be only one image for customer profile in path ‘Thumbnail/Customer/’.
For each person, there can be only one profile image in path ‘Thumbnail/Person/’.
For each user group, there can be only one profile image in path ‘Thumbnail/UserGroup/’.
Customer profile image should contain the customer name and each person or group profile image should contain the relevant employee code or group code.
Biometric images should be included in the path ‘Biometric/Image’ and templates should be included in the path ‘Biometric/Template’.
Biometric image/template file name should be in ‘<employeecode>_<modality>_<dataid>’ format.
Images can be in jpg or png format. Providing the extension is not mandatory.
Other import data files (CSV files) can also be included in the same zip file. All date time should be MM/dd/yyyy h:mm: ss a format and date format should be MM/dd/yyyy format.
The file naming conventions is mandatory when importing files.
User thumbnails
User thumbnails can be imported as jpg, png format in a zip file according to the file structure as showen in Import and Export information section. Unlike other information administrator are feels free to import all user thumbnails with any other file import.
Note
User thumbnails cannot be exported.
User biometrics and template files
User biometrics and templates data can be imported as zip file as shown in Import and Export information section.
Note
User biometrics cannot be exported.
User profile information

First name
This is mandatory information.
Last name
This is mandatory information.
Employee code
This is mandatory information.
Email
primary telephone
Address1
Address line 1
Address2
Address line 2
City
Country
State province region
Zip or postal code
Created at
MM/dd/yyyy h:mm: ss a format is required.
User group information
Group code
This is a mandatory field. Group code should be unique.
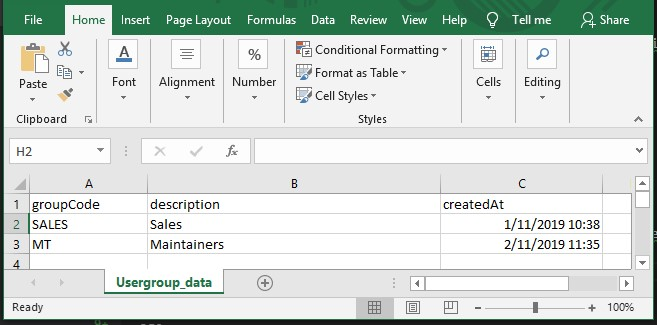
Description
Created at
MM/dd/yyyy h:mm:ss a format is required.
User/user group location restrictions information

Name
This is mandatory information
Description
Address
Created at
This is mandatory information. MM/dd/yyyy h:mm: ss a format should be applied.
Allow bypass
Employee code
This is mandatory information when importing users. Otherwise, this field should be empty.
Group code
This is mandatory information when importing user groups. Otherwise, this field should be empty.
Radius
Latitude
This is mandatory information.
Longitude
This is mandatory information.
User group memberships information
Start date
MM/dd/yyyy h:mm: ss a format is required.
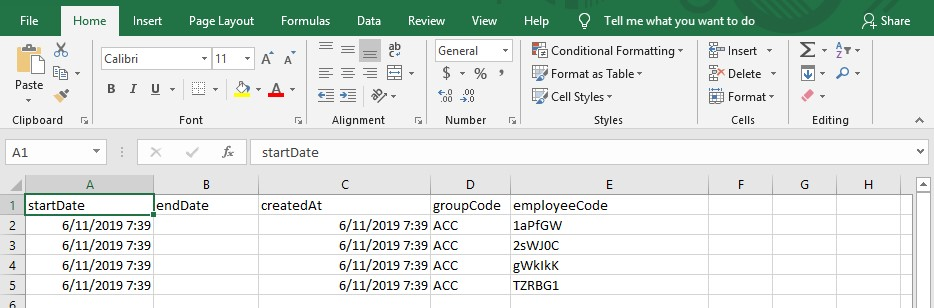
End date
MM/dd/yyyy h:mm: ss a format is required.
Created at
MM/dd/yyyy h:mm: ss a format is required.
Group code
Employee Code
Shifts information

Name
Shift name.
description
Start time second
Shift start time
Checkin start
The timestamp for the check-in start time to prevent early check-ins.
Checkin end
The timestamp for the check-in end time to prevent late check-ins.
End time second
The timestamp for shift end time
Checkout starts
Tht timestamp for the checkout start time to prevent early checkouts.
Checkout snd
Tht timestamp for the checkout end time to prevent late checkouts.
Work hours
The number of work hours user should cover in the shift.
OT star
The timestamp for overtime start.
OT end
The timestamp for overtime end.
Restrict checkin
If this is true, checkin start and checkin end restrictions will be applied.
Restrict checkouts
If this is true, checkout start and checkout end restrictions will be applied.
Restrict OT
If this is true, OT start and OT end restrictions will be applied.
Max OT
Maximum overtime overs permitted.
Rosters information
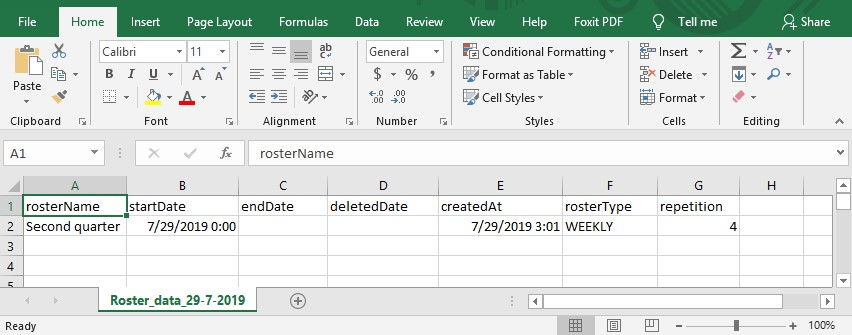
Roster name
Start date
Start date of the roster.
End date
End date of the roster.
Deleted date
This should be empty.
Created date
Specify the date for the roster create.
Roster type
Repetition
Roster items information
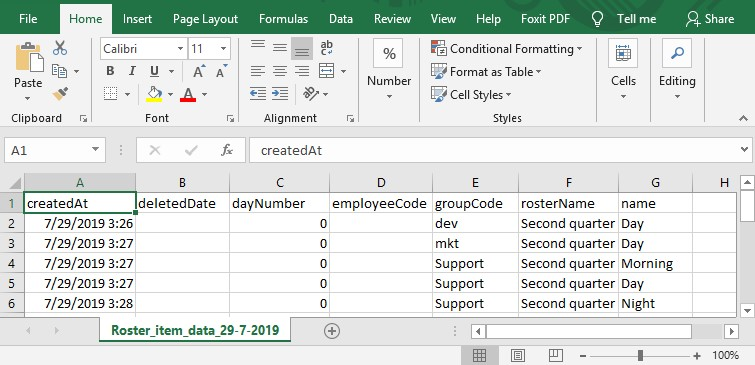
Created at
Created date for the roster item
Deleted date
Day number
Employee code
Group code
Roster name
Name
Name of the shift
Holidays information
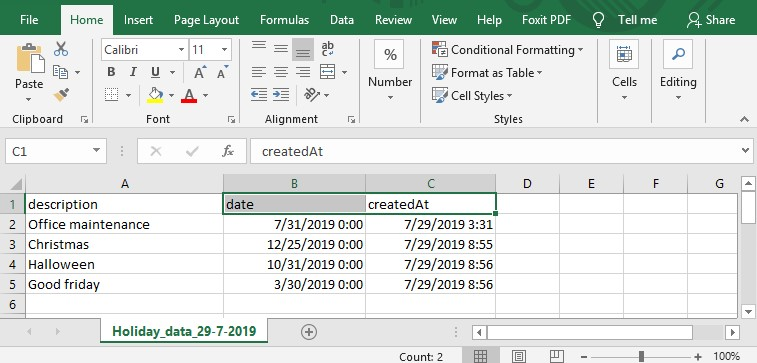
Description
Description of the holiday
Date
Date of the holiday
Created at
Created date in the server
Leaves information
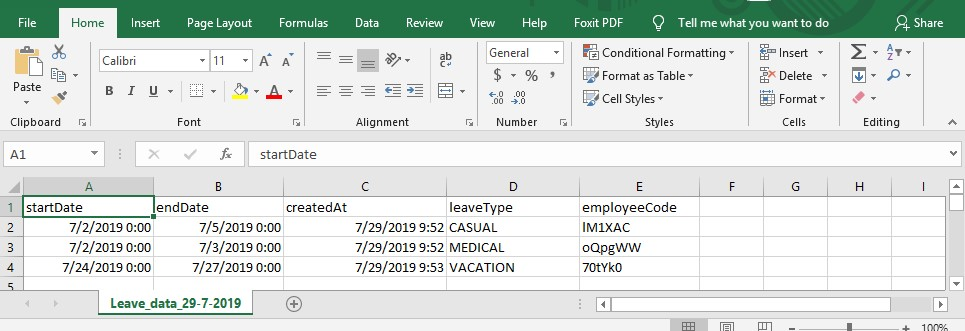
Start Date
Leave start day
End date
Leave end day
Created at
Leave created date in the NCheck Bio Attendance server
leave type
Employee code
Event logs information
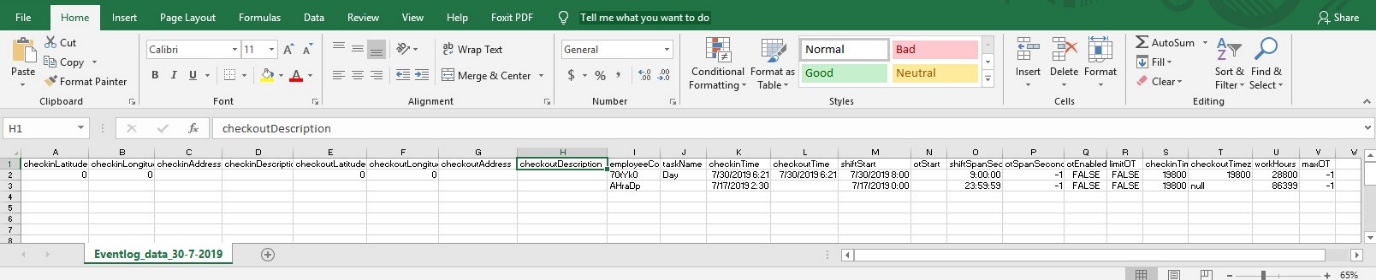
Checkin latitude
Latitude of the check-in location
Checkin longitude
Latitude of the check-in location
Checkin address
Address of the check-in location
Checkin description
Description of the checkin
Checkout latitude
Latitude of the checkout location
Checkout longitude
Latitude of the checkout location
Checkout address
Address of the checkout location
Checkout description
Description of the checkout
Employee code
Task name
Shift name
Checkin time
Date and time of the check-in time
Checkout time
Date and time of the checkout time
Shift start
Date and time of the Shift start
OT start
Shift span second
OT span second
OT enabled
Limit OT
Checkin time zone
Checkin time zone in seconds.
Checkout time zone
Checkout time zone in seconds.
Work hours
Work hours in seconds
maxOT
Select import location
This view allows to browse files In the local file system for operations in NCheck Bio Attendance system.
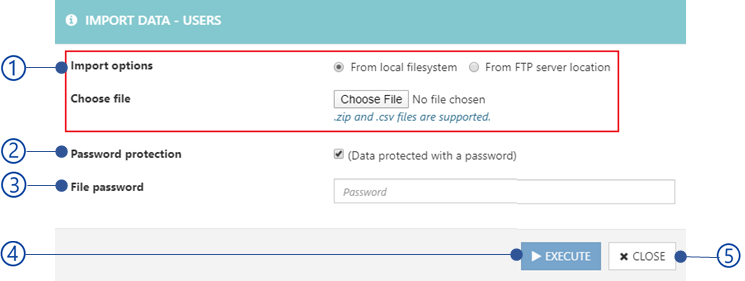
Select the import location file
Password protection
Select this check box to enter the password if the file is encrypted.
File password
Enter the encrypted password
Execute button
Execute button will be disabled if the mandatory fields are empty or Validation errors exist. Table 59 is showing error message could appeared when import files.
Close button
Error code |
Error message |
1003 |
Unable to connect with the FTP server {server name} |
2046 |
Invalid FTP file path |
2047 |
Invalid FTP username or password |
3013 |
Data import failed. Invalid password. |
4003 |
Unidentified error occurred during data import. Please contact administrator or NCheck Bio Attendance support for more details. |
Import from local file system
Choose the zip/csv file from the local file system

Select export location
Note
Encrypted files cannot be open via Microsoft Windows default extractor. You may use any third-party software which support encrypted files extraction.
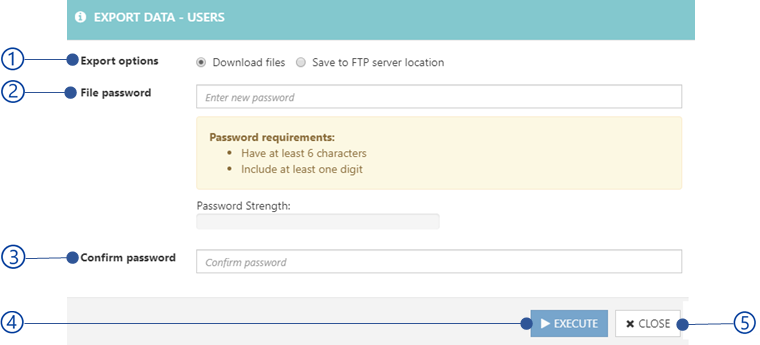
Export option
File password
The password must have at least 6 character and one digit/
Confirm password
Execute button
Execute button will be disabled if the mandatory fields are empty or Validation errors exist. Table 60 is showing the error message could appeared on import files.
Close button
Error code |
Error message |
1003 |
Unable to connect with the FTP server {server name} |
3003 |
Password does not match. |
3004 |
Password must contain at least 6 characters with one number. |
2046 |
Invalid FTP file path |
2047 |
Invalid FTP username or password |
4004 |
Unidentified error occurred during data export. Please contact administrator or NCheck Bio Attendance support for more details. |
Download exported files
Download file to the local file system.
Save to FTP location
This view allows to set FTP location details for file save operations in NCheck Bio Attendance server

Figure 288 FTP server location configuration for save exported files
FTP host address
File path in the file system
Check this if the FTP access credentials is required
FTP Username
FTP password
Report parameters
All report parameter can be explained using following figure.
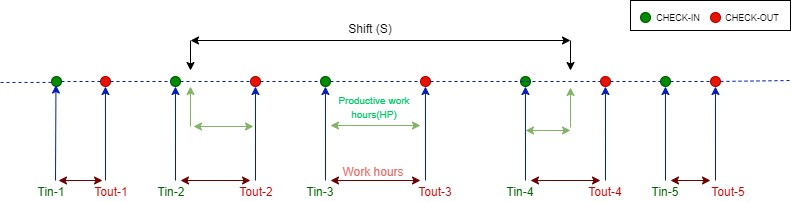
First check-in
First check-in time within the shift
Last check-out
Last check in time within the shift
Work hours
Total summation of time differences between consecutive check-ins and check-outs.
In-out hours
Time difference between First check-in and Last check-out .
Productive hours (HP)
According to the figure, productive hours can be identified as

According to the Figure this can be defined

Productive work hours (HPS)
Minimum from Productive hours (HP) and Shift work hours (HS)
Unproductive hours


Late arrival
Time difference between shift start and the first check-in when first check-in occurs after the shift start time.
Late departure
Time difference between shift end and the last check-out when last check-out occurs after the shift end time.
Early arrival
Time difference between shift start and the first check-in when first check-in occurs before the shift start time.
Early departure
Time difference between shift end and the last check-out when last check-out occurs before the shift end time.
Efficiency
The ratio between Productive hours (HP) and work time defined for the particular shift.
Event logs count
Number of events for the particular user/employee for the selected date range.
Roster item count
Number of roster items assigned for the particular user/employee for the selected date range.
Number of Leaves
Number of leaves approved for particular user for the selected date range.
Number of holidays
Number of holidays of the organization in the selected date range.
Replacements
Depending on the organization requirement such as handle the work load, manage absentees, additional employee(s) can be added to a specific roster item as mentioned in Add additional staff section. This parameter shows number of additional user(s)/employee(s) replaced for the user/employee in such cases.
Table options
The following options are available in tables using over the NCheck Bio Attendance control panel.
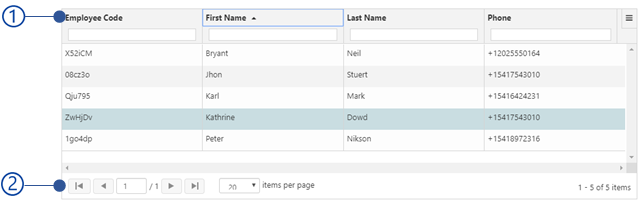
Figure 289 Control panel table view
Table header

Figure 290 Figure . Table header column view
Table column
Column sorting order as mentioned in Table 61
Column search
This field is used to filter the column content.
Icon |
Soring order |
None |
No sorting will be applied for the particular column |

|
Columns will be sorted in ascending order |

|
Columns will be sorted in descending order |
Table menu
Over the NCheck Bio Attendance control panel, list of data is representing using data tables. Following features are available in the data table.
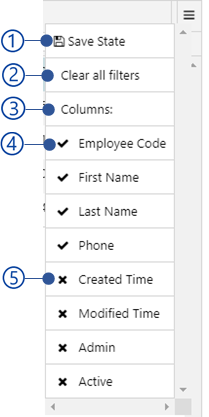
Figure 291 . Table menu view
Save state
Save the applied filters and columns in the browser cache.
Clear all filters
Clear applied filters from the browser cache.
Columns
All table columns.
Visible columns
Hidden columns
Table paging options
Table paging options allowed to prevent retrieving and loading large number of data to the table at once. These options are important to handle large data within the system without affecting the performance of the system.

Figure 292 Figure . Table paging view
Go to the first page
Go to the previous page
Current page number
Number of pages
Go to the next page
Go to the last page
Number of items for a page
The available options are 20, 50 100.
Index of the first row in the page
Index of the last item in the page
Number of items in the page
Control panel settings
Administrator allows to configure below mentioned settings in the NCheck Bio Attendance Cloud/On-premises server.
General setting list
Default shift start time
The start time of the for the default shift. Default is 00.00.00.
Default shift end time
The end time of the default shift. Default is 23.59.59.
Day start time
Time to start working/office hours. Default is 00.00.00.
Week start date
Week start day of the organization. Default is Monday.
Month start date
Month start day of the organization. Default is 1st day of the month.
Date format
Date format for the control panel and reports. Default is yyyy-MM-dd.
Time format
The time format for the Control panel and reports. Default is HH:mm:ss.
Default shift selection behavior
This option control default shift selection. The default is Allow when other shifts available. Available options are
Don’t allow
Not allowed to select default shift.
Allow when no shifts available
Allow using default shift when custom shifts are not available.
Allow when other shifts available
Allow using default shift when custom shifts available.
Auto checkout at the end of the shift
Enable this option to auto checkout user at the end of the shift automatically. This setting has disabled by default.
Notify check-in attempts on restricted leave
When this setting is applied, administrator gets email or control panel notification if a user who are on restricted (leave policy) leave tries to check-in.
Unidentified event log count to keep
Number of maximum unidentified event logs to keep in the system. Older event logs will be deleted if the maximum event log count is exceeded. Set -1 to disable this setting.
External resource URL
In NCheck Bio Attendance on-premises server, If the email sent to your inbox does not show images properly. You can keep those images in a publicly accessible location and specify URL for those images here. To refer default resource as “https://<server ip>:<port>/resources/ncheck.image?resource_name”.
Client settings list
Result dialogue timeout
Timeout for check-in/checkout result dialogue. The default value is 5 seconds.
Enable licensing
In NCheck Bio Attendance cloud, enable this setting to activate Standard clients with the cloud subscription if there are available licenses as mentioned in License statics section of the Subscription..
Show work time on clients
The display worked time in result dialogue after check-in or check-out events. This setting has been enabled by default.
Offline operation mode
Enable to record attendance in NCheck Bio Attendance Standard clients when the internet service is not available. This setting has been disabled by default.
Manual capture start
Enabling this setting, user able to manually record the event (Standard clients) or record the event as either check-in or check-out. Following capture start modes can be select once the manual capture start enabled.
Check-in check-out selection
Once this setting has selected, user able to manually select the event type as check-in or check-out.
Select start button
Standard clients capture face automatically once the face is detected. Enable this setting to capture button to capture manually.
Automatically synchronize offline data
Synchronize the offline data automatically with the NCheck Bio Attendance server when Enable offline mode setting is enabled. This setting has been enabled by default.
Offline data synchronize interval
Data synchronize interval when the Offline data synchronize interval setting is enabled. The default synchronize interval is minutes.
Allow automatic peripheral enabling of new clients
If this setting is enabled, the peripherals in the registered devices will be enabled automatically. This setting has been enabled by default.
Reset offline client password
Reset password for the control panel login in NCheck Bio Attendance Standard clients when the offline mode is enabled. Client password is empty by default.
Duplicate event timeout
The time interval between consecutive attendances record to prevent duplicate record in seconds. Default is 3 seconds.
Event log image size
Size of the biometric image when recording attendance. The biometric image is sending to the NCheck Bio Attendance server for user identification. Time took to record attendance can be depended on the size of the image. According to the selected size, image will be compressed without changing the aspect ratio. Default image size is Medium. The available image sizes are
Small
The images will be compressed to 224*224.
Medium
The images will be compressed to 512*512.
Original
The original image will be uploaded.
Note
The recommended event log image size is Medium.
KIOSK mode operation (For Microsoft Windows clients)
Enable this to open NCheck Bio Attendance clients for Windows in the full-screen mode. This setting has been disabled by default.
KIOSK mode exit code
Exit code from the KIOSK mode for NCheck Bio Attendance Lite for Android can be given here. Exit code is empty by default.
Allow predefined location
This setting is used to configure the location source for the Android and IOS Lite clients need to be used when recording attendance events. The available location options are.
Always use GPS
The location coordinate will be retrieved from the GPS facility available with the device.
Prefer GPS over predefined
If the GPS facility available, GPS coordinates will be used. Otherwise, predefined location will be used as Predefined location preference of Android and IOS Lite clients.
Always use predefined
The location coordinates will be taken from the predefined location as Predefined location preference of Android and IOS Lite clients.
Self-enroll templates
If this setting is enabled, NCheck Bio Attendance Lite for Android registered for a user allows to enroll face template during attendance recording if no template has enrolled for a user. Refer Face capturing in lite client section for more details.
Hat detection feature
This setting allows to record attendance events if the user wears a hat. If the hat detection feature is enabled, attendance events will be recorded when the hat detection score from the client is greater than the Hat detection threshold . Hat detection feature available for NCheck Bio Attendance Standard clients only.
Hat detection threshold
This setting is available in NCheck Bio Attendance Standard clients when the Hat detection feature setting has enabled. Administrator can set the hat detection threshold. Attendance event will be recorded if the hat detection score from the NCheck Bio Attendance Standard clients lager than hat detection threshold.
Use in-built biometric verification on personal clients
If this setting is enabled, attendance events can be recorded in Android and IOS Lite clients using the authentication utilities available with the device. Available verification features are as follows for the devices.
Android
Either Finger or face authentication must be available with the Android device.
Finger ID or Touch ID features must be available with the IOS device.
Guard application support
To enable guard application support, this this setting must be enabled first. Otherwise, Guard application registration and other functionalities will be restricted.
Hide user list on windows client
Enable this setting to hide the Windows user result views from the Windows Standard and Lite clients.
Mask detection
This setting can be used to detect user face with a mask. Before enable face mask detection, make sure that you have selected the “Detect face mask” setting under the “Face quality” setting in biometric setting. Once the mask detection is set, NCheck Bio Attendance clients will calculate the mask detection score to perform the operations based on “Mask detection threshold” according to the selected mask detection option as below. The following settings are available for mask detection
Do not detect
Select this option to identify face without face mask.
Detect
Select this option to identify face with face mask. The detection will be indicated in the clients as follows
Table 62 Indicators for Detect mask detection option¶ Indicator of Windows Standard client
Indicator of Android Standard client
Mask detection score >= Mask detection threshold


Mask detection score < Mask detection threshold


Required
To record the event successfully, user must wear a mask. If the mask detection score is greater than the “Mask detection threshold”, attendance will be recorded successfully. The detection will be indicated in the clients as below
Table 63 Indicators for Required mask detection option¶ Indicator of Windows Standard client
Indicator of Android Standard client
Mask detection score >= Mask detection threshold
Mask detection score < Mask detection threshold


Mask detection threshold
Decrease the value, if a user face with a face mask is not identified as mentioned in “Mask detection” settings. Make sure that you have selected the “Detect face mask” setting under the “Face quality” setting in biometric setting
Biometric setting list
Allow without biometrics
This feature allows to record user attendance from NCheck Bio Attendance Lite clients simply selecting a button as mentioned in Main view for non-biometrics capture section. This setting has been disabled by default.
Manual face selection
This allows to select users for check-in/checkout when the multi-face capturing mode (Refer Lite client section for more details about multi face mode) is enabled in the NCheck Bio Attendance Lite client devices. This setting has been enabled by default.
Face liveness mode for client application
Liveness can be used to differentiate live faces from non-live faces to prevents buddy punching. Face liveness mode is None by default. When this is enable, user will be asked to follow set of instructions. If user follows the instruction correctly, event will be recorded. Available options are
Passive
In this mode, the user should hold his head still for a few seconds.
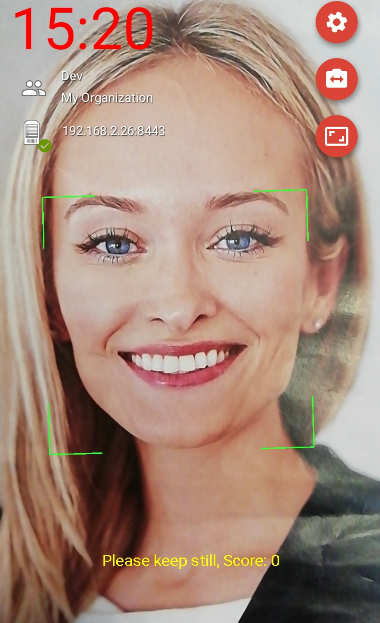
Figure 293 Android Standard client in passive liveness mode
Active
Passive and active
Both passive and active mode above is combined for better face recognition result.
Simple
Custom
None
In this mode, the face liveness check is not performed.
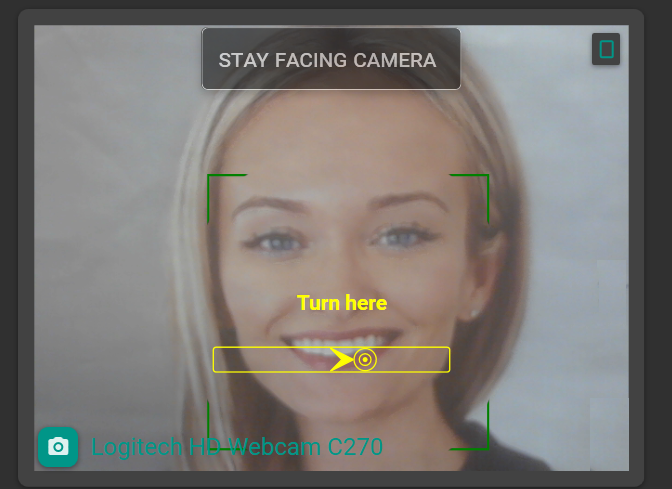
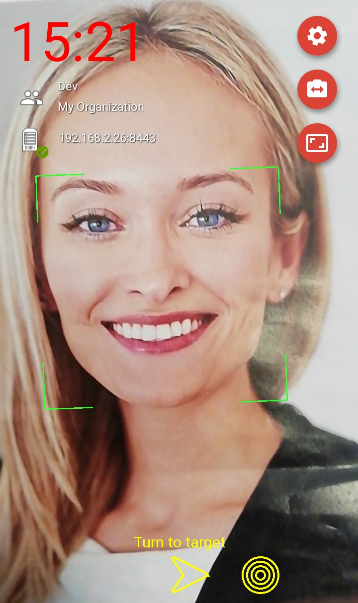
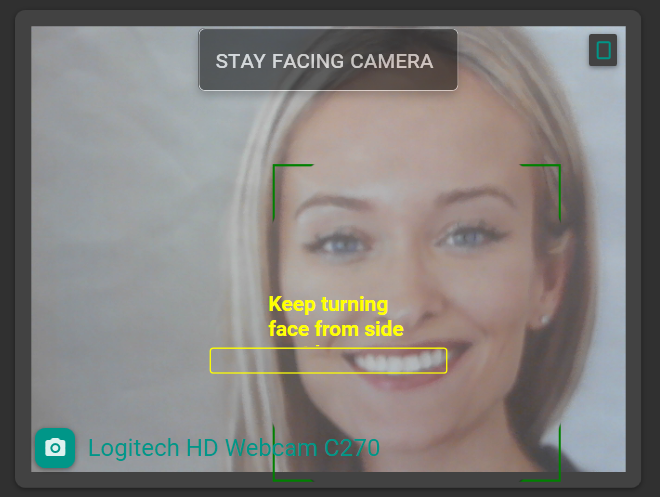
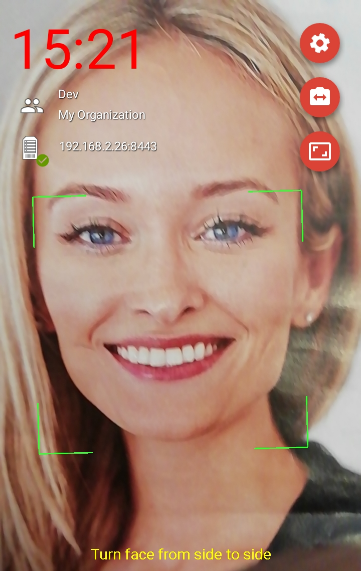
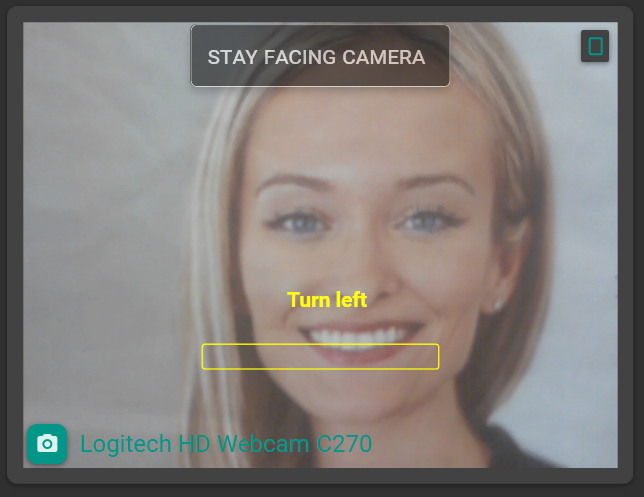
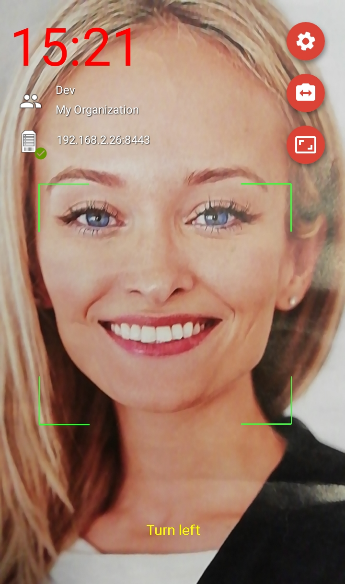
Refer Face capturing in Standard client section for more details about record attendances using liveness settings in NCheck Bio Attendance Standard clients.
Face liveness threshold for client application
The value which controls the requirements for client-side face liveness. The greater this value is the stricter rules are applied when deciding if the face is live. Default face liveness threshold value is 50.
Server-side face liveness checking
Enable this setting to differentiate live faces from non-live faces. Unlike client-side face liveness, here the server will detect the liveness of the captured face.
Server face liveness confidence threshold
The value which controls the requirements for server-side face liveness. The greater this value is the stricter rules are applied when deciding if the face is live. Default face liveness threshold value is 50.
Recognition threshold
Increase the value if same user identified differently time to time during identification. Note that good image quality is required for a higher recognition accuracy during face identification. Default recognition threshold value is 48.
Verification threshold
Increase the value if higher verification accuracy is required. Note that good image quality is required for a higher accuracy during face verification. Default verification threshold value is 36.
Enrollment threshold
Start with a higher enrollment accuracy if the system is intended to be used with a larger crowd. Default enrollment threshold value is 48.
Face confidence
Use higher face confidence for event image if good image quality is available. Default face confidence value is 40.
Face quality
Increase the value if the same user identified differently from time to time. By increasing the value, the system is forced to ignore low quality face images. Default face quality value is 40. Detect faces with mask sub setting has been introduced with face quality setting to enables face capturing waring face masks. Refer Detect faces with mask setting for more details.
Maximum face yaw
The maximum angle of the face needs to be captured by the client. Maximum face yaw can be 0- 90 degrees.
Detect faces with mask
Neurotechnology Biometric algorithms can recognize faces even the person wearing a mask. In an environment where most people wear face masks (e. g.: Hospitals) this setting will easily identify employees To enable this feature, check the checkbox “Detect faces with mask” under Face Quality setting.
Note
By enabling this setting, face quality threshold is set to 0 and you cannot change it without disabling mask mode
Face confidence for enrollment
Use higher face confidence for enrolling image if good image quality is available. Default face confidence value is 30.
Face quality for Enrollment
Increase the value if the enrolling face image duplicates with enrolled face image of another user. By increasing this value, the system is forced to ignore low quality face images. Default value is 48.
Finger quality for Enrollment
Increase the value if the enrolling finger image duplicated with enrolled finger image of another user. By increasing the value, the system is forced to ignore low quality finger scans. Default fingerprint quality value is 40.
Iris quality for Enrollment
Increase the value if the enrolling itris image duplicates with the iris image of another user. By increasing the value, the system is forced to ignore low quality iris scans. Default fingerprint quality value is 50.
Fingerprint quality
Increase the value if the same user identified differently from time to time. By increasing the value, the system is forced to ignore low quality finger scans. Default fingerprint quality value is 40.
Iris quality
Increase the value if the same user identified differently from time to time. By increasing the value, the system is forced to ignore low quality iris scans. Default fingerprint quality value is 50.
High-speed face detection
High speed face detection when the face biometric is used. This setting has been disabled by default.
Disable duplicate checking
Enable this setting to enroll same biometric image for different users.
Web interface setting list
Dashboard refresh interval
Dashboard refresh interval can be set in minutes to refresh the Dashboard to display recent attendance overview. The default refreshing interval is 2 minutes.
Show meridian in time
Enable the toggle button to show AM/PM with the time. This setting has been disabled by default.
Report export PDF font
User must select appropriate font from this setting to export report successfully according the selected control panel language. The available fonts are
Roboto (Latin)
Default font to export pdf report. Select this language to export report in any western European language.
Simsun (Chinese, Latin)
Select this font to export report in Chinese language.
Ek Mukta (Hindi, Latin
Select this font to export report in Hindi language.
Event log location map provider
Select map provider to check the map representation of users event logs as mentioned in Map view section. Available map providers are
Google maps
Baidu maps
Map API key
Add map API key to enable map representation of users event logs according the selected map provider in Event log location map provider setting.