CLIENT APPLICATIONS
NCheck visitor management client application use to register and record visitors who are coming for visit appointments. There are two types of NCheck visitor management clients
NCheck visitor management Android client
NCheck visitor management Windows client
System requirements
Client |
Requirements |
Android client |
|
Windows client |
|
Peripherals
NCheck visitor management client applications support following peripherals.
Note
NCheck visitor management installer for Windows is installing all necessary drivers to enable face, fingerprint, and iris scanners. But in case if you need additional drivers, you may need to install compatible drivers in the computer. You can download drivers for supportable camera, fingerprint, and iris scanners from scanner driver package.
Face
NCheck visitor management Android client is using cameras available with the device. NCheck visitor management Windows clients support following camera types.
USB cameras
In general, USB cameras working in Windows OS are supported.
IP cameras
Refer Neurotechnology guide for supported cameras section for all supported IP cameras. Refer Preference section for add IP cameras for NCheck visitor management Windows client.
Fingerprint
NCheck visitor management clients support external or internal USB fingerprint scanners. Refer Neurotechnology guide for supported fingerprint scanners and sensors for Windows standard client.
Iris
NCheck visitor management clients support external or internal USB iris scanners. Refer Neurotechnology guide for supported iris scanners for Windows standard client`. <https://www.ncheck.net/supported-scanners-for-ncheck-standalone-version/iris-scanners>`_
Note
By default, iris scanners are disabled for Windows standard client. To enable, unzip necessary iris scanners from the IrisScanners folder in NCheck visitor management installation folder (By default the installation folder is “C:Program FilesNeurotechnologyNCheck visitor management”)
Other
NCheck visitor management supports capturing other authentication data. Data capture is performed by using the following hardware.
Windows client |
Android client |
|
RFID |
RFID scanners |
NFC Support |
Barcode |
Using built-in camera/barcode scanners |
Using built-in camera |
Access control
NCheck visitor management clients are able to trigger external executables with given parameters as mentioned in External executables section.
Supporting Locations
NCheck visitor management uses operating system provided location services to capture the location of attendance events.
Note
For enabling location service from the operating system, please refer location service configuration for the relevant operating system.
Install clients
To install clients,
Download clients
NCheck visitor management clients application can be downloaded from download page.
Install clients
To install Windows client, refer Install for windows section for more details. To install Android client, refer Install Android clients section for more details. After successful installation, refer Open clients section for more details about opening application
Open clients
The clients, performs following tasks before starting the application.
Task |
Sub task |
Description |
Initialize app |
Check permissions |
Refer Check permissions section. |
Prepare directories |
Refer Prepare directories section. |
|
Validate data files |
Validate data files used for biometric capturing |
|
Initialize device settings |
||
Check registration status |
Check whether the application has registered or not. If not registered application will show registration view as shown in Register clients section. |
|
Initialize data service |
The data service used for communicating with NCheck visitor management server is starting |
|
Validate license |
Check network |
Refer Check network section for more details. |
Check license |
Refer Purchase NCheck visitor management license section for more details. |
|
Obtain license |
Validate the license. If the license validation failed, a valid license should be activated as mentioned in Activate license section. |
After completing all tasks, the application main view will be started as mentioned in Main view section.
Check permissions
Note
Permissions are required for Android clients only
In Android application, the permissions need to be grated to ensure privacy and security of the device data. NCheck visitor management Android clients requires following permissions.
Google play licensing check
Google Play offers a licensing service that lets you enforce licensing policies for applications that you publish on Google Play. With Google Play Licensing, your application can query Google Play at run time to obtain the licensing status for the current user, then allow or disallow further use as appropriate. Android permission “com.android.vending.CHECK_LICENSE: is using
Access location
NCheck visitor management Android client is using device location details such as GPS coordinates and address when recording attendance. This requires “android.permission.ACCESS_FINE_LOCATION” permission.
Network information
This requires “android.permission.ACCESS_NETWORK_STATE” permission. NCheck visitor management Android clients are using network information to check the network available in the device for communication
Access interment
This requires “android.permission.INTERNET” permission. Android clients requires Internet to
Communicate with remote NCheck visitor management server
License operations as mentioned in Purchase NCheck visitor management license section.
To log application and device data in remote logging service(Firebase)
Access Wi-Fi information
In mobile services Wi-Fi is frequently used to access internet. Android client uses device Wi-Fi information to check the network connectivity and indicate to user. “android.permission.ACCESS_WIFI_STATE” and “android.permission.CHANGE_WIFI_STATE” permissions are required
Access camera
“android.permission.CAMERA” permission is required. NCheck visitor management Android client is using camera for
Face capture
Record visitor capturing face biometrics, Enroll face(s) to visitor
Barcode capture
Capture visitor pass as barcode for attendance recording and appointment creation, Capture device token,
Access storage
“android.permission.WRITE_EXTERNAL_STORAGE” permission is required. NCheck visitor management Android client uses application specific external storage to keep following data
Diagnostic data
App generated log files to check application working status.
License files
NCheck visitor management Android client activated license details
Capture RFID
NCheck visitor management Android client is capturing RFID to record attendance and appointment creation. “android.permission.NFC” permission is required.
Access device power management tools
To wake up device when record attendance and create appointments. “android.permission.WAKE_LOCK” permission is required.
Receive application boot completed
Start the client automatically when device has restarted. This requires “ndroid.permission.RECEIVE_BOOT_COMPLETED” permission.
Prepare directories
Following directories are using
Log directory
Keep application specific logs to keep information about application status while using. If any problem happens, we are requesting for these logs to investigate the problem.
License directory
Keep license specific data such as license mode, license text
Check network
When application start client application is checking the valid license availability in the device. This requires a network connection as mentioned in Purchase NCheck visitor management license section. Before license check, client check network availability with the device. if the network is not available, client will hold until the network available checking the network connectivity periodically as shown below
Client |
Network View |
Windows client |
|
Android client |
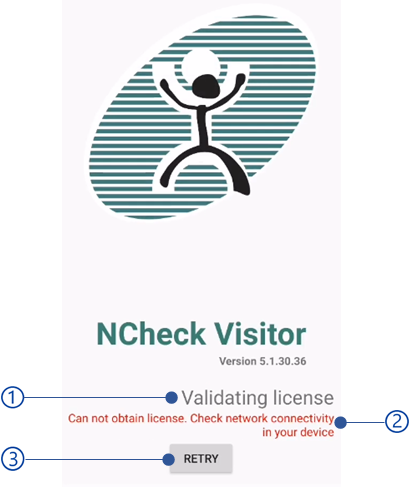
Figure 296 Android client network check¶ |
Register clients
NCheck visitor management Clients can be used with following modes
NCheck visitor management Cloud
NCheck visitor management server installed on-premises
Registration process configures the application to work with one of the above two modes. Accessing registration can be done as the following ways
Application will prompt you the registration dialogue when application start in case it is not registered
Once the device is unregistered as mentioned in unregister section.
Registration views are shown in below.
Registration ode |
Client |
View |
Cloud |
Windows |
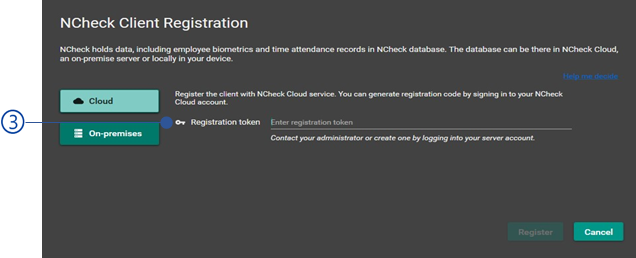
Figure 297 Windows client registration view on cloud mode¶ |
Android |
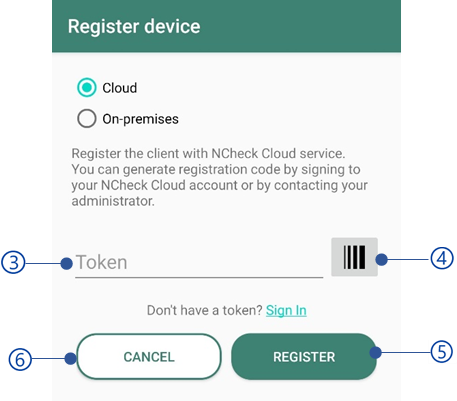
Figure 298 Android client registration view on cloud mode¶ |
|
On-premises |
Windows |
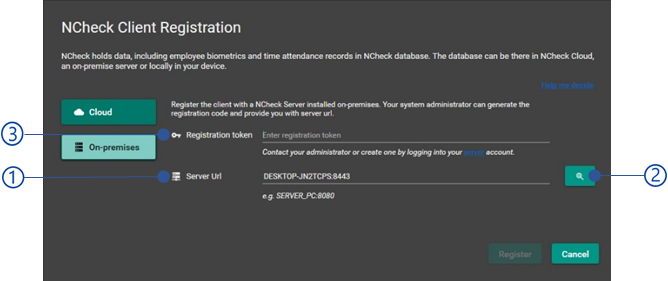
Figure 299 Windows client registration view on on-premises mode¶ |
Android |
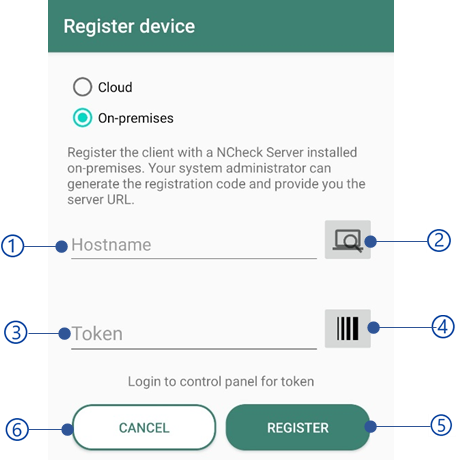
Figure 300 Android client registration view on on-premises mode¶ |
Server URL
Search server button
Select this option to detect server URL. This option works if the server and client work in same network.
Scan barcode button
Instead of entering registration token, users can scan barcode in Android client.
Register button
If the server has signed with the untrusted certificate, you will be asked to accept self-signed certificate as mentioned in SSL Certificate validation section. Once certificate accepted, it will perform all tasks ac mentioned in Open clients section again.
Cancel button
Registration token
To register clients a registration token is required. Refer Device registration section for more details about generating registration token.
SSL Certificate validation
To start the NCheck visitor management server, a valid SSL certificate must be added as mentioned in Server section. If any SSL certificate validation error occurred, you will be prompted the validation error as below.
Client |
Self-signed certificate prompt |
Windows |
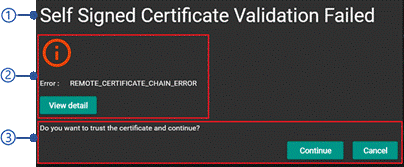
Figure 301 Certificate validation error dialog for Windows client¶ |
Android |
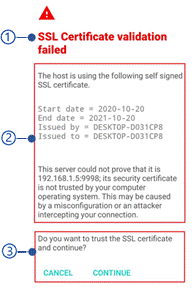
Figure 302 Certificate validation error dialog for Android client¶ |
Title of the SSL certificate validation error dialogue
Error message
Actions
Continue button
Cancel button
License activation
License activation should be performed,
In application start either no license activated or activated license has expired
Open License manager from Main menu.
Refer License and activation section for more details.
Note
Android client will be asked to force close the application either the license activated over the existing one or deactivated license
Main view
Client main view could be either Attendance view or Registration view according to the mode( Attendance mode / Registration mode ) selected when generate registration token as mentioned in Device registration section.
Client |
Main view |
Windows client |
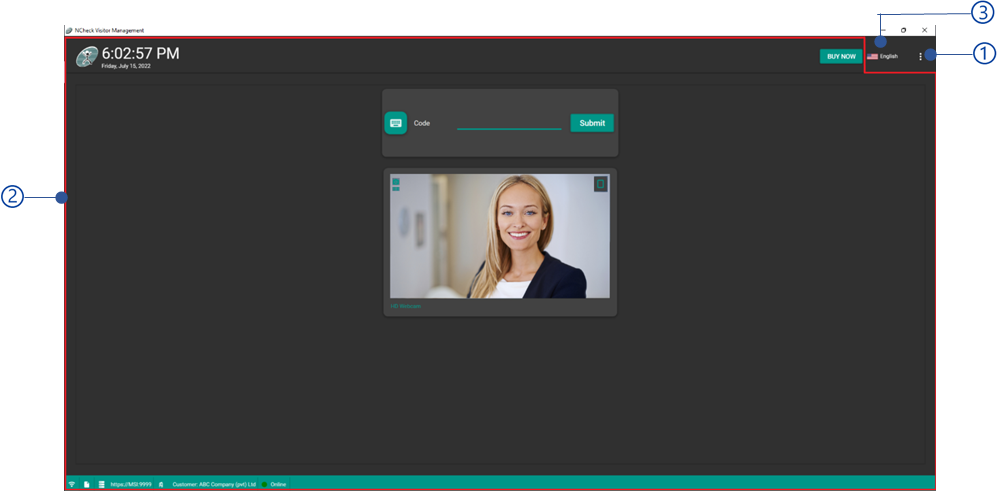
Figure 303 Main view of Windows client¶ |
Android client |
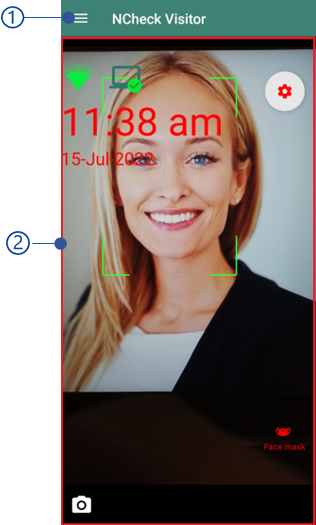
Figure 304 Main view of Android client¶ |
Menu button
Refer Main menu section.
Visitor interaction view
Language
Language of the Windows client. Available languages are
English
Chinese
Thai
Spanish
Attendance view
Client |
Main view |
Windows client |
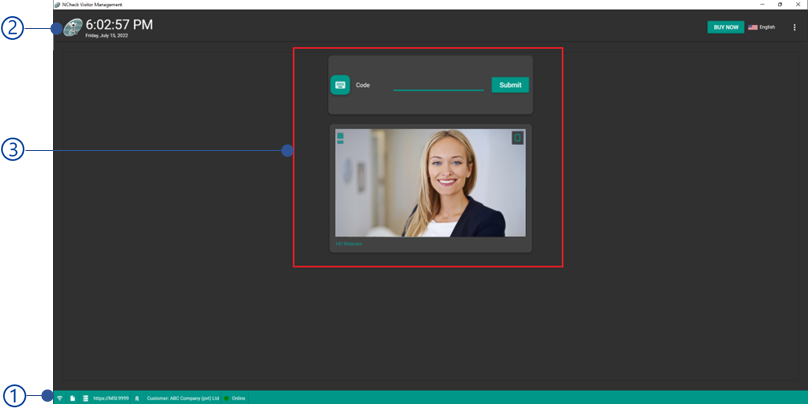
Figure 305 Attendance view of Android client¶ |
Android client |
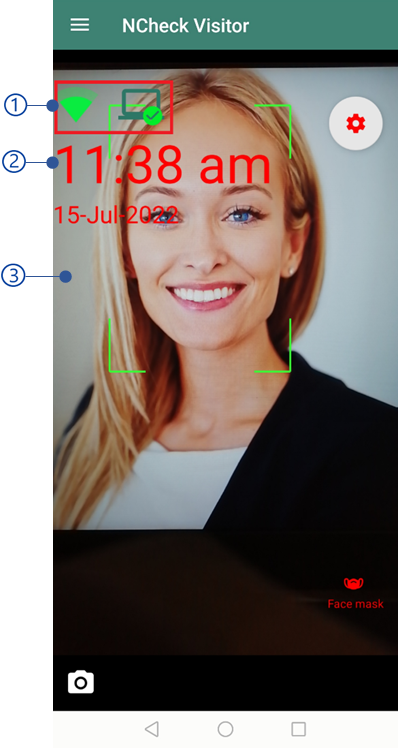
Figure 306 Attendance view of Android client¶ |
Status bar
Refer Status bar section for more details.
Date and time
Show the current time and date
Attendance capture
Attendance capture is where the visitor attendance capturing. Attendance view has following views
Attendance capture view
Attendance capture view is capturing visitor events. Using either visitor biometrics or id data. Attendance capture views have been shown below.
Client |
Attendance capture view |
Windows client |
|
Android client |
|
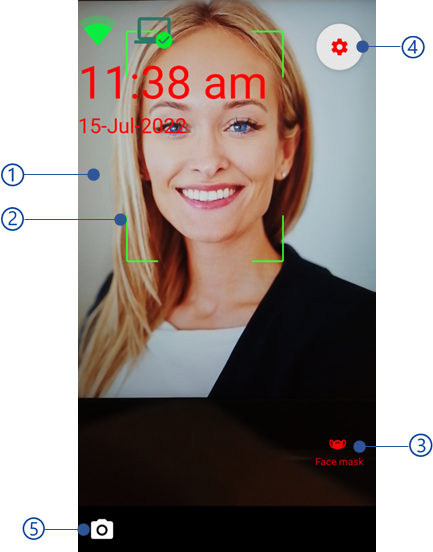
Capturing area
Face rectangle
When capturing faces, the boundaries of the faces is showing using face rectangle.
Mask detection indicator
Mask detection indicator is showing in the view according to the Mask detection setting can be applied from either web control panel Client settings or Device settings section.
Camera capturing settings
Refer Table 20 for more details.
Peripherals view
Peripheral view is showing available peripherals to capture as configured in Biometric authentication section. Refer Peripherals section for more details about peripherals.
Client |
Settings |
Settings view |
Windows client |
|
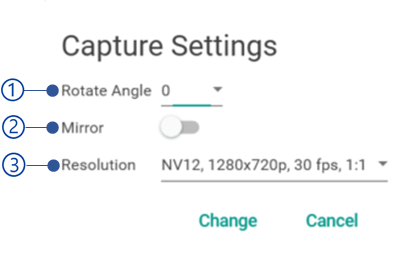
Figure 307 Camera capture settings of Windows client¶ |
Android client |
|
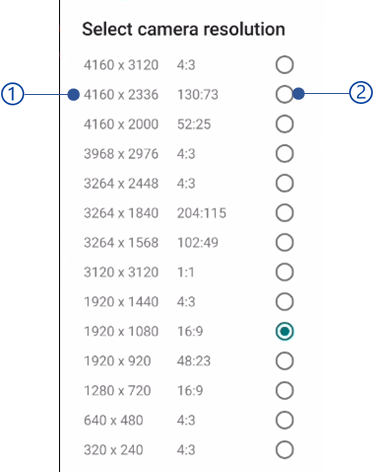
Figure 308 Resolution dialog of Android camera capture settings¶ |
Feedback view
Feedback view is the result dialog which showing to the visitor after record event successfully. The feedback view can be configured as mentioned in Custom visitor feedback view section when Add/edit/clone schedule Custom feedback view can be provided based on customer requirements as an extension. Refer Use extension section for more details about extension. The default feedback view has shown in below.
Client |
Default feedback view |
Windows client |
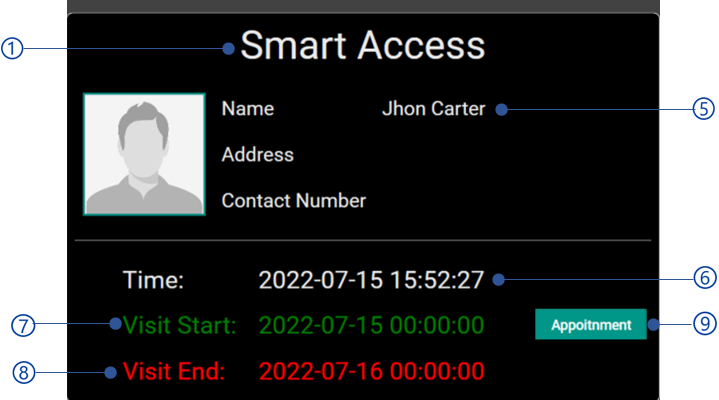
Figure 309 Windows client feedback view¶ |
Android client |
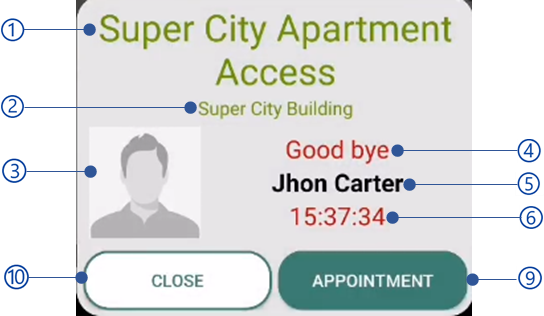
Figure 310 Android client feedback view¶ |
Schedule name
Schedule location
Visitor thumbnail
Welcome/Goodbye status
Visitor first name and last name
Event time
Appointment start time
Appointment end time
Appointment button
Open visitor appointment quick access view as mentioned in Appointment overview section to update appointment. Appointment button is visible when the attendant mode has enabled as mentioned in Login section.
Close button
Status bar
Client |
Status bar view |
Windows client |

Figure 311 Status bar view of Windows client¶ |
Android client |

Figure 312 Status bar view of Android client¶ |
Network availability
License status indicator
Shows the current license obtaining status as licensed, trial or expired.
Server indicator for cloud, on-premises, and standalone mode.
Mode |
Windows client Indicator |
Android client |
Cloud |

|

|
On-premises |

|

|
Server and port
URL and port of the connected server in cloud, on-premises or standalone mode
Schedule location
Customer name
Connectivity status with the server indicator in cloud and on-premises mode as shown in below.
Table 24 Online/Offline statuses of Standard clients¶ Status
Description
Android standard client
Windows standard client
Online
Connected with the server


Offline
Cannot connected with the server


Registration view
Registration view can be configured using either registration token generated for Registration mode as mentioned in Device registration section or Client mode setting in Device settings sections. NCheck visitor management has provided default registration pages. Customer can request custom registration pages and add to the system using NCheck visitor management extension. Refer Use extension section for more details. NCheck visitor management default registration page layout contains following details.
Figure 313 Registration page layout
Page header
Page sub header
Back button
Navigate to previous page
Reset button
Reset all the data and go to the start page
Registration page content area
Current date
Current time
NCheck visitor management registration page can be configured with following pages
Common booking page
Schedule booking page
Overhead display
Common booking page
The common booking page allows to filter and select schedule from the appointment from available a mentioned in Filter schedules section. Once the schedule select, visitor may ask to give certain detail and appointment will be created.
Appointment detail views
While creating appointment, following information may ask from visitor
Visitor pass
Visitor pass view is showing to take and validate visitor pass when pre-printed pass is using according to the selected Visitor pass generation method of Enr section.
Registration page layout as shown in Figure 313
Visitor pass field
Keyboard to enter visitor pass
Scan
Scan visitor pass as barcode/RFID as configured in Pass type setting of Add/edit/clone schedule section.
Enroll biometrics
Enroll biometrics when create appointments for visitor identification. The biometric can be configure as Face, Finger, Iris or None as configured in Biometric collection setting of Add/edit/clone schedule section. If the biometric collection is None, this view will be skipped.

Registration page layout as shown in Figure 313
Capture button
Select capture button to show biometric capturing from client.
Capture biometrics thumbnail
To remove button select remove button in the top right corner of the thumbnail.
Next button
Navigate to next detail view.
Note
In simple biometrics and smart access scenarios, the appointment will be created without asking visitor details. once biometric captured.
Appointment time
Select appointment start and end time.
Registration page layout as shown in Figure 313
Appointment start and end time
Select appointment start and end time for the appointment if Allow change appointment time setting has enabled as mentioned in Add/edit/clone schedule section. Default value of the appointment start and end time
If the Slot time is equal to 0, schedule start and end time.
If the slot time is greater than 0, Selected time slot start and end time as mentioned in time slot view section.
Change appointment date
Change appointment date from available dates.
Time slot view
Refer Time slots section for more details.
Next button
Navigate to next detail view
Select seats
Note
This view is available in Travel and Entertainment visit scenario.
This view allows to the select seats from available as configured in Add/edit/clone schedule section.
Figure 314 Select seats view
Registration page layout as shown in Figure 313
Seat types
Seat selection view
Click on each box those are not occupied to select seats
Checkout details
This will show the selected seats for each seat categories with pricing. Select checkout button to navigate next view
Visitor details
To enter visitor details and submit the appointment
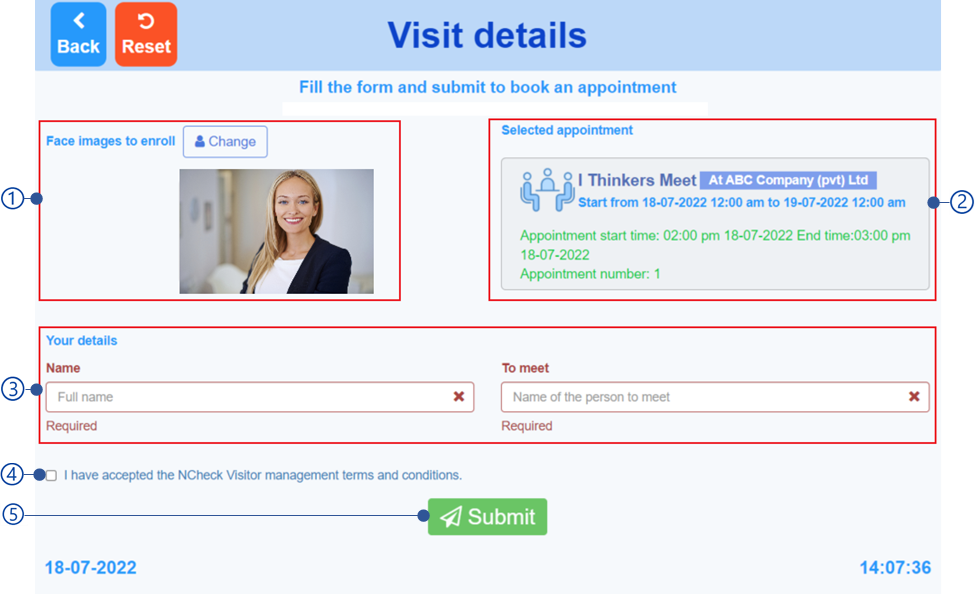
Figure 315 Visitor details view
Captured biometrics details
Select change button to navigate back to Enroll biometrics .
Appointment detail quick view as shown in Figure 316
Appointment start and end time as selected in Visitor details
Appointment number
Visitor form view
Refer Visitor form section for more details.
NCheck visitor management terms and conditions
Accept terms and conditions by click on checkbox.
Submit button
Submit appointment. Once appointment created it will show the confirmation dialog as shown in Figure 317 .
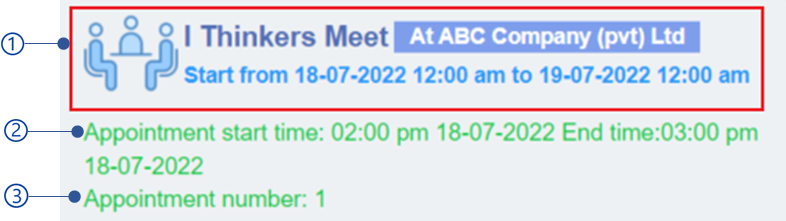
Figure 316 Appointment detail quick view
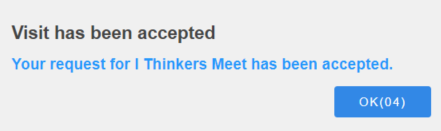
Figure 317 Appointment confirm dialog
Scheduled booking page
Registration view can be configured to show specific schedule. Therefor visitor can start on Appointment detail views conveniently without selecting the schedule.
Overhead display
Overhead display page is using to show the current appointment numbers of the schedule. It can be configured to the selected schedule. Once configured, the page will appear in the client and start to show the appointment numbers for current in-progress or to be started schedules. Once the Appointment completion status changed as completed, cancelled or back to original, the view will update the appointment number automatically every 10 seconds.
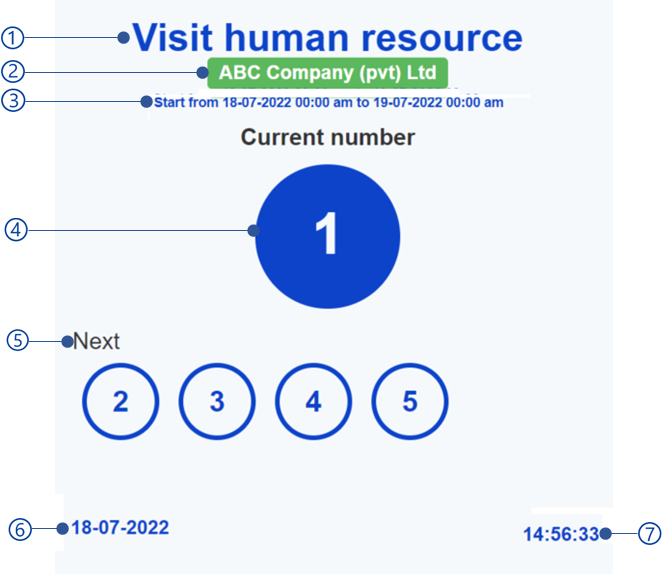
Figure 318 Overhead display view
Schedule name
Schedule location
Schedule start and end time
Current in-progress appointment number
Next appointment number list
Current date
Current time
Main menu
Client |
Menu |
Windows client |
|
Android client |
Login
NCheck visitor management attendants are allowed to login to the clients using their NCheck visitor management username and password and operate the client attendant device. In attendant mode, attendants allow to manage visitor appointments as mentioned in Feedback view section.
Control panel
Once attendant logged-in to the system as mentioned in Login section, this control panel menu item will be visible. Attendant allows to browse control panel and perform actions allowed for attendant role.
Re-register
Reregister clients as mentioned in Register clients section.
Note
Re-register is available in Windows client only
Unregister
Unregister option performs followings in client and server if user select OK button from the unregister device confirmation dialog as shown in Figure 319 .
Unregister client from the server ad clear registration details from the client
The client will be unregistered from the server. If any case that server is not reachable, user can clear out the registration detail from the device if user select OK button from the unregister device confirmation dialog as shown in Figure 320 .
Deactivate server license
Deactivate license if client is using server license as mentioned in Purchase NCheck visitor management license section.
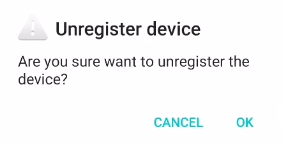
Figure 319 Unregister device confirmation dialog
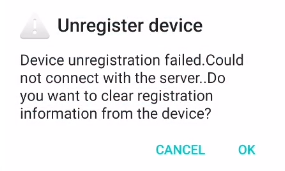
Figure 320 Unregister device on device registration failed confirmation dialog
Note
After unregistering the client, the client should be registered again as mentioned in Device registration section and activate license if server license deactivated as mentioned in Activate license section.
Diagnostic data
Diagnostic data contains the client specific logs and license information to investigate application specific bugs if there any. Diagnostic data file will be downloaded to the download folder once select OK button in generate diagnostic data confirmation dialog.

Figure 321 Generate diagnostic data confirmation dialog
Synchronize
Keep synchronize the server-side device settings changes applied from Settings section and Device settings and with the client.
License manager
Activate and deactivate client license as mentioned in Activate license and Deactivate license sections.
Buy now
This option will be open the NCheck visitor management pricing information if the client is using a trial license as mentioned in On-premises server and client license section.
Check form updates
Update the application from the google play store when new version has published.
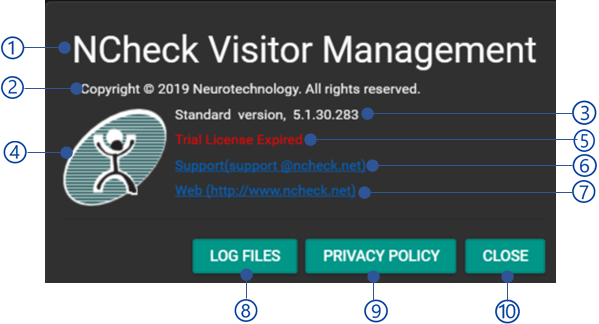
About
Client |
About view |
Windows client |
|
Android client |
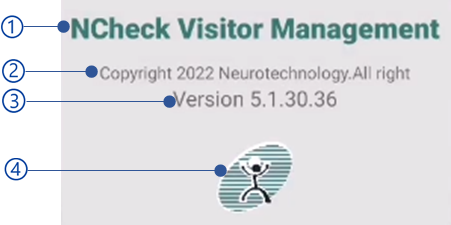
Figure 322 Android client about view¶ |
Product name
Copyrights
Application type and version
Neurotechnology logo
License Expiration status
NCheck visitor management support email
NCheck visitor management website
Open NCheck visitor management log folder
Generate NCheck visitor management privacy policy
Close button
Preferences
Client |
Preferences |
Windows client |
|
Android client |
|
Capture sound
Enable to play the capturing sound when the image is capturing
Extract on server
Face details should be extracted to identify the faces in the captured image. Enable this setting to minimize the extraction delay on low performance devices.
Enable auto capture
When this setting has disabled, the capture button will appear in the Attendance capture view to capture face/barcode.
Capture quality
Select face capture quality to reduce the time when recording events
Low
Medium
High
very high
Predefined location
This allows to set a default location for Android client to use when record visitor events when the Allow predefined location setting has set as “Always predefined” as mentioned in Client settings section. The predefined location dialog as follows.
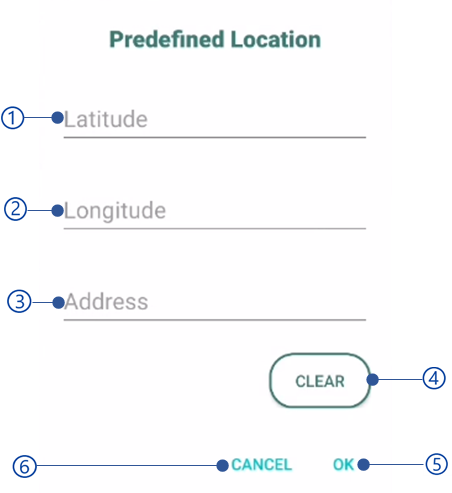
Figure 323 Predefined location dialog
Latitude
Latitude coordinate of the location
Longitude
Longitude coordinate of the location
Address
Clear button
Remove all location parameters.
Ok button
Save location coordinates
Cancel button
Rotation setting
Custom rotation settings need to be configured in case of camera orientation and device rotation settings return from the Android API are not same as standard Android devices. This applicable for the devices,
Designed for a specific orientation
Accelerometer and gyroscope sensors are not available
Camera orientation and device rotation can be set as follows, Camera orientation for a normal android device can be identified as follows.
Camera |
Orientation |
Front camera |
270 degrees |
Back camera |
90 degrees |
When the camera orientation has differences as mentioned above, this value can be set manually using these settings. Device rotation for a normal device can be identified as follows,
Device orientation |
Device rotation |

|
0 |

|
1 |

|
2 |

|
3 |
User can set matching value for device rotation in special devices depending on the device orientation as above table.
Enable logs
Log all events to a file for debugging.
Show camera guidance message when idle
Enable this setting to show custom guidance message to show when capture face/barcode.
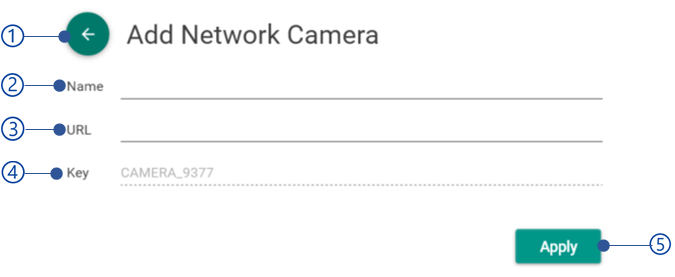
Network camera list
This option allows to configure network cameras with NCheck visitor management Windows client application
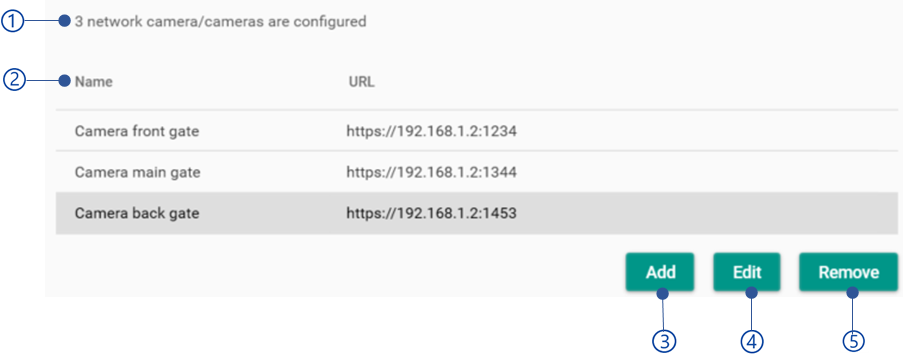
Figure 324 Network camera list view
Number of network cameras configured
Configured network camera list
Add button
Refer Add/edit network camera section for add network camera.
Edit button
Refer Add/edit network camera section for edit network camera.
Remove button
Remove selected camera from the camera list
Serial scanners
Serial scanner configuration in client preferences is used to configure barcode and RFID scanners which can be connected using physical serial port or Bluetooth serial port. Serial scanners view has shown below.
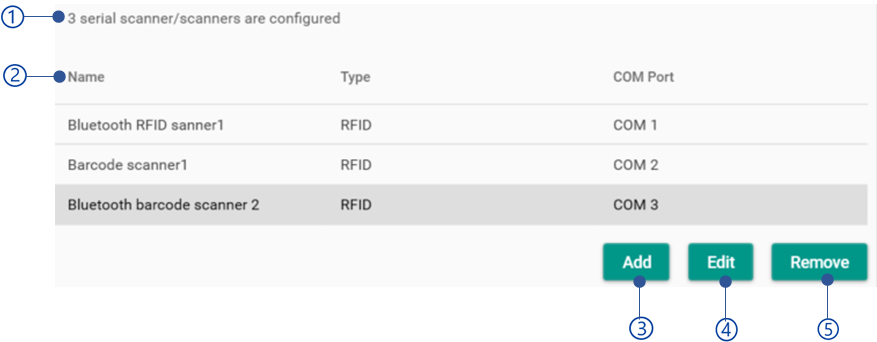
Figure 326 Serial scanners view
Number of serial scanners available
Serial scanners table
Add button
Refer Add/edit serial scanner section for more details about add serial scanner.
Edit button
Refer Add/edit serial scanner section for more details about edit serial scanner.
Remove button
Remove selected serial scanner.
Add/edit serial scanner
Add/edit serial scanner view has shown below
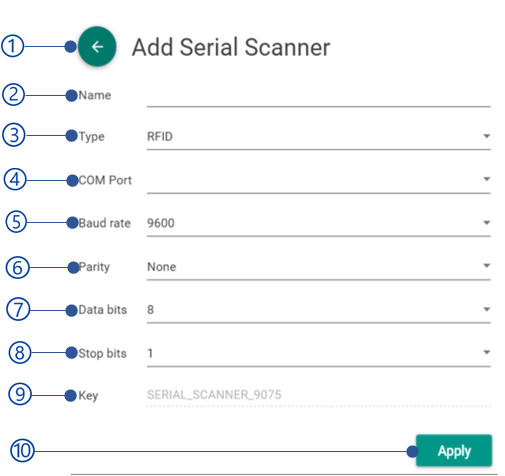
Figure 327 Add/edit serial scanner dialog
Back button
Name
Type
Type of the serial scanner as RFID or Barcode
COM port
COM port is serial communication in the client device. COM port can be COM 1, COM 2, COM 3, COM 4
Baud rate
Baud rate is, data rate used. standard data rates supported are listed in selection. Baud rate can be
4800
9600
19200
38400
57600
115200
230400
Parity
Paraity is used to error correction ( usually none) eld odd parity and even parity. The available values are
None
Odd
Even
Mark
Space
Data bits
Data bits are number of data bits in a communication character. Data bits can be
5
6
7
8
Stop bite
Serial port stop bits are number of bits sending after one letter/byte to mark finish. Select value from
None
1
1.5
2
Key
A unique ID that cannot be changed.
Apply button
External scanners
External scanner configuration is used to configure the any third-party peripheral device integrated with Ncheck Pheripheral API. NCheck Peripheral API can be used to develop peripheral integration package (dll in windows and APK in Android). Integration package is configured with the client using external scanner configuration. External scanner configuration view has shown below.

Figure 328 External scanner configuration view
Browse button
Browse peripheral integration package.
Configure button
Configure button provide external scanner specific configurations which have provided by the peripheral integration package