GETTING STARTED
This getting started document guide you to setup your NCheck visitor management system and perform the initial configuration of the visitor management system. You can follow below steps to setup and configure the system and start appointment booking, visitor tracking and managing.

Figure 1 Visitor Management overview
Planning the system
NCheck visitor management has following components
Server
Server is required component. Depending on the visitor management requirements following deployment options available for the server.
Cloud subscription
NCheck visitor management cloud subscription can be purchased. No IT expertise need to configure the server
Onpremises
NCheck visitor management onpremises server version can be download and installed. This requires additional overhead on system maintainance.
Online registration
Online registration is used for appointment booking. It can be enabled from the visit configuration.
Self-registration Kiosk
Self-registration Kiosk is used to register for an appointment on arrival to the organization.
Visitor attendance and access control device
Visitor attendance and access control devices are used to authenticate visitors and control visitor access only for the places relevant to the appointment.
Assistant device
Assistant device can be used register for an appointment, authenticate and manage visitor by an assistant assigned from the organization.
Information Display
Information display is used to provide information about current appointments in progress
Depend on your visitor management system requirements, you will select required components. Minimal visitor management system can have only the NCheck visitor management Server.
Server Installation
Depending on the customer requirements following options available for server
Start NCheck visitor management with cloud
To start with NCheck visitor management cloud server, you have to signup first. Launch signup page from signup url.
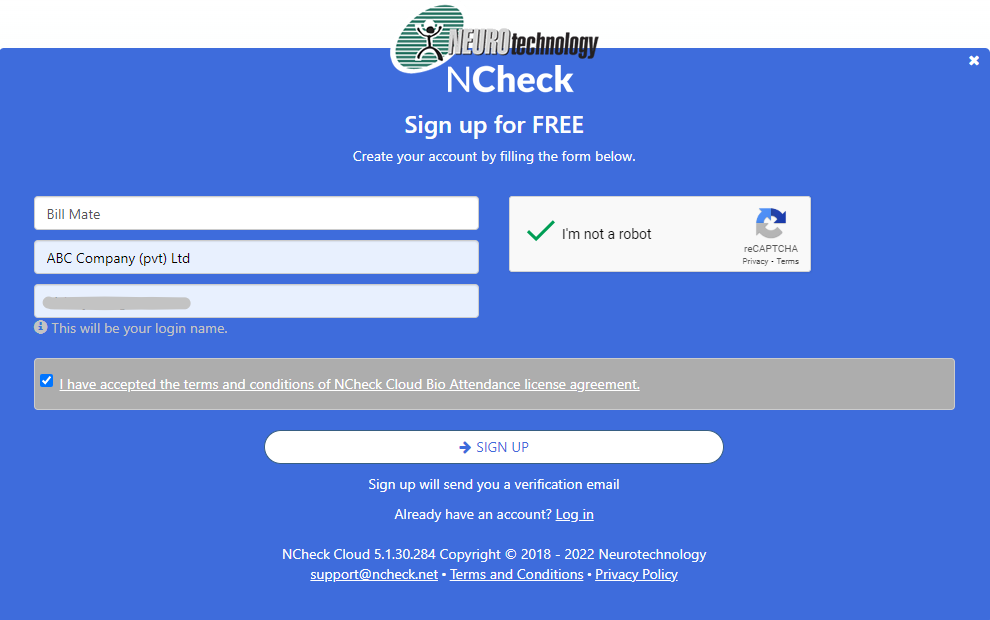
Figure 2 NCheck visitor management signup page
File the NCheck visitor management signup form and select signup button. After successful signup, you will receive verification email for the email address you have provided when signup. If the verification email did not receive, select “I didn’t receieved a veriication email” option as shown in Figure 3 . It will resend the verification email as shown in Figure 4 .
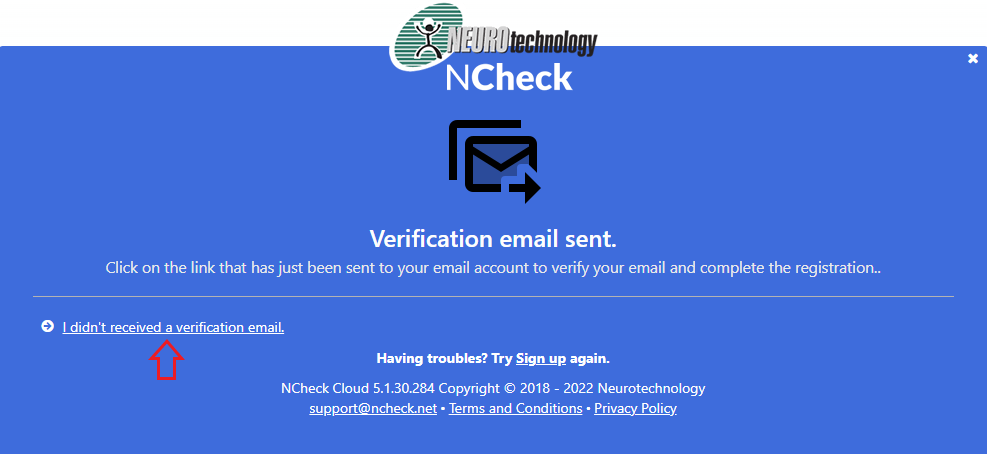
Figure 3 Verify email address
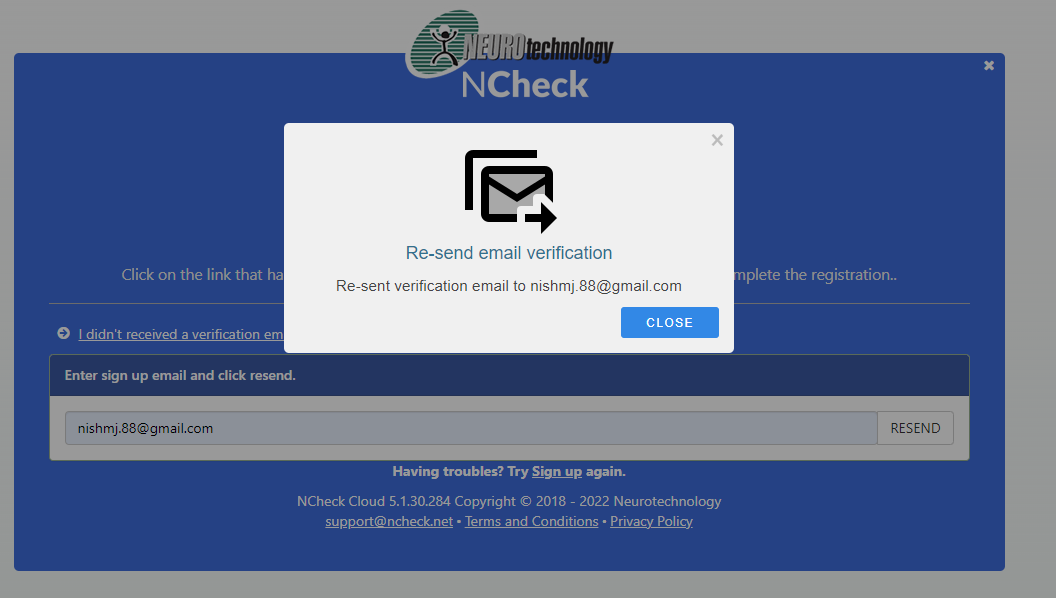
Figure 4 Resent email verification dialog
Open the verification email you have received.
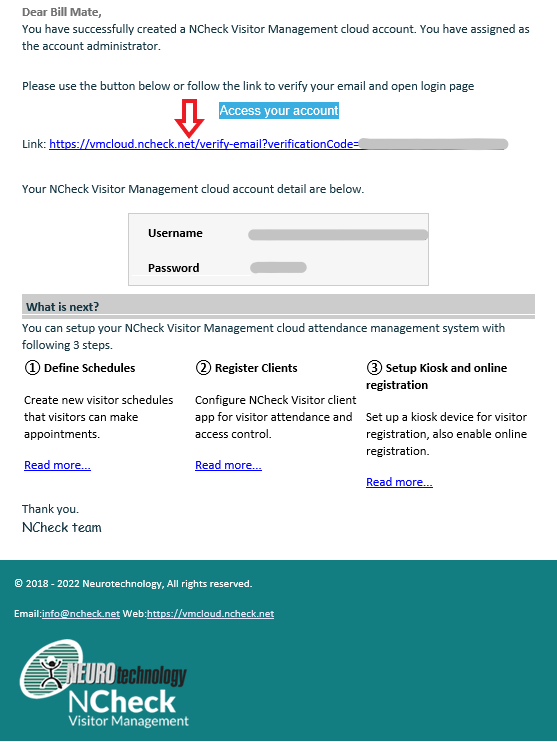
Figure 5 Verification email
Select verification link to verify email. Once the email account has verified, it will open a confirmation page as shown in below.
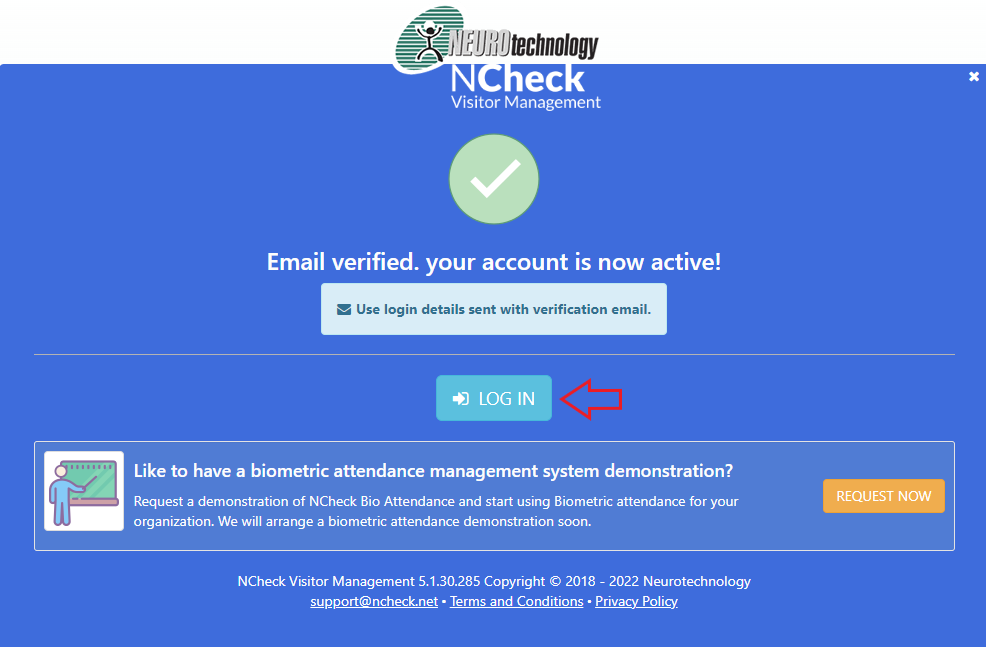
Figure 6 Email verification confirmation page
Select login-in button to login NCheck visitor management cloud account. You can use username and password received in verification email login to cloud account. Refer Log in to NCheck visitor management Control Panel section for more details about cloud account login.
Note
Free plan will be assigned to your NCheck visitor management Cloud subscription after successful signup. You can change the plan of your subscription from administration control panel. Refer plan and pricing for more details about available subscriptions.
Start NCheck visitor management with on-premises server
NCheck visitor management server installed in your location. Server can be installed on machine with following configuration
64bit Windows with Java runtime 1.8 or above
Processor with two cores of 2.4 GHz
4GB free memory
Network interface
Download NCheck visitor management server installation package from download page. Run installer package to install the server. Installation process will guide you through the installation process. At the end of the installation,
Installation waits for starting NCheck visitor management server.
installation completion dialog shows the instructions to log in to the NCheck Control Panel.
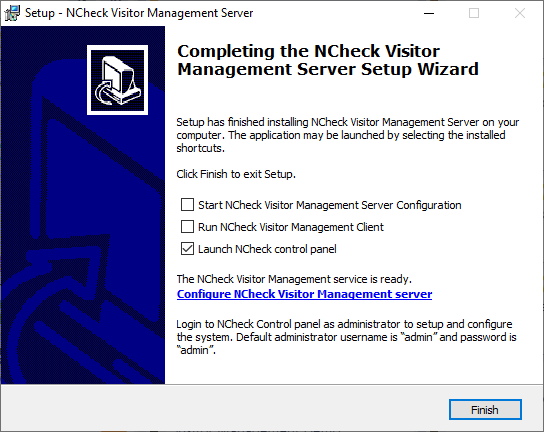
Figure 7 Server installation completion dialog
Note
NCheck visitor management server may fail to start if it cannot use the default port 8443. You should change the server configuration and save to start the server
Log in to NCheck visitor management Control Panel
NCheck visitor management server can be access from web browser as mentioned below
Version |
URL |
Remarks |
Cloud |
||
On Premises |
|
|
NCheck Control panel can be access from the server tray icon menu from the server |
Default username “admin”, password “admin” |
Note
For on-premises server by default, server uses a generated self-signed certificate. When you first time connect to the server through browser, Browser may warn you about Server SSL certificate. You should accept to continue.
After first time login, a system configuration guidance message to set up your first visit schedule in the system.
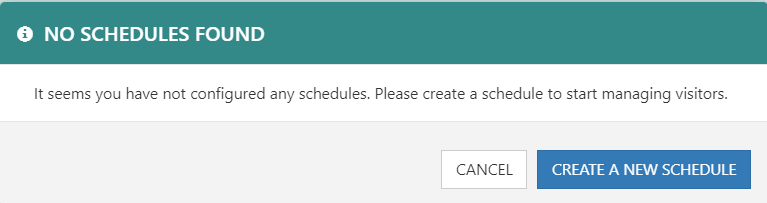
Figure 8 System configuration guidance message
Road map to configure system
To configure the NCheck visitor management the following steps need to be followed in order
Create a location (Optional)
New visit location can be created from “Visit schedules and locations”
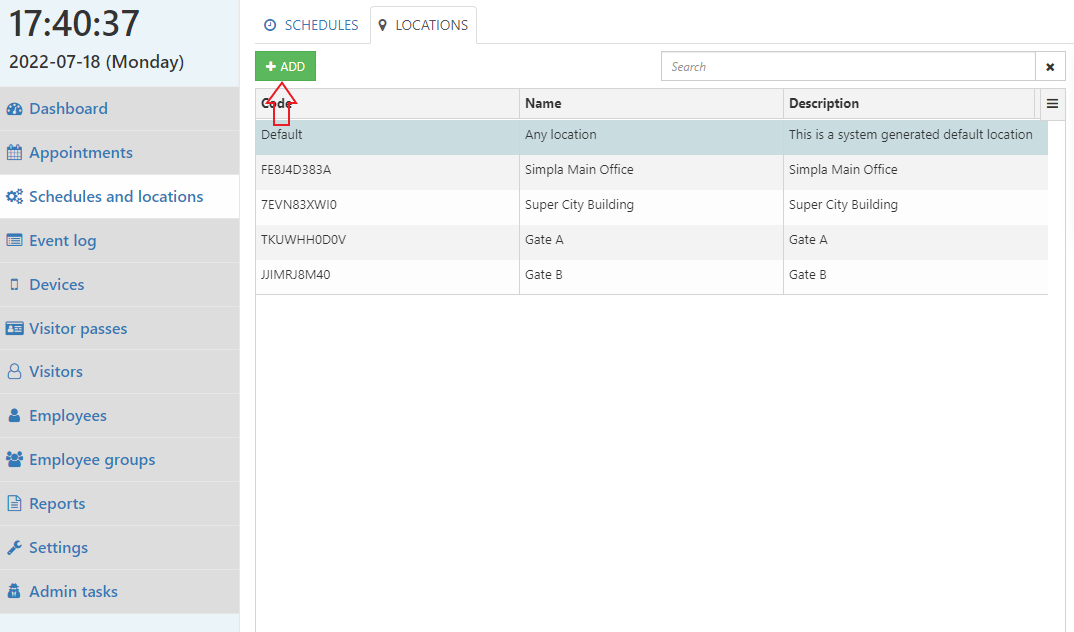
Figure 9 Location management view
Select Add button. Add new location dialog will be shown as below.
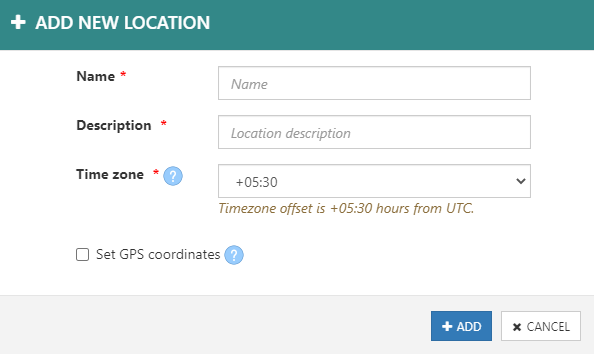
Figure 10 Add new location dialog
Create a visit schedule
New visit schedule can be created from “Visit schedules”. Schedule can be created to allow visitors in a specified time of selected days in week. We will create a visit schedule to allow visitor to meet an employee at any time (everyday, 24 hours) below.
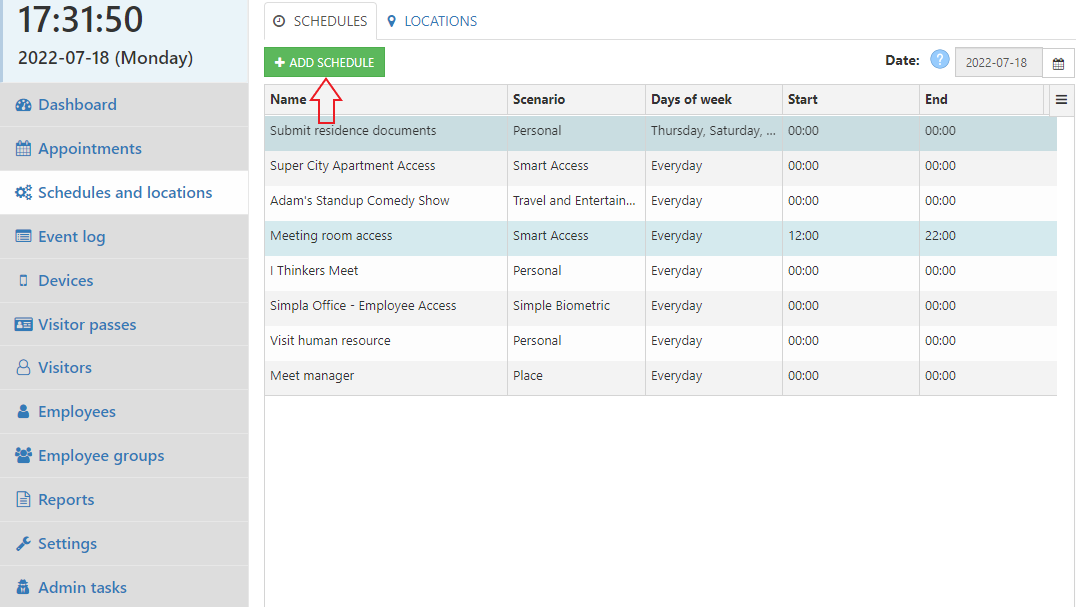
Select Add schedule button. It will show Add schedule dialog with list of scenarios to select one.
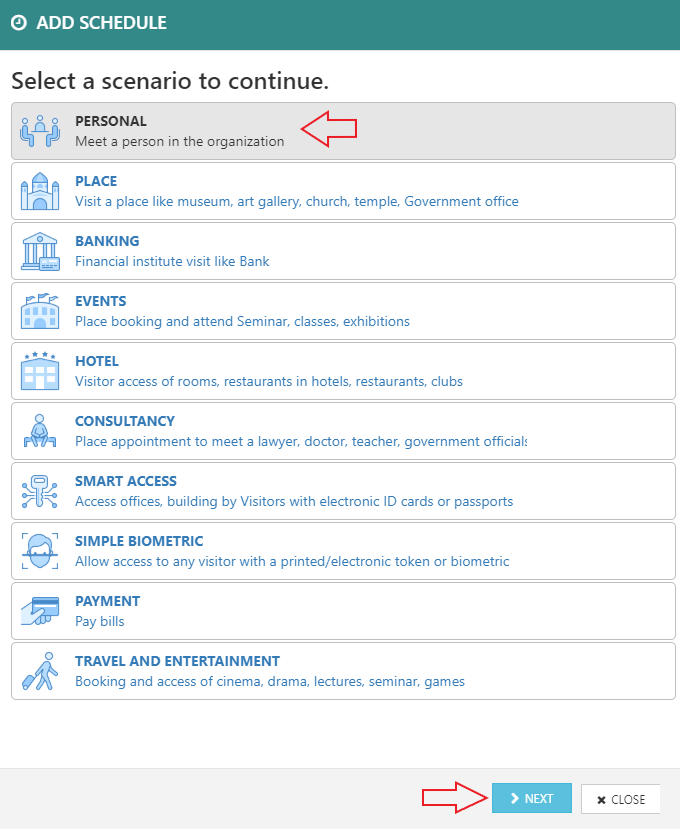
Figure 11 Add schedule dialog
Select the best scenario from the list of scenarios and select Next button. It will Add schedule detail dialog to add schedule details
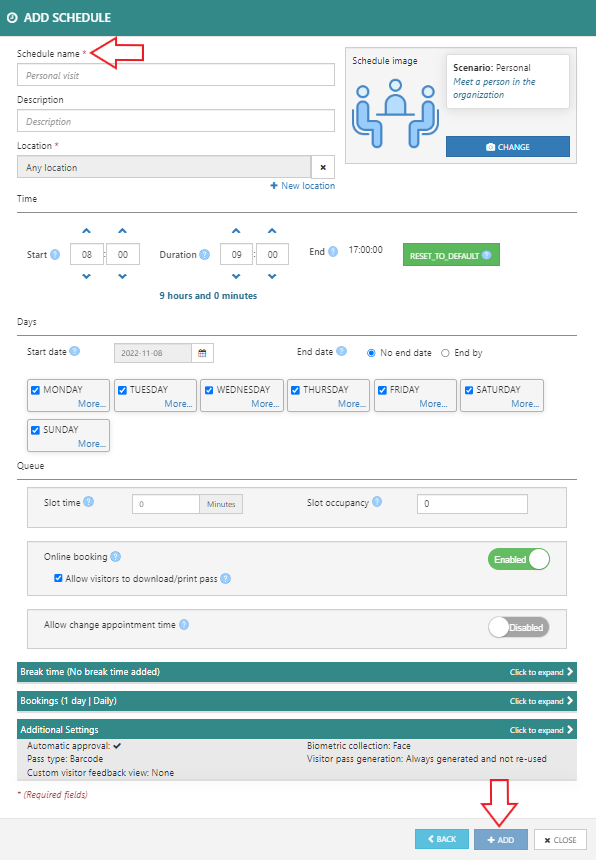
Figure 12 Add schedule detail dialog.
Enter the schedule name. Select Add button to create new visit schedule
Setup visitor self-registration kiosk and place a visitor appointment
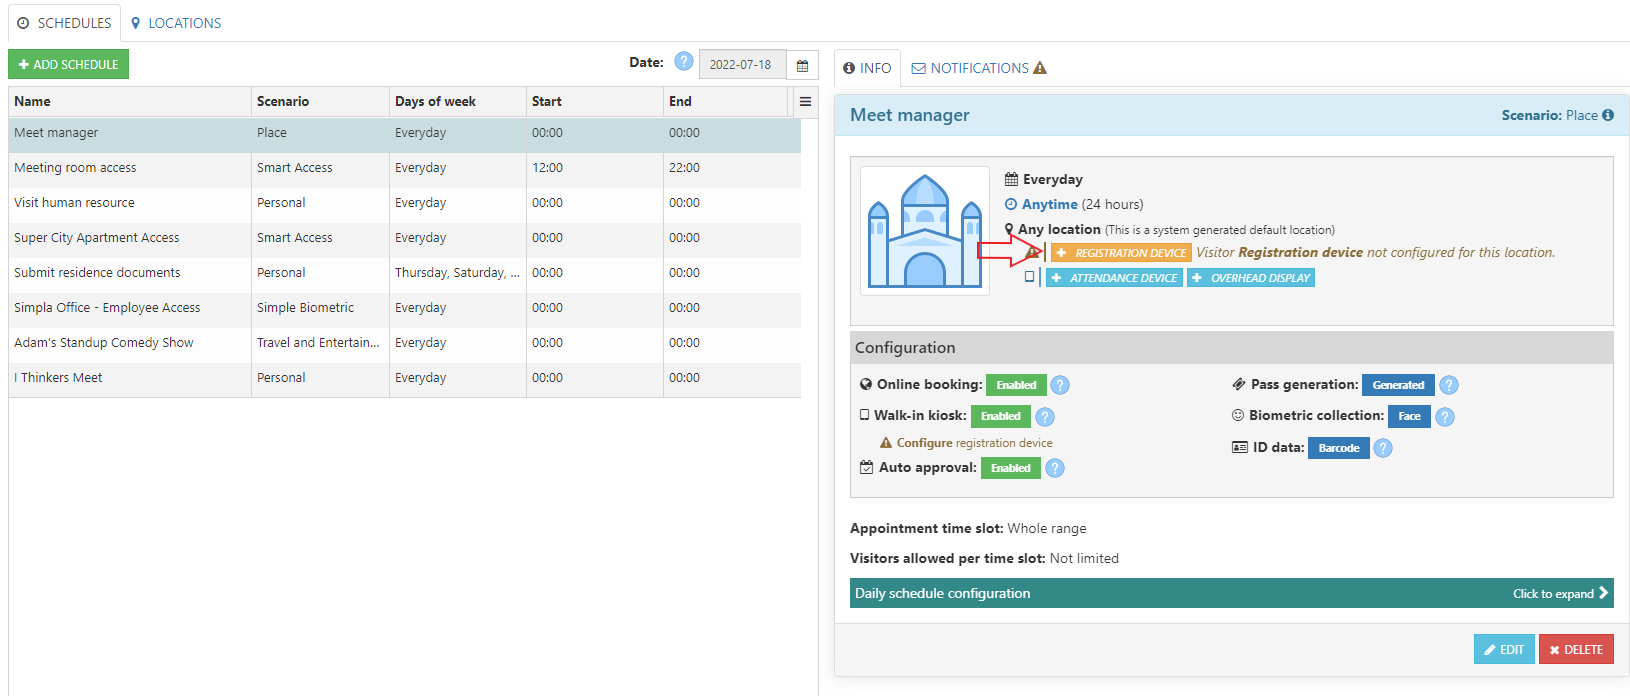
Figure 13 Registration device for selected schedule
Select Registration device button for the schedule. You can find the registration device registration token in Generate a new device token dialog
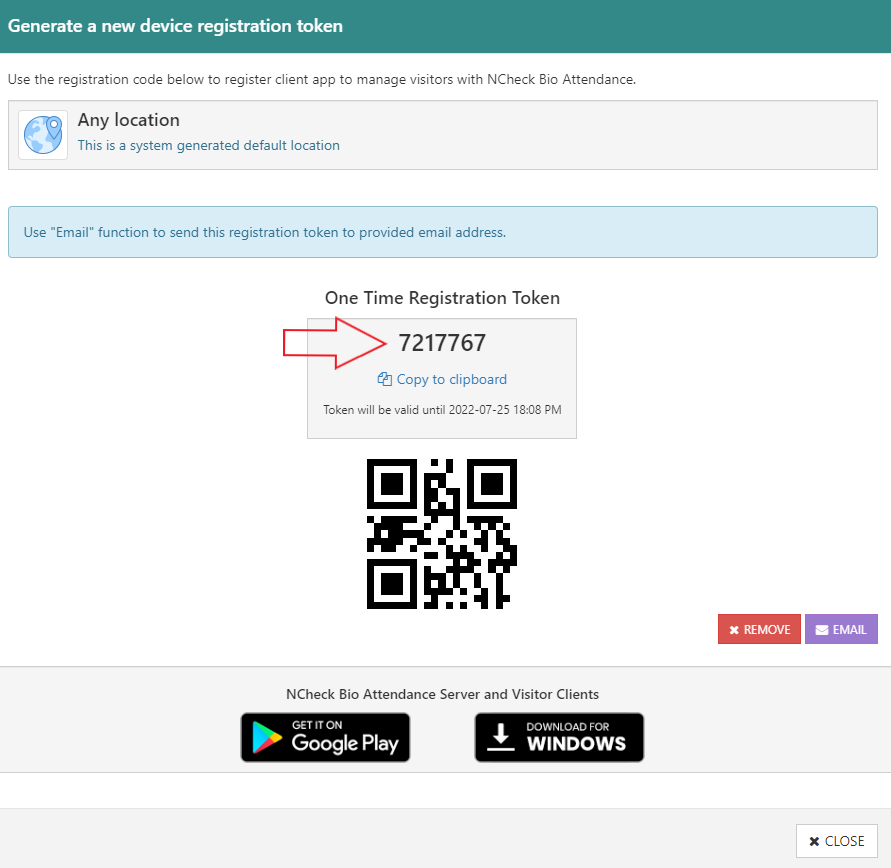
Figure 14 Generate a new device token dialog for registration device
After that, Install NCheck visitor management Client for Windows or Android. Register the client using the generated device registration code. After registration, device shows the appointment booking view for the Kiosk.
Set up visitor attendance device
Visitor attendance device is used to authenticate visitors and record visitor check in, check out and access events. Attendance device registered for a location of a visit schedule records visitor check in and check out events. Follow below steps to set up a visitor attendance device
Figure 15 Attendance device button for the schedule
Go to Visit Schedules and select the visit schedule. Select Attendance device button from the schedule quick view. You can find the registration device token in Generate a new device token dialog
Figure 16 Generate a new device token dialog for attendance device
After that Install NCheck visitor management Client for Windows or Android. Register the client using the generated device registration code. Device is registered for the location of visit schedule. Visitors who have visit appointments at the location can check in or check out from the device.
Enroll visitor biometric
Visitor biometric collection can be configured to collect from
Enable Collect biometric from registration kiosk
You can follow below steps to enable biometric collection when registration from registration kiosk device. Go to visit schedules. In visit schedule select Edit button
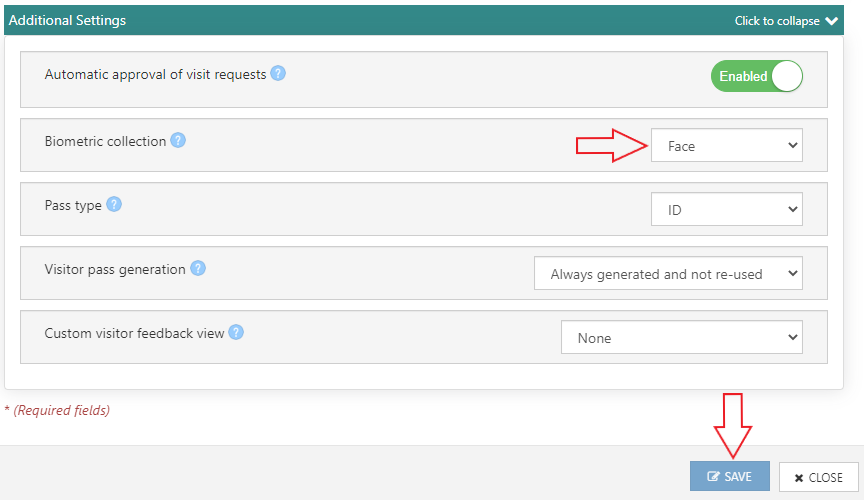
Figure 17 Biometric collection setting in edit schedule dialog
Expand additional settings and make sure that a biometric modality is selected for “Biometric collection” Select Save button to save if any change is there
Change biometric collection from attendance device
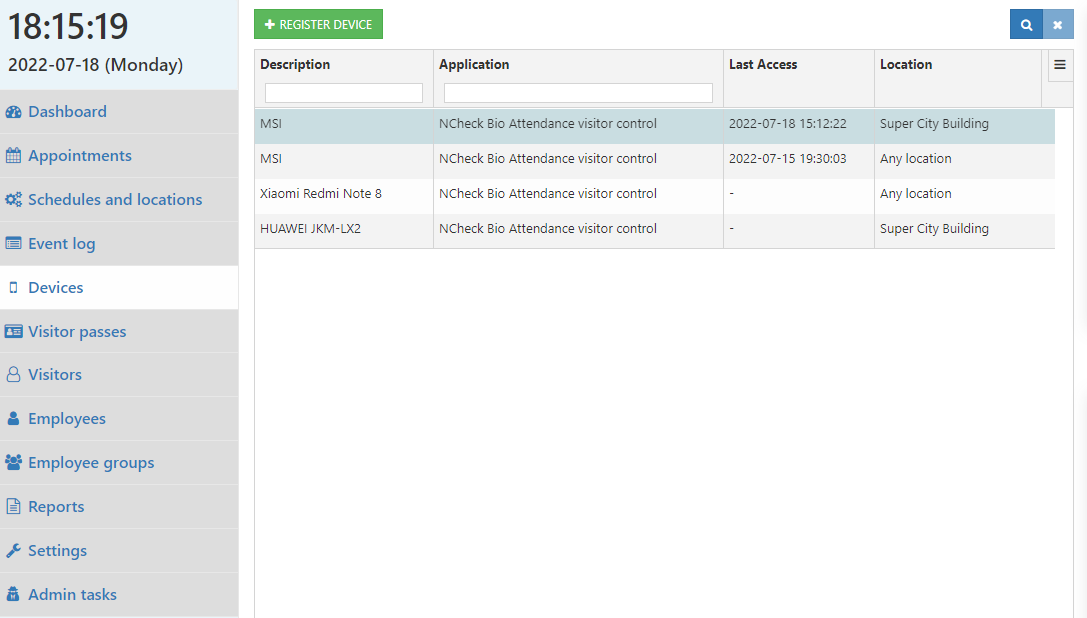
Figure 18 Device management view
Go to device management and select the device

Figure 19 Settings button for the selected device
Select Settings button from the device quick view.
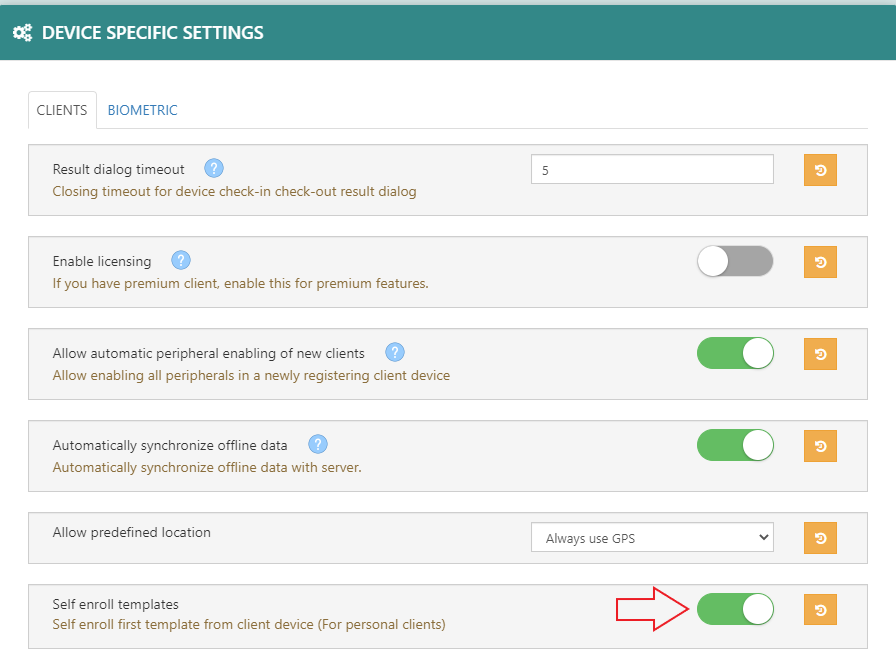
Figure 20 Self enroll template setting in device settings dialog
In the device setting dialog select Client tab and make sure that the self-enroll biometric setting is enabled
Enable Biometric authentication (Optional)
Follow steps below to configure biometric authentication for a device. Go to device management
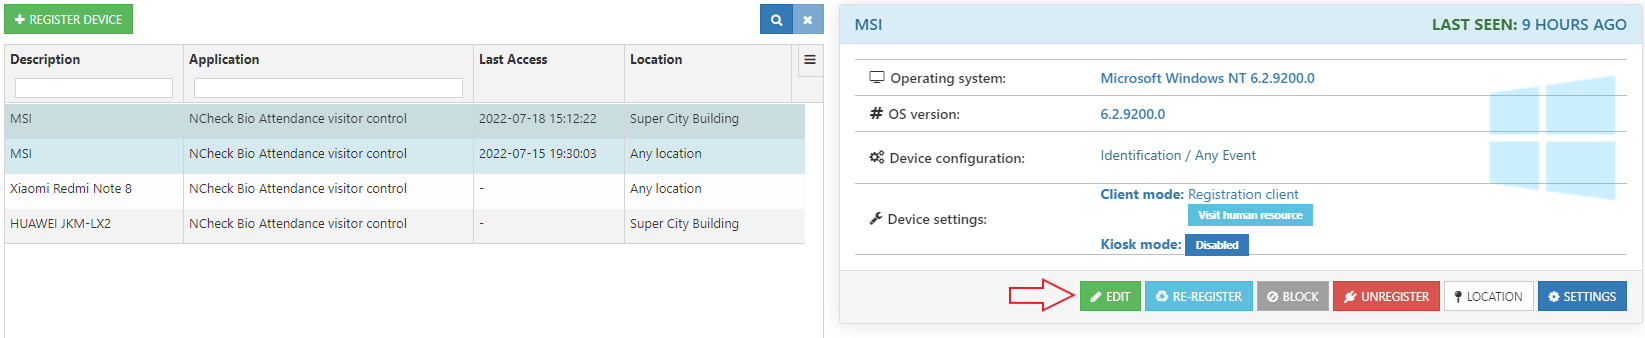
Figure 21 Edit device button for selected device
Select the device. From the device quick view, select Edit button
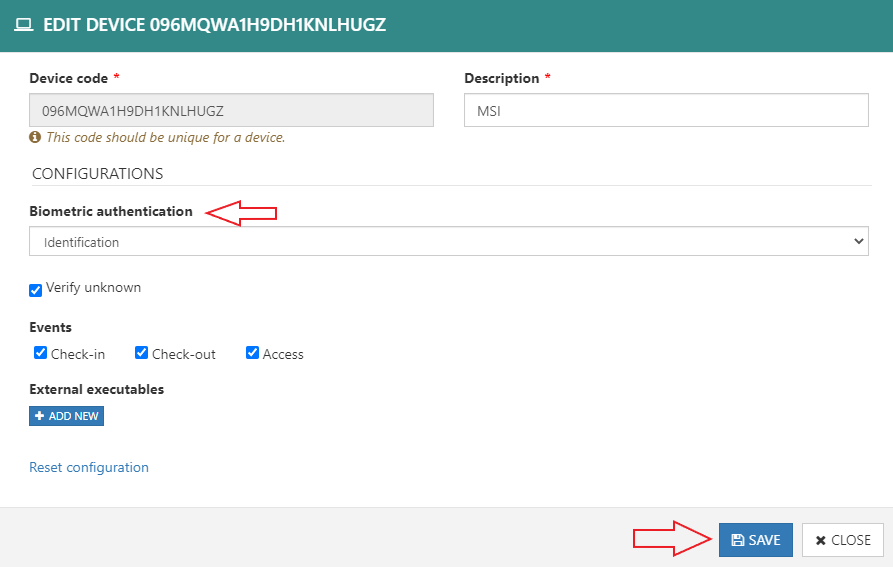
Figure 22 Set biometric authentication in edit device dialog
In the Edit device dialog, set a biometric authentication mode for attendance device and select Save button to save changes.
Configure Visitor access control (Optional)
Visitors are allowed from attendance device
A visitor has an appointment for a visit in the device location
Device location is an access location for an appointment location of a visitor
Location configuration can assign access locations for a location add/edit location. Attendance devices in access locations record access events.
Configure door control (Optional)
NCheck visitor management attendance devices can activate access door locks over the network or by executing door control programs in windows or android platforms. To configure door control, go to device management and select the attendance device. Select Edit button.
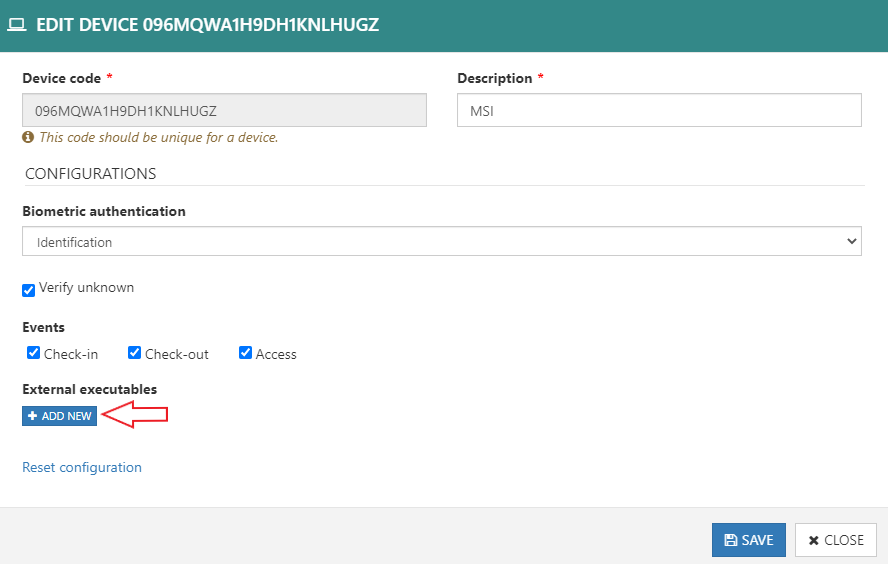
Figure 23 Add new button in Edit device dialog
In the Edit device dialog, select Add new button next to External executables.
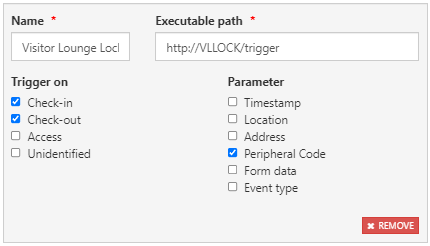
Figure 24 Add external executable
Fill the configuration and select Save button to save changes.
Set up visitor information display
Visitor information display devices can be used to provide information to visitors. To configure visitor information display, follow below steps

Figure 25 Information device button for selected schedule
Go to Visit Schedules and select the visit schedule. Select Information device button from schedule quick view.
Figure 26 Generate a new device registration token dialog
You can find the visitor information device registration token in Generate a new device registration token dialog. After that Install NCheck visitor management Client for Windows or Android. Register the client using the generated device registration code. After registration, device shows the default visitor information view. To change the visitor information view, follow below steps Go to device management. For the selected the device select “Settings” button
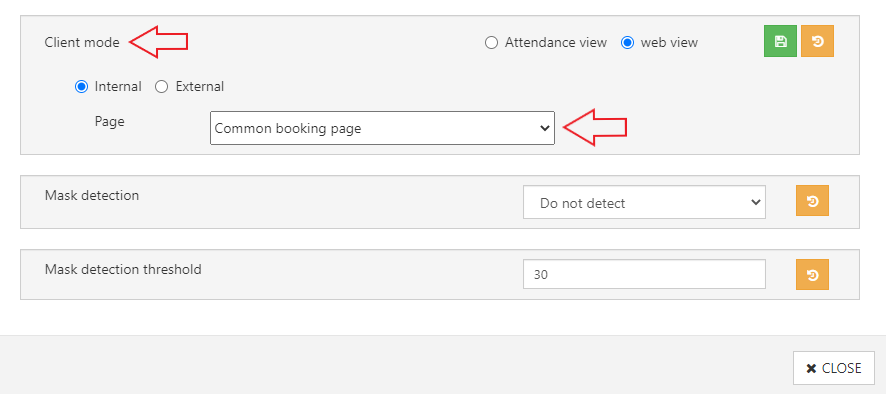
Figure 27 Client mode setting in Device setting dialog
Select the page from available page list You can select an internal view or provide external information URL.
Visitor Assistant device
Visitor assistance device is a visitor attendance device. But to help visitors, assistant should be logged in to the device. Assistant is an employee in the system and should be a visitor administrator or an employee assigned for a visit schedule. Follow below steps to register and use an assistance device
Create a Visitor admin or assign an employee to the visit schedule
Set up a visitor attendance device
Open NCheck visitor management client. It will start visitor identification
Log in assistant to the device
Identify a visitor. After identifying the visitor, it will show following assistance options
Appointment – Allow assistance to view, update the appointment
Record check in, check out or access event
Assistant can also create new appointment without identifying a visitor.